Adjusting shift linkage, Repiacing fuse, Adjusting brake – Craftsman 247.270250 User Manual
Page 20: Changing belt
Attention! The text in this document has been recognized automatically. To view the original document, you can use the "Original mode".
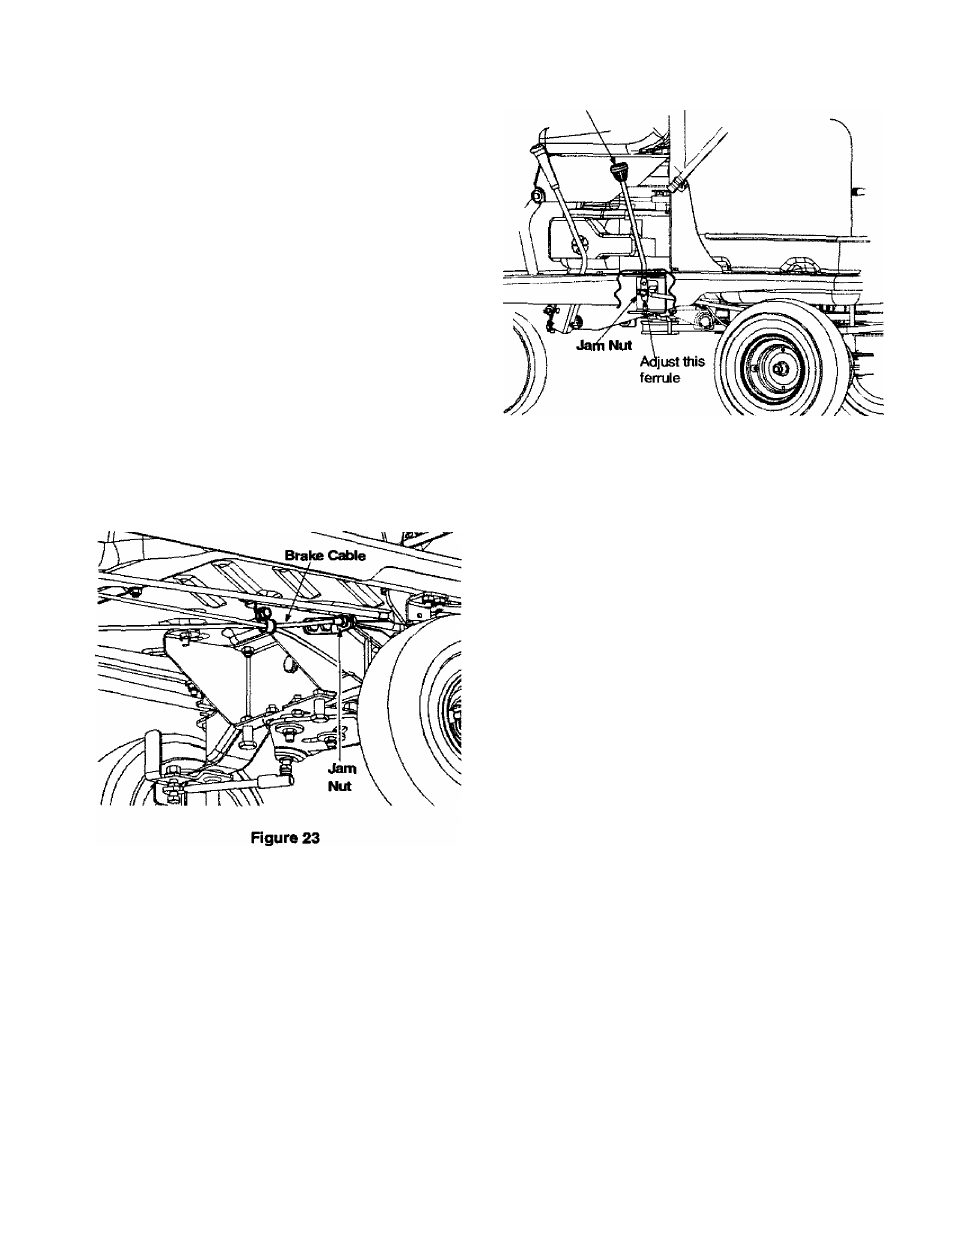
Adjusting Brake
A
Shift Lever
WARNING:
Do not adjust the brake while
engine is running. Be sure to block the wheels
of the vehicle before attempting any
adjustment on the brake cable.
NOTE:
Adjustments are done at the cable end; for
adjustment of the calipers, see a Sears service center.
IMPORTANT: The brake cable should be adjusted so
that it has a bit of slack when the brake is released.
The front cable bracket is mounted on the frame behind
the pedal assembly. Both ends of the brake cable are
threaded; the longer threaded area at the pedal end
offers a wider range of adjustments.
1. Using a pair of 1 /2” wrenches, loosen the jam nuts
and back the cable out to tighten or thread inward
to loosen. See Figure 23.
2. Retighten the jam nuts when proper tension is
reached. See Figure 23.
3. Unlock the parking brake and check adjustment.
Re-adjust if necessary.
Adjusting Shift Linkage
1.
2
.
3.
4.
5.
6
.
7.
Inspect the shift linkage for damage or wear.
Disengage the parking break and push the vehicle
back and forth to verify that it is in neutral.
Remove hairpin clip and washer securing fernjle to
the shift rod. See Figure 24 . Loosen the jam nut.
Rotate ferrule towards the start of the threads to
adjust forward engagement.
Rotate ferrule towards end of the threads to adjust
reverse engagement.
Once the engagement is adjusted, tighten the jam
nut. Insert ferrule into shift rod and secure with
washer and hairpin clip, removed in step 3.
Move shift rod to (N) and check for correct
adjustment.
Figure 24
~ ' ’
Repiacing Fuse
The fuse is located behind the engine on the seat
support bracket. Fuses seldom fail without a reason. If
the fuse blows, the source problem must be corrected
or the new fuse will blow again.
1. Check for loose connections in the fuse holder and
replace holder if necessary. A dead short may be in
the cranking or charging circuit where insulation
may have rubbed through and exposed bare wire.
2.
Replace the wire or repair with electricai tape if the
wire strands have not been damaged. Also look for
a wire pinched, burned, or rubbed against any part.
3. Stop the vehicle and engage the parking brake.
Remove ignition key.
4.
Pivot the seat up. Disconnect the spark plug wire
and ground it.
5. Pull the fuse out of the fuse holder.
6.
Replace with new automotive style 20 amp fuse.
7.
Reconnect spark plug wire and pivot seat down.
Changing Belt
A
WARNING:
Be sure to shut the engine off,
remove ignition key, disconnect the spark plug
wire and ground against the engine to prevent
unintended starting before removing belt(s).
NOTE:
Proper removal of the belt requires the removal
of several other components by means of special tools.
Read through the following procedure and determine if
you can successfully complete it prior to attempting;
otherwise contact a Sears service center.
IMPORTANT: The V-belts, used on this vehicle, are
specially designed to engage and disengage safely. A
substitute (non-OEM) V-belt can be dangerous by not
20