Stopping engine, Using your chipper-shredder, Lower the hopper assembly – Craftsman 247.775880 User Manual
Page 10
Attention! The text in this document has been recognized automatically. To view the original document, you can use the "Original mode".
NOTE: To prevent the unit from sliding, place your
foot firmly against the tire.
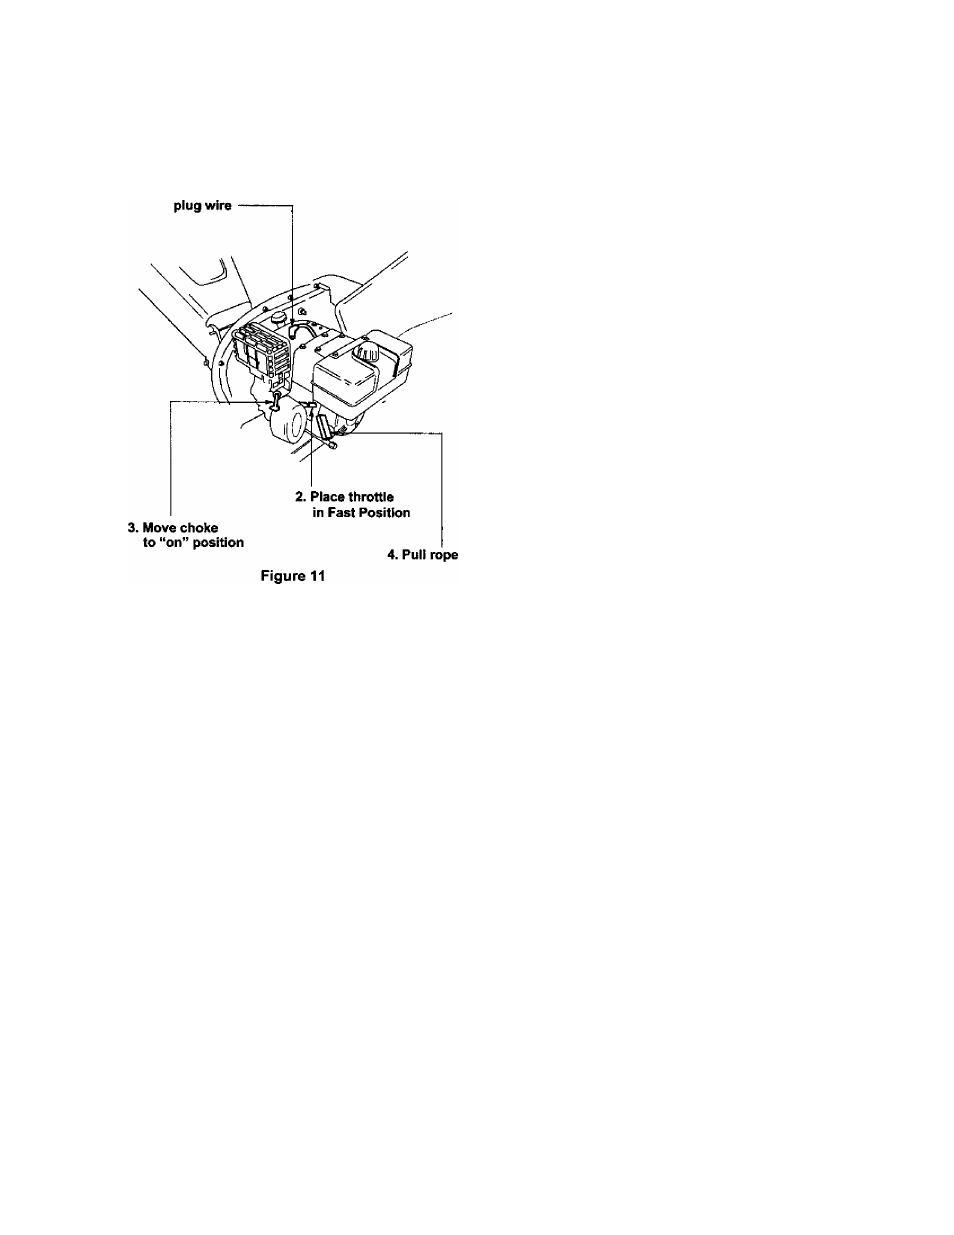
Attach spark
•
Attach spark plug wire and rubber boot to spark
plug. See figure 11.
•
Place throttle in FAST position. See figure 11.
•
Move choke lever to CHOKE position (in the
direction of the arrow) as shown.
•
If restarting a warm engine
after a short
shutdown, move choke lever to “No Choke”
position.
•
Grasp starter handle and pull rope out slowly
until engine reaches start of compression cycle
(rope will pull slightly harder at this point). Let
the rope rewind slowly. Pull rope with a rapid full
arm stroke. Let rope return to starter slowly. See
figure 11.
•
When engine starts, move choke lever to half
choke position until engine runs smoothly and
then to No Choke position.
■
If engine
fails to start after three pulls, move
choke lever to No Choke position and pull starter
rope again.
•
If engine fires, but
does not continue to run,
move choke lever to Full Choke position and pull
rope again.
■
Move choke lever to OFF position as engine
warms up.
NOTE: A noise will be heard when finding the start of
the compression cycle. This noise is caused by the
flails and fingers which are part of the shredding
mechanism falling into place, and should be
expected. In addition, the flails and fingers will be
noisy after the engine is started, until the impeller
reaches full speed.
STOPPING ENGINE
•
Move starter switch to OFF position.
•
Disconnect spark plug wire and move away from
spark plug to prevent accidental starting.
USING YOUR CHIPPER-SHREDDER
A
WARNING: Do not attempt to shred or
chip any material other than vegetation
found in a normal yard (i.e., branches,
leaves, twigs, etc.).
A
The chipper-shredder is designed for two
different methods of operation.
a. Leaves and small branches up to 1/2"
diameter (maximum) can be fed into the
hopper assembly when it is in the raised or
lowered position. See figure 12.
b. Bulky material, such as stalks or heavy
branches, up to 3” in diameter should be
fed into the chipper chute. See figure 12.
WARNING: Do not put material larger
than is specified into the hopper, and/or into
the chipper chute. Personal injury or
damage to the machine could result.
•
If it becomes necessary to push material into the
chipper-shredder, use a smalt diameter stick -
NOT YOUR HANDS. The stick should be small
enough that it will be ground up if it gets into the
impeller assembly.
LOWER THE HOPPER ASSEMBLY
•
To lower the hopper assembly, use one hand to
grasp the hand-hold at the top of the hopper
assembly and lift slightly. See figure 5.
•
Pull up on the release bar, and lower the hopper
assembly to the ground. Release the bar. See
figure 5.
WARNING: Never remove chute deflector
till the unit has completely stopped.
Never
shut off the engine until all chipping is
completed.
A
For best performance, it is important to keep the
shredding blade and the chipper blades sharp. If the
composition of the material being discharged
10