For the customers in the u.s.a, Troubleshooting, Specifications – Sony RM-V18A User Manual
Page 4
Attention! The text in this document has been recognized automatically. To view the original document, you can use the "Original mode".
Operating a Cable box
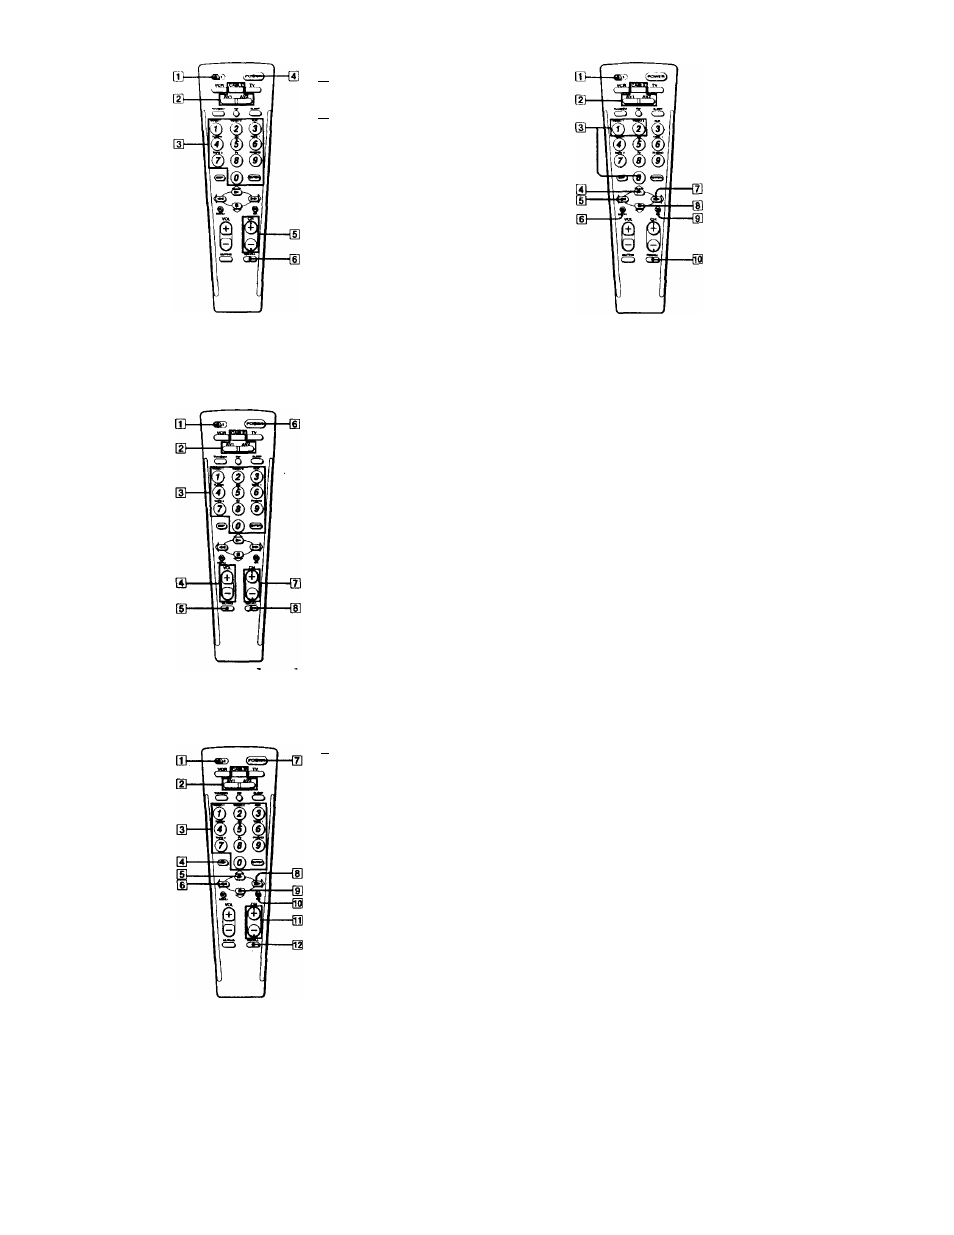
Operating a tape deck
Q]To sc't up tlio Commander.
ID To switch to Cable box operation. Press
the button on which the Cable box is
assigned.
[3l To change the channel. For example, to
change to channel 5, press 0 and 5 (or,
press 5 and ENTER).
[3 To turn on and off.
[J] Channel up: +
Channel down: -
[6] To operate JUMP, FLASHBACK or
CHANNEL RETURN function on the
Cabl^box depiending on the setting of
the manufacturer.
Notes
• There may be causes you may turn on/off
the cable box by pressing the CH+ or CH-
buttons on the Commander.
• If your cable box can control volume, be sure
to set its volume control to a medium
position. If the volume on the cable box is
turned down completely, you will not be
able to adjust your TV's volume with the
Commander.
Operating a Receiver
To set up the Commander.
To switch to Receiver operation. Press
the button on which the Receiver is
assigned.
To select the input source:
1 selects VIDEO 1
2 selects VIDEO 2
3 selects AUX
4
selects TUNER
5 selects CD
6 selects TAPE 1
7 selects TAPE 2
8
selects TV
9 selects PHONO
(0 switch to another input source by
each pressing).
Volume up: +
Volume down; -
To mute the volume on a receiver.
To turn on and off.
Presetting frequency up: +, down: -
Tuning frequency up: +, down; -
To shift band (FM/AM).
Operating a CD player
|1 To set up the Commander.
2l To switch to CD player operation. Press
the button on wtdch the CD player is
assigned.
[3] To select the track number. 0 selects
track 10.
To select track numbers above 10, see
the descriptions on the
DISP
button
below.
H] To select numbers 10 and above.
For example, to select track 15, press
DISP
and then press 5.
To play.
To select the previous track.
To turn on and off.
To select next track.
To stop.
H To pause.
Next track: +
Previous track: -
To select next disc.
[T] To sot up tho Commander.
[2] To switch to tape deck operation. Press
the button on VN’hich the tape deck is
assigned.
[3] To select the tape deck and direction;
1 selects Deck A (dual cassette deck
only*)
2 selects Deck B (dual cassette deck
only*)
0 functions as -^reverse button, or
switches play sides.
3
To play.
6] To rewind.
6] To record, press ► while pressing • /
First release ►, then release #.
3 To fast-forward.
8] To stop.
9] To pause.
S To select the tape deck: Deck A or Deck
B (dual cassette deck only**)
* If your tape deck's commander has two sets
of tape operating buttons and has no A/B
button for deck selection, use the numeric
buttons (1 and 2); button 1 selects Deck A,
and button 2 selects Deck B.
•* If your tape deck's commander has one set of
tape operating buttons, and has an A/B
button for the deck selection, use the RECALL
button to select Deck A or Deck B.
Troubleshooting
If you have problems setting up or using the Commander:
• When setting up the Commander, carefully go through the procedures
described in "Setting the Code." If the code that's listed first for your
component doesn't work, try all the codes for your component - in the order
in which they're listed. If all the codes fail to work (or if your component is
not listed in this manual), try using the procedures in "Searching for the
Correct Code."
• Check that you're aiming the Conunander directly at die component, and that
there are no obstructions between the Commander and the component.
• Make sure the batteries you're using are not worn out, and that they're
inserted correctly.
• Check that the button of the TV, VCR, CABLE, AVI or AV2 is pressed to
choose your desired component.
• Check that the component has infrared remote capability. For example, if
your component didn't come with a remote commander, it probably isn't
capable of being controlled by a remote commander.
• If your video components are connected to an audio system, make sure
you've set up the Commander as described in "Controlling the Volume of
Video Components Connected to an Audio System."
• Should any problem persist, reset the Commander to the factory setting by
pressing die POWER, TV/VIDEOand VOL-buttons simultaneously.
For the customers in the U.S.A.
Customer Support Information
If - after you've read through this manual - you still cannot get the
Remote Commander to work properly, call ttre Sony Customer
Support Helpline at 1.800-822-2217.
Specifications
Operable distance Approx. 7 m (23 ft) (varies depending-of the
component of each manufacturer)
Power requirements Two size AA (R6) batteries (not supplied)
Battery life
Approx. 6 months (varies depending on frequency of
use)
Dimensions
Approx. 61 x 191 x 30 mm (w/h/d)
(272x778x1 ’/Ain.)
Approx. 100 g (3.5 oz.) (not including batteries)
Label (1)
Mass
Supplied accessory
Design and specifications are subject to change without notice