Step f - connect tubes (cont.), Tube connections fig. 24 – EcoPure ECOP30 User Manual
Page 17
17
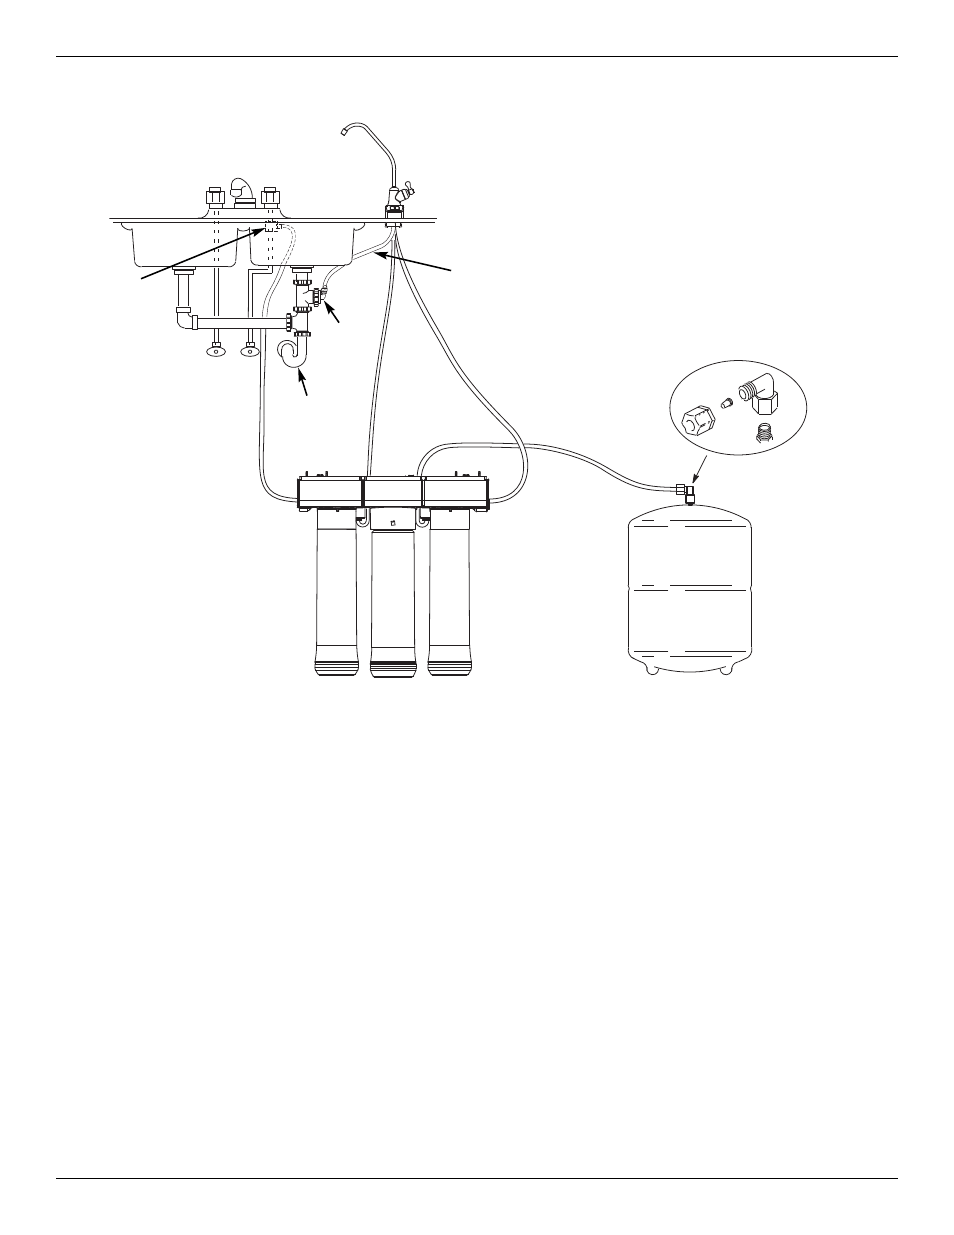
Step F - Connect Tubes (cont.)
ROUTE YELLOW TUBE TO STORAGE TANK
1. Locate the yellow tube attached to the Reverse Osmosis
filter assembly.
2. Route the loose end of the yellow tube to the fitting on top
of the storage tank. See Fig. 24.
3. Cut tube square and to length. See Fig. 19.
4. Do not connect at this time. This will occur in the sanitizing
step.
CONNECT GREEN TUBE TO COLD WATER
SUPPLY PIPE
1. Route one end of the 1/4” green tube to the fitting on the
water supply pipe. See Fig. 24.
2. Cut tube square and to length. See Fig. 19.
3. Connect to tee feed adaptor. See Fig. 7. Insert all the way
into the fitting. See Figs. 20 & 21.
4. Route the other end of the green tube to green collet to the
fitting on the left side of the Reverse Osmosis filter
assembly.
5. Cut tube square and to length. See Fig. 19.
6. Insert all the way into the fitting. See Figs. 20 & 21.
7. Pull on the tube to be sure it is held firmly in the fitting.
CONNECT BLUE TUBE TO REVERSE OSMOSIS
ASSEMBLY
1. Locate the blue tube attached to the faucet.
2. Route the loose end of the 3/8" blue tube to the blue collet
on the right side of the Reverse Osmosis filter assembly.
3. Cut tube square and to length. See Fig. 19.
4. Insert all the way into the fitting. See Figs. 20 & 21.
5. Pull on the tube to be sure it's held firmly in the fitting.
CONNECT BLACK TUBE FROM REVERSE
OSMOSIS FAUCET TO DRAIN ADAPTER
1. Locate the 3/8" black tube attached to the faucet. Fig. 24.
2. The loose end needs to be attached to the black collet on
the sink drain adapter.
3. Cut this tube as needed to route it as straight as possible,
without loops, dips, or kinks.
4. Cut the end of the tube square. See Fig. 19.
5. Insert all the way into the fitting. See Figs. 20 & 21.
6. Pull on the tube to be sure it is held firmly in the fitting.
RED TUBE TO REVERSE OSMOSIS FAUCET
The red tube connection was completed in the faucet
assembly steps.
NOTE: Tubing lengths should allow for the
removal of the assembly from the hanger
washers for servicing. If tubing lengths are
shortened for neater appearance, it may be
necessary to keep the assembly on the
hanger washers for service.
NOTE: Codes in the state of Massachusetts
require installation by a licensed plumber
and do not permit the use of saddle valves.
If you live in the state of Massachusetts,
review plumbing code 248-CMR of the
Commonwealth of Massachusetts before
proceeding with the installation.
NOTE: Tube colors
match collet colors.
Tube Connections
FIG. 24
Tubing Connector
Drain
Adaptor
3/8” BLACK
Tubing
Sink
P–Trap
3/8”
BLUE
1/4”
RED
1/4”
GREEN
3/8”
YELLOW
HOT COLD
Tee Feed
Adaptor