Assembly instructions for use on yield-pro – Great Plains Terra-Tine Row Cleaner User Manual
Page 10
Terra-Tine™
207-016M
5/2/2005
8
Assembly Instructions for use
on Yield-Pro®
Your Terra-Tine™ Row Cleaner comes to you
partially assembled. Follow the instructions below
for assembly and mounting.
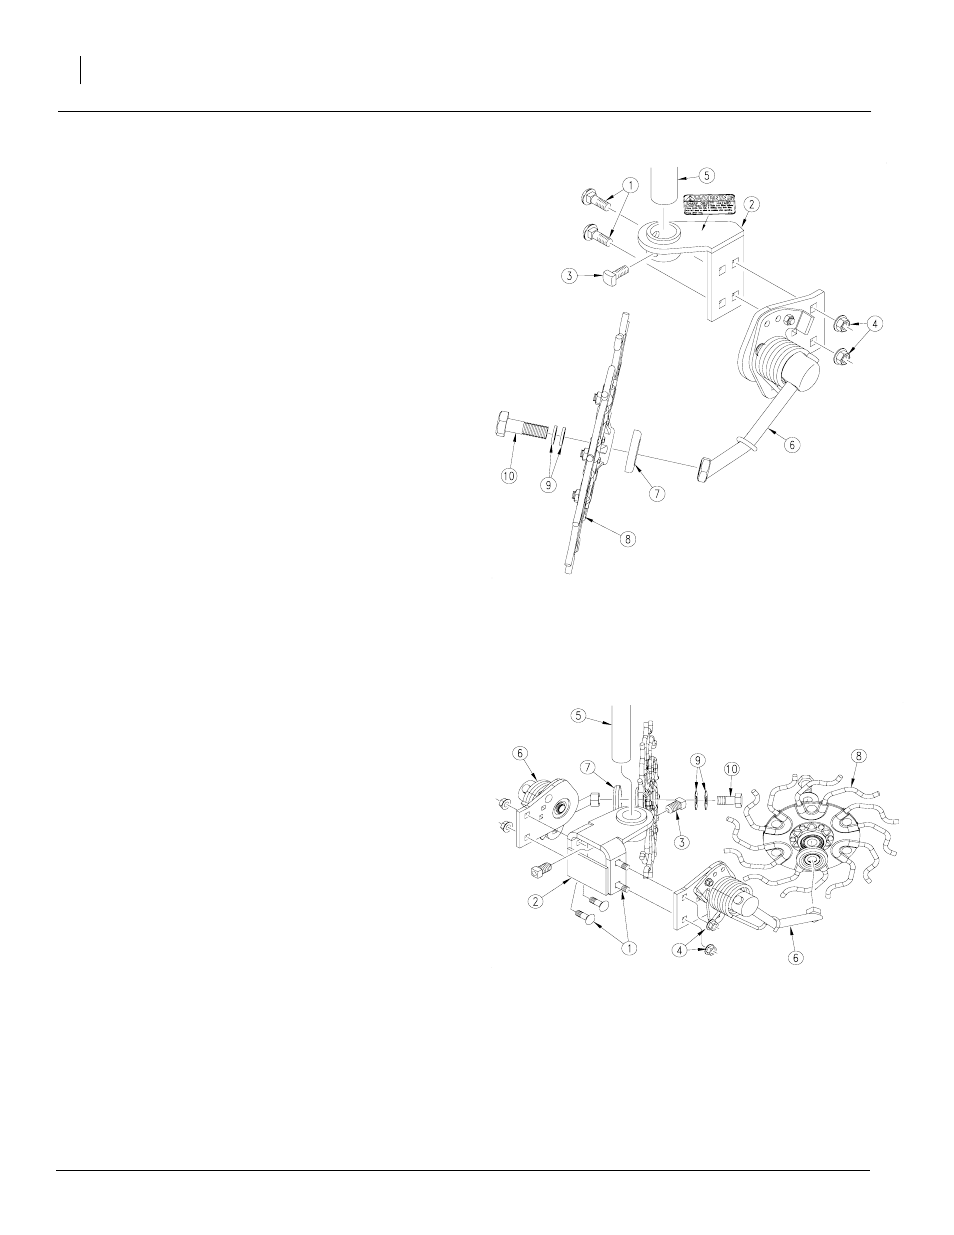
Refer to Figure 2 Single Terra-Tine
™ Assembly
1.
Mount the Terra-Tine™ wheel (8) to the pivot
arm assembly (6) using bolt (10), washers (9)
and dust cover (7).
2.
Place the shank mount (2) above the coulter
mount on the 1 1/2” vertical shaft (5) (pur-
chased separately). Position the set screw (3)
in the mount. Do not tighten at this time.
3.
Using the carriage bolts (1) and the flanged
nuts (4), fasten the wheel and arm assembly
(6) to the shank mount (2) in the front holes as
shown.
4.
Consult the “Adjustments” section to this
manual before tightening all hardware. When
the Terra-Tine™ wheel is in the desired
position, tighten all hardware.
Refer to Figure 3 Dual Terra-Tine
™ Assembly
1.
Mount both Terra-Tine™ wheels (8) to the piv-
ot arm assembly (6) using bolts (10), washers
(9) and dust cover (7).
2.
Place the shank mount (2) above the coulter
mount on the 1 1/2” vertical shaft (5) (pur-
chased separately). Position the set screws
(3) in the mount. Do not tighten at this time.
3.
Using the carriage bolts (1) and the flanged
nuts (4), fasten the wheel and arm assembly
(6) to the shank mount (2).
Consult the “Adjustments” section to this manual
before tightening all hardware. When the Terra-
Tine™ wheel is in the desired position, tighten all
hardware.
Figure 2
Single Terra-Tine
™
Assembly
22937
Figure 3
Dual Terra-Tine
™
Assembly (Twin Row Only)
22945