Install rear hitch (optional), Extended rear hitch, A-frame hitch – Great Plains 4000TT Predelivery Manual User Manual
Page 25: Extended rear hitch a-frame hitch
Great Plains Manufacturing, Inc.
Assembly
21
02/11/2014
586-201Q
Install Rear Hitch (optional)
Note: The rear tow hitch will be shipped with big compo-
nents banded together and bolts will be in a box.
Carefully un-band the components. There are two dif-
ferent types of rear hitches, rear hitch extended or a-
frame style. See appropriate mounting directions list-
ed below.
Extended Rear Hitch
Refer to Figure 19
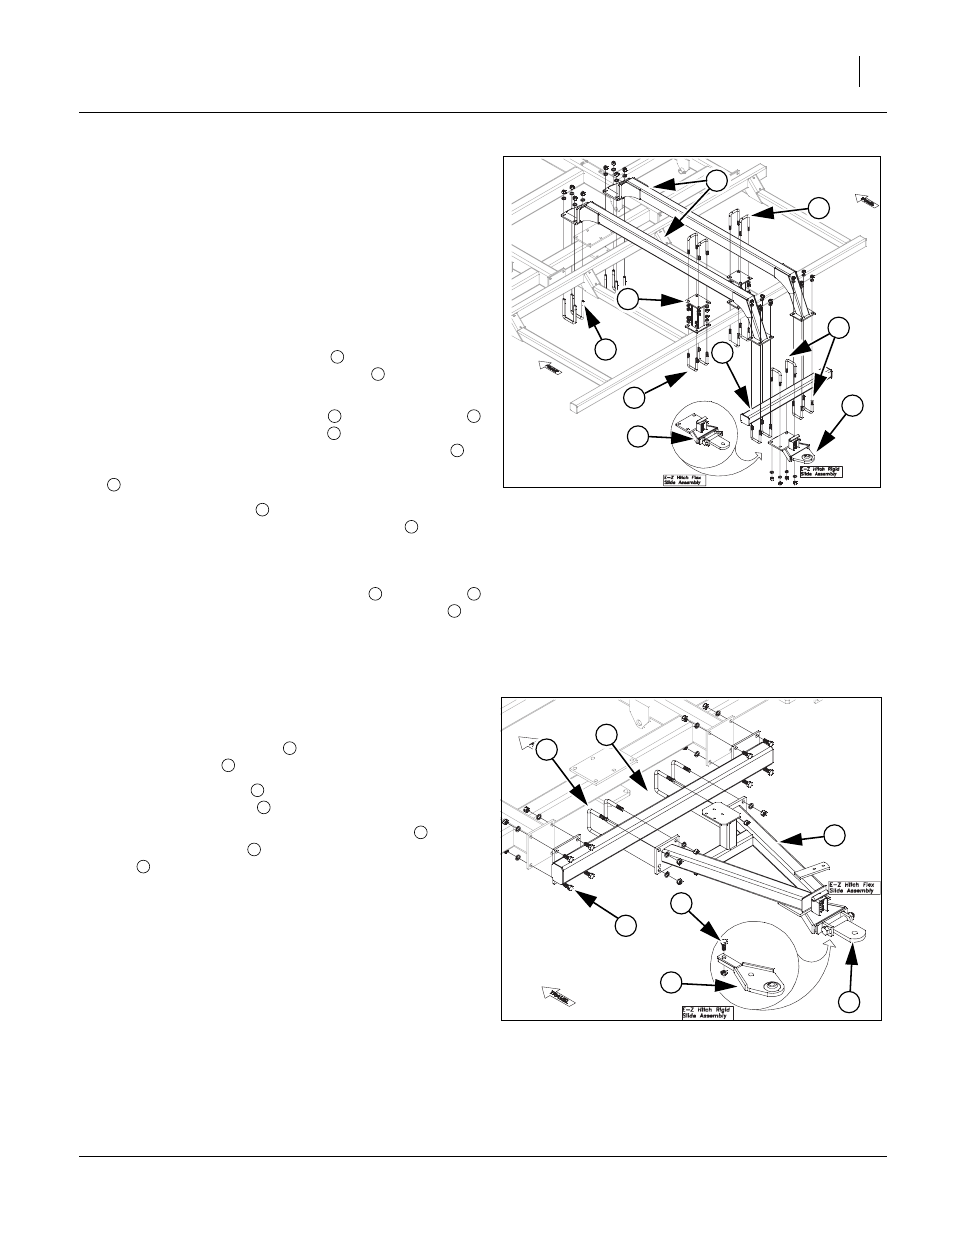
73. Attach rear hitch brace brackets
to rear of drag
frame with 5/8 x 3 1/32 x 4 1/2 u-bolts
, 5/8 lock
washers and 5/8 nuts.
74. Attach middle of rear hitch arms
to brace brackets
with 5/8 x 3 1/32 x 5 1/2 u-bolts
, 5/8 lock washers
and 5/8 nuts. Attach front plates of rear hitch arms
to
rear tube of center frame with 3/4 x 4 1/32 x 1/2 u-bolts
, 3/4 lock washers and 3/4 nuts.
75. Attach 46” cross arm
to bottom side of rear hitch
arm plates with 5/8 x 3 1/32 x 4 1/2 u-bolts
, secure
with 5/8 lock washers and 5/8 nuts.
Note: Do not tighten any bolts until every thing is installed.
76. The bolt on sleeve assembly with rigid
or flex slide
may be fastened using 5/8 x 3 1/32 x 4 1/2 u-bolt
,
secure with 5/8 lock washers and 5/8 nuts.
77. Tighten all bolts to specs, See “Torque Values Chart”
A-Frame Hitch
Refer to Figure 20
78. Attach rear mounting bar
to rear of center frame with
5/8 x 1 1/2 bolts
, 5/8 lock washers and 5/8 nuts.
79. Attach a-frame hitch
to rear of center frame with 5/8 x
4 1/32 x 4 1/4 u-bolts
, 5/8 lock washers and 5/8 nuts.
80. Hitch will have either the flex slide assembly
or the
rigid slide assembly
. There will be a 3/4 x 1 1/2 hex
bolt
and 3/4 jam nut in front hole of assembly to keep
the slide assembly from sliding clear out.
81. If machine is equipped with optional rear hitch accessory
kit may be installed as shown in “Parts Manual”.
82. Tighten all bolts to specs, See “Torque Values Chart”
83. Route hoses and light harness along hitch and frame
with hose clamps and hose wraps, provided.
Note: Be sure hoses and light harness is fastened securely so
they don’t drag or get pinched.
2
1
3
Figure 19
Rear Hitch
42828
6
5
4
8
7
2
1
2
3
1
4
3
5
6
2
7
8
2
5
4
3
Figure 20
A-Frame Hitch
42437
2
7
6
1
1
2
3
4
5
6
7