Viking Pump TSM630.1: H-LL Universal Seal User Manual
Page 6
SECTION TSM 630.1
ISSUE
F
PAGE 6 OF 14
3. Move rotary member so setscrews are directly below seal
access holes on side of bracket. Tighten all setscrews
securely to shaft. Some seals are equipped with holding
clips which compress the seal springs. Remove holding
clips to release springs after seal is installed on shaft.
4. FOR “O-RING” GASKET TYPE MECHANICAL SEAL
SEAT: Lubricate outer diameter of O-Ring seal gasket
with oil. Flush sealing faces of both rotary member
and seal seat with oil and press seal seat in to bore
until back, unlapped face, is flush with bore. Install
seal holder, capscrews, and nuts and tighten securely.
Remove tapered installation sleeve.
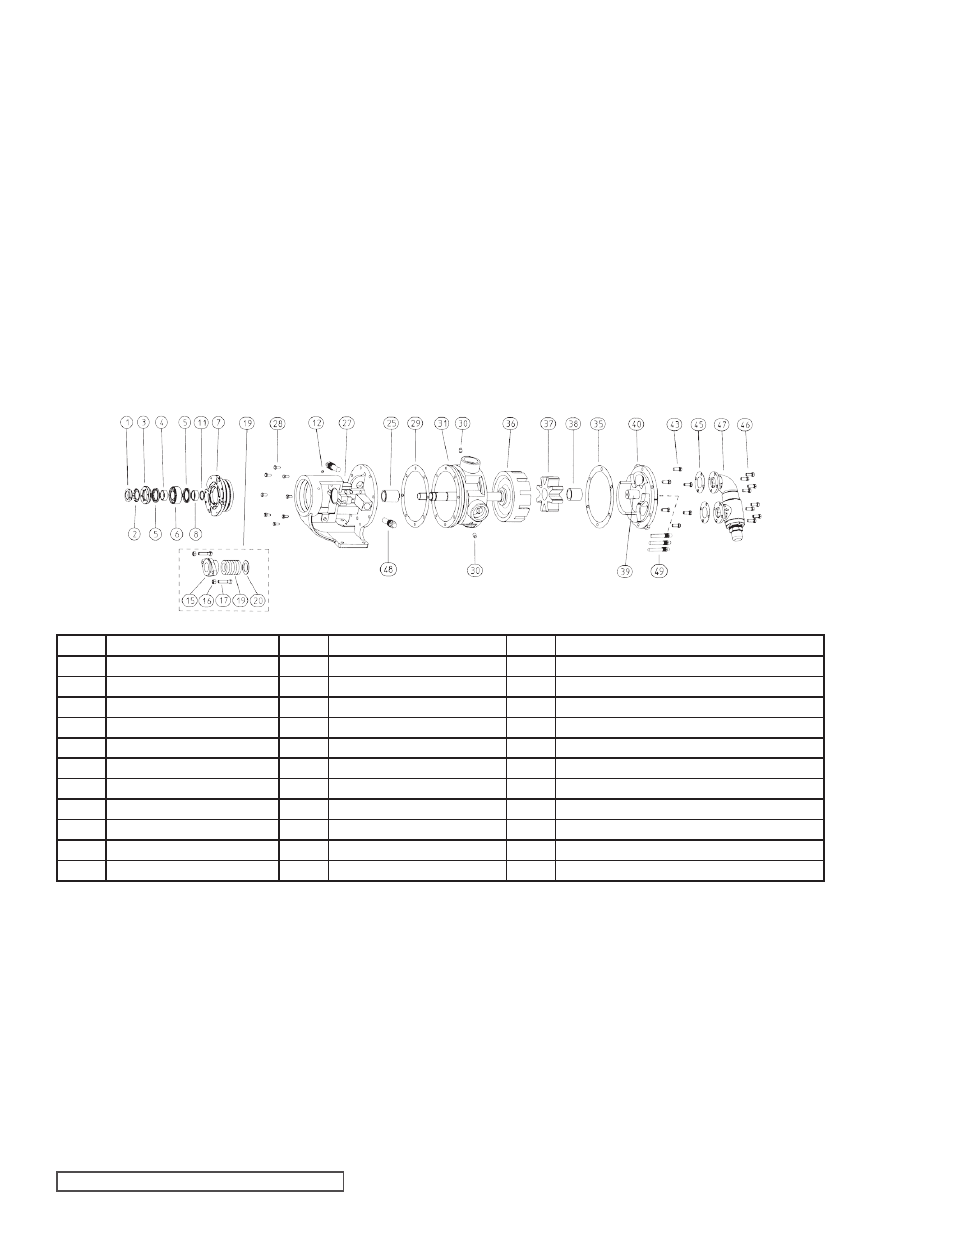
ITEM
NAME OF PART
ITEM
NAME OF PART
ITEM
NAME OF PART
1
Locknut
16
Packing Gland Nut
36
Rotor and Shaft Assembly
2
Lockwasher
17
Packing Gland Capscrew
37
Idler and Bushing Assembly
3
End Cap
19
Packing
38
Idler Bushing
4
Bearing Spacer Collar (Outer)
20
Packing Retainer Washer
39
Idler Pin
5
Lip Seal
25
Bracket Bushing
40
Head and Idler Pin Assembly
6
Ball Bearing
27
Bracket and Bushing Assembly
43
Capscrew for Head
7
Bearing Housing
28
Capscrew for Bracket
45
Relief Valve Gasket
8
Bearing Spacer Collar (Inner)
29
Bracket Gasket
46
Capscrew for Valve
11
Ring, Half Round (Not H, HL)
30
Pipe Plug
47
Internal Relief Valve
12
Grease Fitting
31
Casing (Tapped or Flanged)
48
Heater Cartridges for Bracket (124E Pumps Only)
15
Packing Gland
35
Head Gasket
49*
Heater Cartridges for Head (124E Pumps Only)
REPAIR: MODELS H, HL, K, KK, L, LQ AND LL
PACKED PUMPS
FOR “CLAMPED-IN” TYPE MECHANICAL SEAL
SEAT: Flush sealing faces of both rotary member and
seal seat with oil and install seal seat and seat gasket
over end of shaft against machined bracket face. Install
other seal gasket, seal holder, capscrews, and nuts and
tighten securely. Remove tapered installation sleeve.
5. Connect flush line or vent stuffing box for seals without
flush line until liquid is present on start up.
NOTE: For maximum seal life, flush line should be used.
EXPLODED VIEW PARTS FOR SERIES 124E/EH, 224A/AE/AH, 223A, 226A, AND 227A MODELS
* The number of Heater Cartridges for Head varies by pump size.
See Table 2 on Page 13 for the number required by pump size.