Triton ETA 300 User Manual
Page 6
10
11
GB
GB
Assembly
Assembly
against the saw blade teeth and use this to align a
cutting mark on the workpiece.
Note: if you wish to prevent the gradual cutting
away of the fence tips (which were designed for this
purpose) attach a small wooden fence tip using the
screw holes provided.
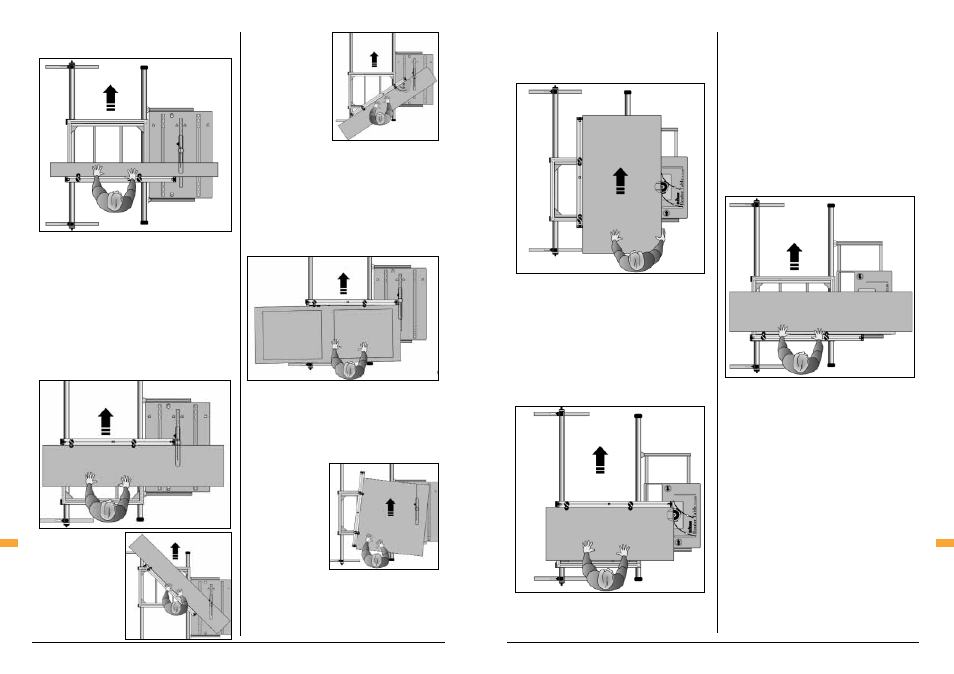
Panel Saw
This position gives a maximum width capacity of
around 1220mm, depending on saw size. Position
the fence (Fig. 13). Ensure it is pushed fully toward
the outer edge of the table before tightening the
clamps, for absolute squareness.
Mitre Cutting
Mitres can be cut with
the fence set at a
trailing angle (Fig. 14)
or leading angle
(Fig. 15) and with the
workpiece in front
(Fig. 14) or behind the
fence (Fig. 15).
You can use the
Workcentre protractor
to set the required
mitre angle. Place it in
the protractor slot
(Fig. 15).
Align the extension
table fence to the
protractor in the
position which best suits your workpiece, then
remove the protractor.
Taper Ripping
For slight tapers on large workpieces (ie. doors), set
the extension table fence to Panel Saw mode and
insert a packer against it (Fig. 16).
Tapers can also be cut by angling the rip fence
(Fig. 17). The required angle can be achieved by
using the Workcentre protractor as outlined in Mitre
Cutting (Fig. 14). A parallel sided packer will be
required to offset the distance between the fence
and the protractor in establishing the correct taper
angle.
If the fence hold-
down clamps do not
adequately secure
your work when
taper ripping, use
additional means of
clamping the work to
the sliding table.
USE WITH A ROUTER TABLE
Edge planing and trenching can be performed in all
modes of operation with a Triton Router Table.
Edge Planing
For edge planing pieces up to 1220mm wide, any
length, use the Fixed Table position (Fig. 18).
Set the extension table fence to the required
width by measuring the distance from the router
cutter to the fence, or by performing a test cut.
On early model Router and Jigsaw Tables set the
rear section of the router table fence flush with
the router cutter and set the front sub-fence to
the maximum depth of cut.
If using the Router Table model RTA300, remove
the fence and fit the guard to the tabletop.
Always guide your work along the extension table
fence, not the router fence.
For planing long edges use the sliding table mode
with the extension table fence positioned as
shown in (Fig. 19). Use the extension table fence
to align the workpiece, and set the router fence, if
fitted, clear of the work.
Trenching
Trenching is possible in all modes of operation. In
the Table Sliding mode clamp a wooden batten to
extension table fence and extend it past the cutter
(Fig. 20). Run the batten through the cutter to
create a sighting notch and to prevent tear-out in
your workpiece.
For long trenches in the Table Sliding mode fit
the extension table fence in the leading position
(furthest away from you) (Fig. 19).
Longer trenches can be performed in the Table
Locked mode (Fig. 18). Always use extreme care if
using the Router Table without the guard.
For large, awkward objects (eg. heavy staircase
stringers) it may be necessary to use the router
hand-held against a guide clamped to the
workpiece.
Fig. 12
Fig. 13
Fig. 15
Fig. 14
Fig. 16
Fig. 17
Fig. 18
Fig. 19
Fig. 20