Triton WCA 201 User Manual
Page 4
6
7
GB
GB
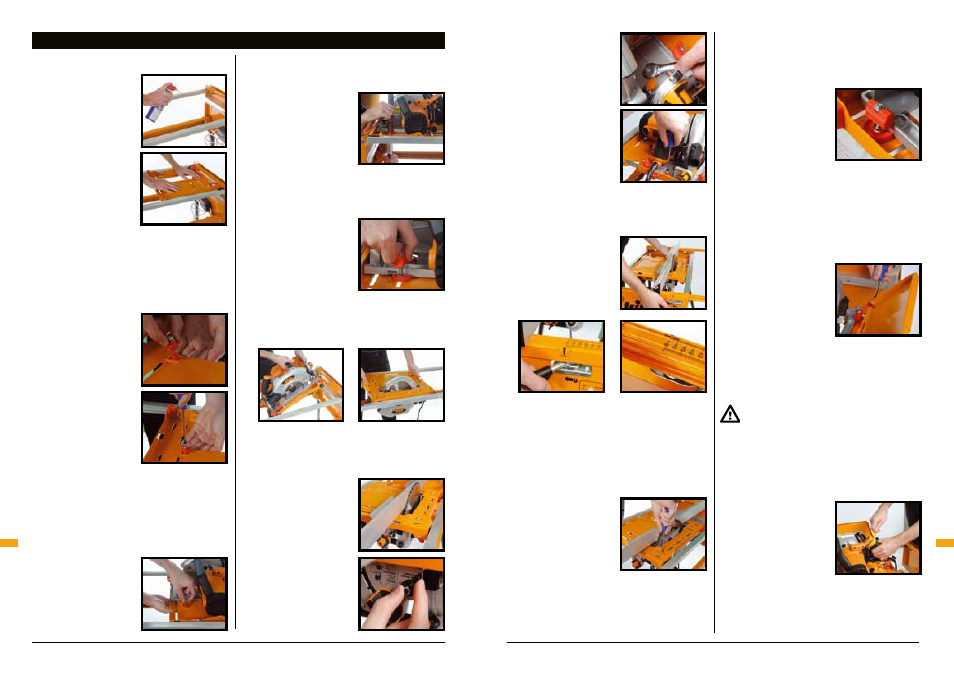
Fitting the slide chassis
Place the Slide Chassis
(L) in the bearing
channels with the red
plastic catch and red
bearing spacers closest
to the front panel (the
switch box end) and the
flanges upwards. Enter
two bearings in the
channel cutouts. Slide
the chassis towards
the rear panel and the
other bearings will
drop in.
Spray the channels
with lubricating oil for a smooth slide.
Fitting the triton saw
Unplug your saw. Check that the blade is set
at 0° and at full depth of cut.
Fit the Saw Alignment
Cams (o) from below,
holding the bases in
the rectangular slots
while you screw into
them. (They cut their
own thread.) Make sure
the lines moulded on
top of the cams are
both pointing towards
the rear panel. Tighten
the screws until nipped
gently.
Fitting the saw locators and knobs
Fit the saw into the chassis with the alignment
cams locating in the holes in the saw base-
plate.
Break or cut the Saw Locators (k) and
Clamping Knobs (l) from their moulding "tree"
and carefully trim off
any remnants with a
sharp knife. Fit the saw
locators in the slots
shown using 4 M6 x
40 screws (m) and M6
Flange nuts (n). The straight edges should be
against the baseplate, but spaced away from it
slightly to allow for final saw adjustment.
(Use a spatula blade or
a piece of cardboard or
metal about 1mm thick
as a spacer.) Firmly
tighten the screws.
Screw the knobs on
(they cut their own thread) until they just
scrape against the top edge of the saw base-
plate. This tension is sufficient to hold the
saw upside-down for
final adjustment, and
still allow the saw to be
shifted sideways slightly
using the alignment
cams.
Check that the saw is securely mounted.
Turn the slide chassis over, re-engaging the
bearings in the channels.
Aligning the saw
Position the chassis halfway between the end
panels. Adjust the fence in close to the blade
and lock it. Make sure
the blade is vertical
by comparing it to the
face of the fence. If
necessary, loosen the
nut holding the Blade
Angle Trimmer, and
adjust the blade angle.
Re-tighten the nut.
Use the saw's spanner
or the Tube Spanner (s)
to rotate the cams until
the front and rear of the
blade are just touching
the fence, when it is at
0mm. When satisfied
with the position tighten
the alignment cam
screws.
Unscrew the front
handle of the saw for
better access to the
front cam. Lower the
blade for access to the
rear one.
Final clamping of saw
Double-check the saw position by now locking
the fence at 0mm, and trying to turn the
blade backwards by
hand. The teeth should
lightly scrape against
the face of the fence. If
not, repeat the above
alignment.
This is a very important step, because it will
ensure that your saw cuts are true, and that
your fence scales are accurate, so take your
time.
When satisfied with the position of the
saw,reposition the saw locators hard up
against the edge of the baseplate, as follows.
Hold each knob against
turning and loosen the
screw about half to
one turn. Push the saw
locator into position,
and firmly tighten the
screw.
Turn the saw right-way
up again and loosen the four knobs a couple
of turns. Check that the saw cannot move
sideways at all, and that all screws are fully
tightened. Do up the knobs again, perhaps
one turn beyond when they first scrape on the
baseplate.
The saw is now set up, and is available at any
time for hand-held use by simply loosening
each knob half a turn
and lifting the saw
straight up. If the
locators are correctly
fitted, the saw will go
back into exactly the
right spot each time.
Fitting the side guard
Slide the two sections of the Side Guard (K)
together until they fit between the pivot
brackets on the slide chassis. Loosely fit the
short M5 x 8 screw (i) and a M5 Nyloc nut (h)
to hold them together.
Fit the two longer M5
x 25 screws (j) and
M5 Nyloc nuts through
the pivot brackets and
into the guard flanges.
Tighten until the guard
is firm, but still free to
pivot. Finally, tighten
the screw holding the two halves together.
Fitting the trigger strap
Before fitting the Trigger Strap (q) always
ensure that the saw is disconnected
from the power and that the switch on
the Workcentre front panel is in the "OFF"
position.
Wrap the Trigger Strap (q) around the handgrip
with the furry side facing outwards. Pass the
strap through the buckle, until the security
loop has passed
through. If your saw
has a safety lock-out
button press it and then
tighten the strap until
the trigger clicks "ON".
FITTING THE TRITON 235MM POWER SAW
Fitting The Triton Saw
Fitting The Triton Saw