Coleman EVANSTON 2000004674 User Manual
Elite evanston, Tent, Hinged, rigid door
STITCH LINE
ELITE EVANSTON
TM
8
TENT
MODEL 2000004674
Pole Descriptions
Pole
Pole Pole
Description
Qty. Dia.
Repair Kit Replacement Kit
Main Pole, black
2
11mm 5010000539
5010000549
Main Pole, grey
1
11mm 5010000539
5010000549
Rainfly Pole, grey, long
1
11mm 5010000539
5010000549
Awning Pole, black, short
1
7.9mm 5010000569
5010000568
Vertical Door Pole, black,
short w/plastic tips
1
6.3mm 5010000543
5010000545
Door Pole, black,
long w/plastic tips
1
6.3mm 5010000543
5010000545
Self-Rolling Window Spring Descriptions
Color Code Description
Qty.
Length
Replacement Part No.
Green
1
610mm 5010000627
Orange
2
670mm 5010000628
CAUTION: “Springs” may have sharp edges. Handle with care to avoid injury.
Keep out of reach of children.
To Set Up Tent
1. Unfold tent and spread out on a clean, level surface with the door facing
the desired direction. (Fig. 1)
2. Assemble all poles by interlocking the shock-corded, sections together.
3. Insert black Main Poles through the black trimmed sleeves on top of tent
forming an X”.
4. Insert grey Main Pole through grey trimmed sleeve, in front of tent. Make
sure grey Main Poles overlap the black Main Poles. (Fig. 1)
5. Insert end of each black Main Pole into pins located in the corners of the
tent. (Fig. 2 & 2A)
6. Go to opposite end of each black Main Pole and gradually apply pressure
to each forming arches. Insert the pin into each pole end at the corners of
tent. (Fig. 2 & 2A)
7. Insert end of the grey Main Pole into pin located on the sides of the tent.
(Fig. 2 & 2B)
8. Go to opposite end of the grey Main Pole and gradually apply pressure to
form an arch. Insert the pin into pole end at the side of tent.
(Fig. 2 & 2B)
Fig. 2
Door
2A
2B
Front of Tent
9. Attach frame clips along edges of tent to
the black & grey Main Poles. (Fig. 3)
Fig. 3
10. Stretch tent until taut, then secure metal loops
located on both sides and four corners of tent with
stakes. (Fig. 4)
Fig. 4
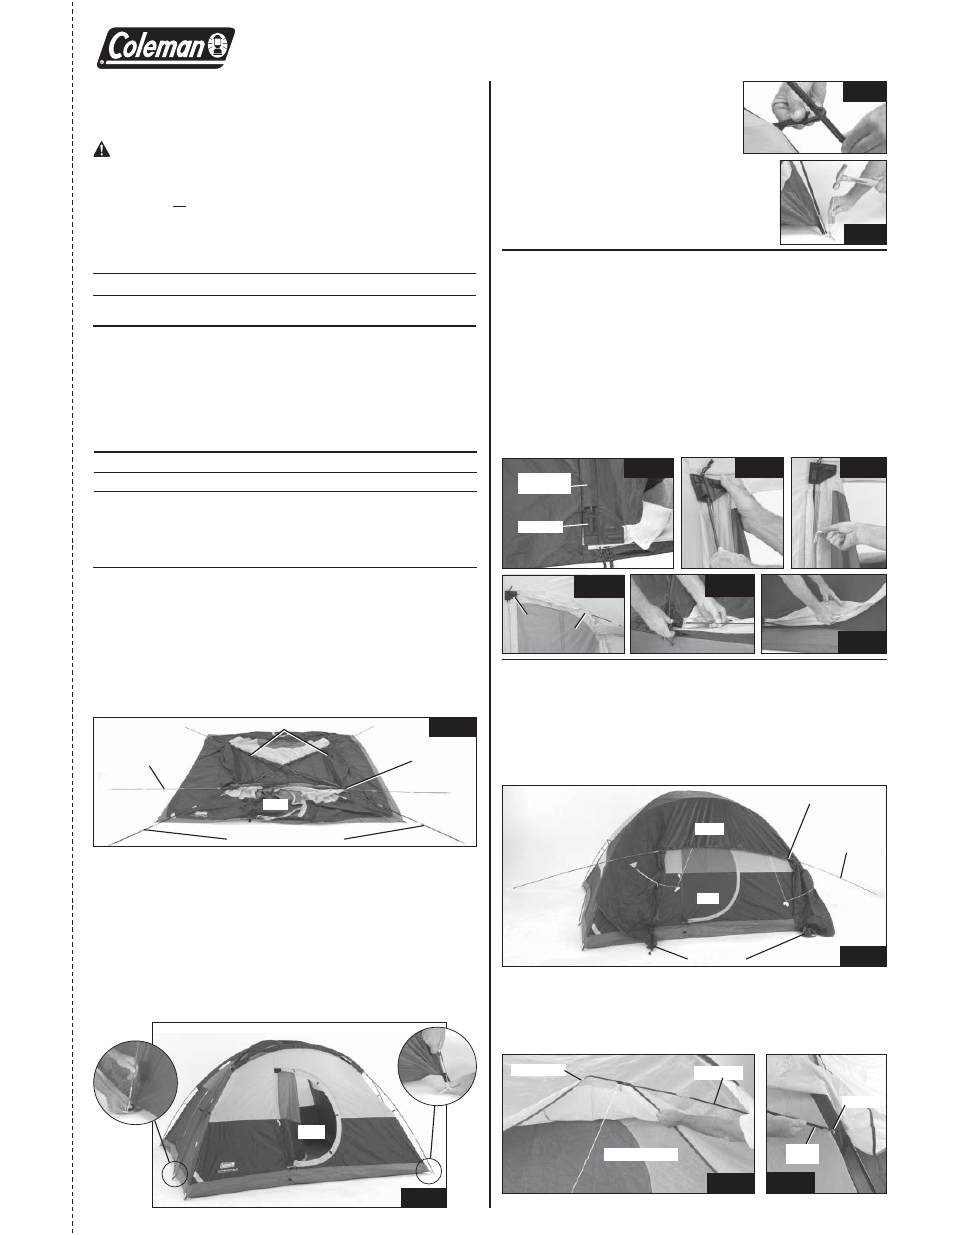
To Attach Rainfly
1. Drape Rainfl y over tent with dark blue vestibule fl aps located at the front
of the tent. (Fig 11).
NOTE: Hook and loop fasteners, located on seams of underside of Rainfl y,
should be centered over black & grey Main Poles.
2. Insert the long, black, Rainfl y Pole with through sleeve in underside of
Rainfl y above front door of tent. (Fig. 11)
3. Insert short, black, thin Awning Pole through sleeve in underside of Rainfl y
above window at back of tent. (Fig. 12)
4. Insert metal tip into grommet on tent seam at back of tent (Fig. 13). Go to
opposite end of Awning Pole and gradually apply pressure to pole forming
an arch; then insert metal tip into grommet.
Fig. 12
Awning Pole
Rainfly Sleeve
Back of Tent
Fig. 1
Door
Grey, Shock-
corded Main Pole
Black, Shock-corded Main Poles
Sleeves with Black Trim
Sleeve with
Grey Trim
Front of Tent
Hinged, Rigid Door
1. Assemble Vertical Door Pole (shorter black pole with plastic tips); then
insert through zippered vertical pole sleeve on hinged side of door. (Fig. 5)
2. Insert end of Vertical Door Pole into bottom hinge plate, apply pressure to
form a slight bow, then insert other tip of pole into top hinge. Zip up verti-
cal pole sleeve. (Fig. 6 & 7)
3. Assemble Door Pole (longer black pole with plastic cap tips); then insert
into zippered pole sleeve at top of door. (Fig. 8)
4. Insert end of Door Pole into top hinge plate, apply pressure to form a bow,
then insert other tip of pole into the bottom hinge. (Fig. 9)
5. Zip up pole sleeve to enclose Door Pole. (Fig. 10)
Fig. 5
Fig. 6
Fig. 7
Vertical Pole
Sleeve
Door Hinge
Fig. 8
Fig. 9
Fig. 10
Pole
Sleeve
Top
Door
Hinge
Pole
Sleeve
Top
Door
Hinge
Fig. 11
Sleeve with Grey Trim
Grey, Shock-corded
Rainfly Pole
Rainfly
Front of Tent
Door
Vestibule Flaps
(continued on other side)
Awning
Pole
Grommet
Fig. 13
Before you begin
Read all instructions before set up.
Select a level site clear of rocks, branches, and other hard or sharp
•
objects, to install your tent.
WARNING: Keep clear of overhead power lines.
Do not set up your tent under trees because of potential lightning strikes
•
or falling tree limbs in inclement weather.
Secure with
•
all stakes and guylines provided to prevent property damage
or personal injury.
For best results in windy conditions, position narrow end of tent into the wind.
•
Enlist the help of at least one other person to assist you when it is time to
•
assemble the tent.