Caution, Wall-mounting instructions – Revel Gem 2 User Manual
Page 28
Ultima Gem2
Owner’s Manual
A-2
WALL-MOUNTING INSTRUCTIONS
The Ultima Gem®2 loudspeaker can be mounted to a wall or the optional pedestal. The following instructions provide detailed
information regarding how to mount the loudspeaker on a wall in your listening room. Before beginning the installation, consider the
best position to mount the loudspeaker for optimum performance. Refer to the Installation Considerations section for guidance on the best
placement for the loudspeaker.
Note: The Gem2 Loudspeaker is NOT designed to mount on a ceiling.
Caution
Before installation, consult a qualified installer or contractor
familiar with the safety requirements of mounting heavy objects.
The customer is responsible for proper mounting of the
loudspeaker. Harman Specialty Group assumes no responsibility
for proper selection and installation of hardware or for any
personal injuries or product damages resulting from improper
installation or a fallen loudspeaker.
Step 1: Determine the approximate location on the wall where
the loudspeaker will be mounted and find the nearest pair of
wall studs. Use a stud finder if necessary.
Note: For safety purposes, the loudspeaker must be
centered on a wall stud when mounted.
Step 2: Retrieve the wall-mount template, found
in the accessory bag that was shipped with the
loudspeaker.
Step 3: Tape the template to the wall, centering the drill holes
over a wall stud. Ensure that the bracket distance is at least 15.5”
(394 mm) from the edge of the ceiling.
Note: The two vertical holes in the center of the bracket template are the
holes that are used for wall-mounting the loudspeaker to the stud.
Step 4: Use a level to verify that the bracket tilt is zero and then
drill two 1/16” (1.58 mm) diameter pilot holes.
Step 5: Retrieve the wall
bracket from the plastic
accessories bag that shipped
with the loudspeaker.
Step 6: Remove the template
from the wall.
Step 7: Place the wall bracket
flat against the wall so that the
drilled holes in the wall line up
with the wall bracket holes. Be
sure to position the bracket so
that the out-thrust tabs are on the bottom end. These are the
stops that keep the speaker from sliding off the bracket.
Step 8: Secure the wall bracket in place with two
screws. The minimum required size of the screws is
#10 (up to a maximum of 1/4”) x 2-1/2” long.
Tighten the screws firmly in place.
Step 9: Connect the wires to the loudspeaker. Set
the rear panel switch to the desired option.
NOTE: DO NOT PLACE THE LOUDSPEAKER FACE DOWN.
AVOID TOUCHING THE TWEETER DOME.
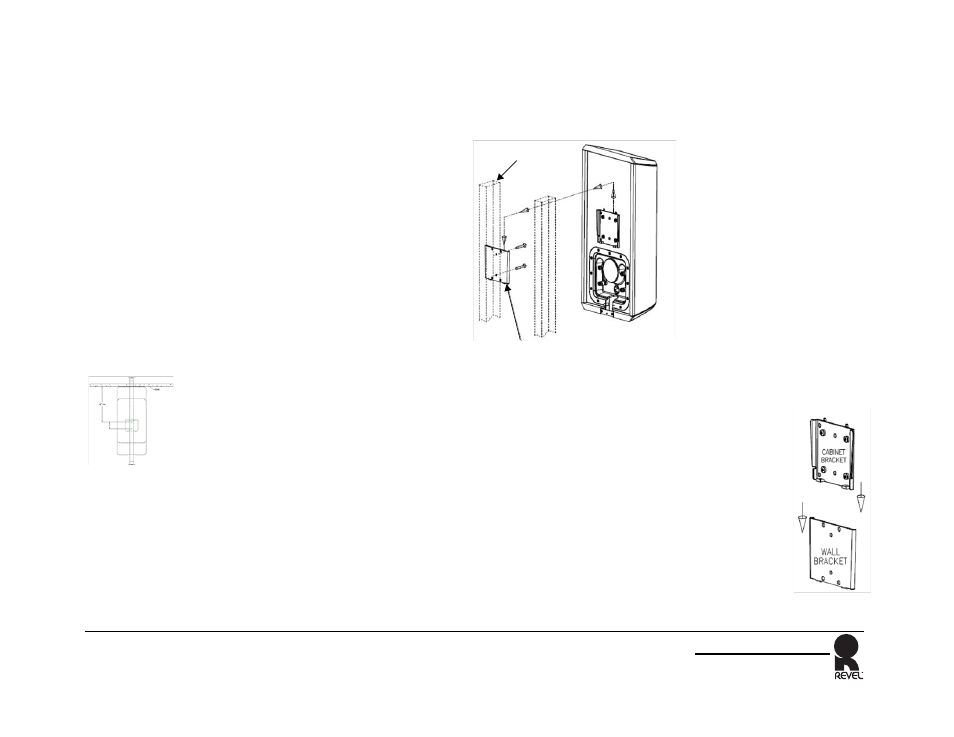
Step 10: The loudspeaker can now be mounted
onto the wall bracket. Slide the loudspeaker onto
the bracket from above, as shown. Make sure the
brackets are firmly mated before releasing the
loudspeaker.
WALL BRACKET
WALL STUD