Watts 682 003 User Manual
Watts Accessories for electrical
IS-682003
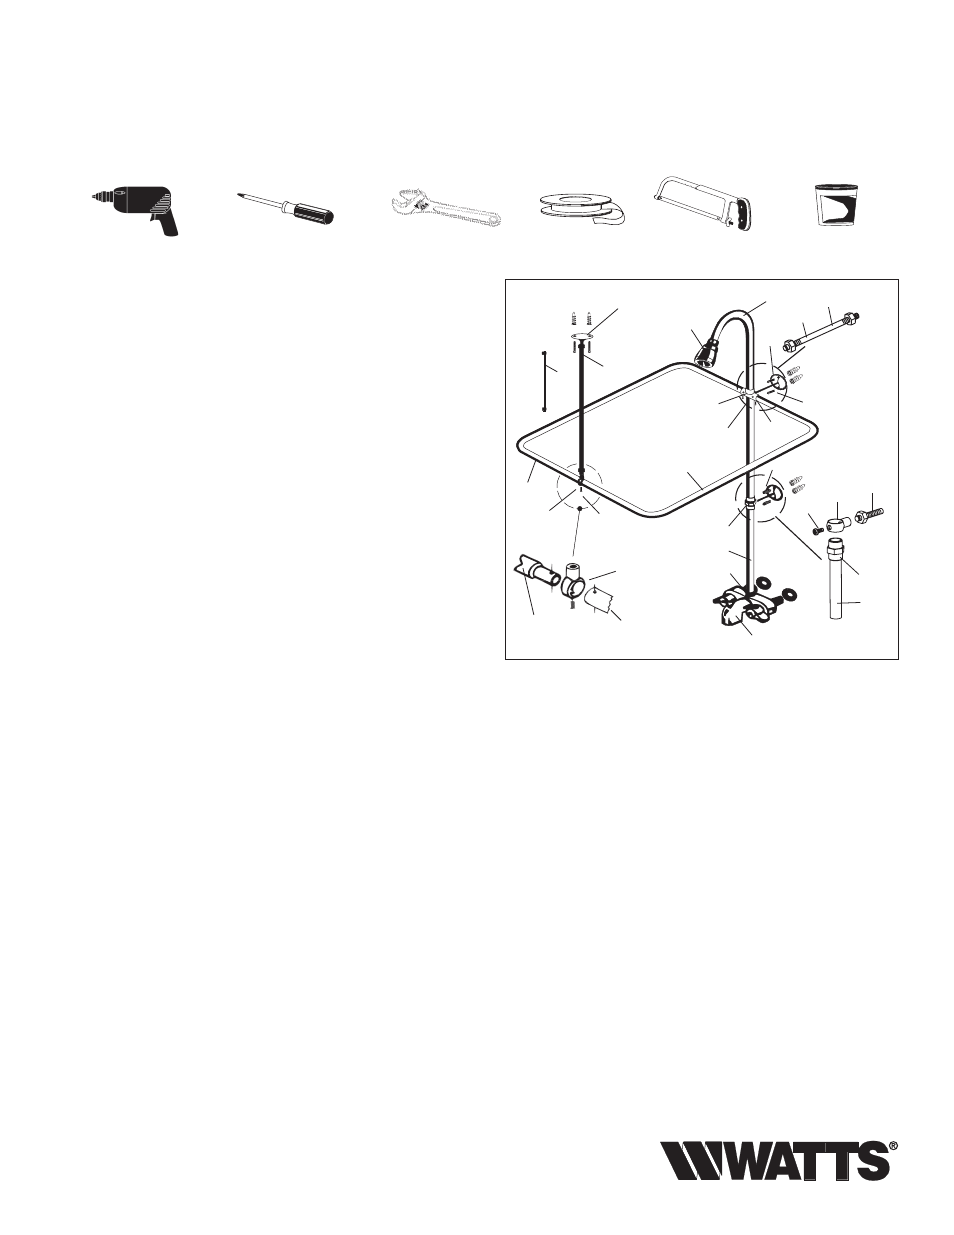
Model 682003 Ad-on Shower
Bath Faucet Type with 2 piece 0140494
Tools required for installation (not included):
Installation Instructions:
1.
Turn off water supply.
2. Remove existing faucet.
3. Apply a bead of plumber’s putty to the back of the new
faucet (1) and place it into position. Attach locknuts (2)
to the threaded shanks.
4. Reconnect existing supply nosecone pieces into faucet
shanks. Tighten coupling nuts securely.
5. Apply Teflon Tape to the threads on both ends of upper
loop riser tube (11).
6. Slide straight end of upper, looped riser (11) through center
hold of shower rod holder (10) of the shower frame assembly.
7. Apply Teflon Tape to top end of the lower straight section
riser tube (3).
8. Thread pipe coupling (4) onto top end of the lower straight
section riser (3) wrench tight.
9. Slide a support loop over the top end of the pipe coupling
(4) and thread in support loop screw (9). With the screw
oriented away from the wall.
10. Thread in straight end of upper, looped riser (11) into the
pipe coupling (4). Tighten up pipe coupling (4).
11. Thread in 6" support rods (13) into side hole of cube
portion of shower rod holder (10) and side hole of riser
support tube (6).
12. Thread opposite end of the lower straight section riser
(3) into faucet connector nut (5).
13. Put together shower frame assembly:
a) Slip support loop (6) over swaged side of one half frame (7).
b) Slide on smooth end of second half frame section (8)
over swaged end. Align pre-drilled holes on the two halves.
Move ceiling support loop (6) over the aligned holes and
thread in support loop screw (9). Tighten screw.
c) Slide the other two smooth ends of the shower frame
sections (7, 8) into rod holder assembly (10) with the thread-
ed cube portion facing straight outward of the
frame. Tighten the two setscrew (10A).
14. Thread Jam nuts (17) onto each end of the wall
support rods (13).
15. Thread support flanges (14) onto the other end of the
6" riser support rods (13).
16. Thread Jam nuts (17) onto each end of the ceiling support
rod (15).
Note: Thread in either the 12" ceiling support rod (15) or 24"
ceiling support rod (16) as required, into the ceiling support
loop (6).
Electric Drill
Screwdriver (Phillips Head)
Adjustable Wrench
Teflon® Tape
Hacksaw
Plumber’s Putty
17. Thread in the other ceiling support flange (14) of the other
end of the ceiling support rod (15 or 16).
Note: Threaded portions of support rods may be cut off
as required for proper length engagement.
18. Move up the complete shower frame assembly along
the upper riser (11) until ceiling support flange (14) reaches
the ceiling.
19. Fasten support flanges (14) to ceiling and wall using
the anchor wood screws supplied with the flanges.
Note: When fastening flanges to drywall (plaster board) or
hollow wall, use plastic anchors (18) provided. Install plastic
anchors (18) into the wall before inserting the anchor screws.
If installation requires that the support flanges be mounted to
wall tile, it is recommended that the holes be pre-drilled with
a masonry type drill bit and that Toggle Bolt Style Anchors
(not supplied) are used.
20. Lock in large setscrew (10B) of the rod holder (10)
to secure shower frame to upper riser (11).
21. Tighten all Jam nuts (17) on threaded rods to slip rings,
support flanges and shower rod holder assembly.
22. Thread on shower head (12) onto curved end of upper
looped riser (11) wrench tight.
23. Turn on water and check for leaks at all connections.
(1)
(9)
(9)
(5)
(13)
(13)
(13)
(13)
(3)
(3)
(11)
(18)
(18)
(18)
(7)
(7) swaged side
(reduced end)
ceiling support
loop (6)
(15)
(2)
(10)
(10)A
108
(17)
(17)
(17)
(17)
(17)
(17)
(6)
(6)
(14)
(14)
(14)
(4)
(4)
(12)
(8)
(8)
(16)