Installation continued – Watts PWSPSE User Manual
Page 6
6
Installation continued
14. Fully open two (2) cold (soft) water faucets near the water soft-
ener.
15. Fully open the house main water shutoff valve. Observe a steady
flow from both faucets.
16. Slowly, turn bypass valve back to the "service" position. Keep
soft water faucets open.
NOTE: If the water appears cloudy or has a slight yellow color,
allow it to run for several more minutes until it runs clear.
17. After the air is purged and the
water runs clear, open a HOT
water faucet until all air is expelled,
then close.
18. Close all water faucets.
19. Check plumbing work for leaks
and fix immediately if any are
found.
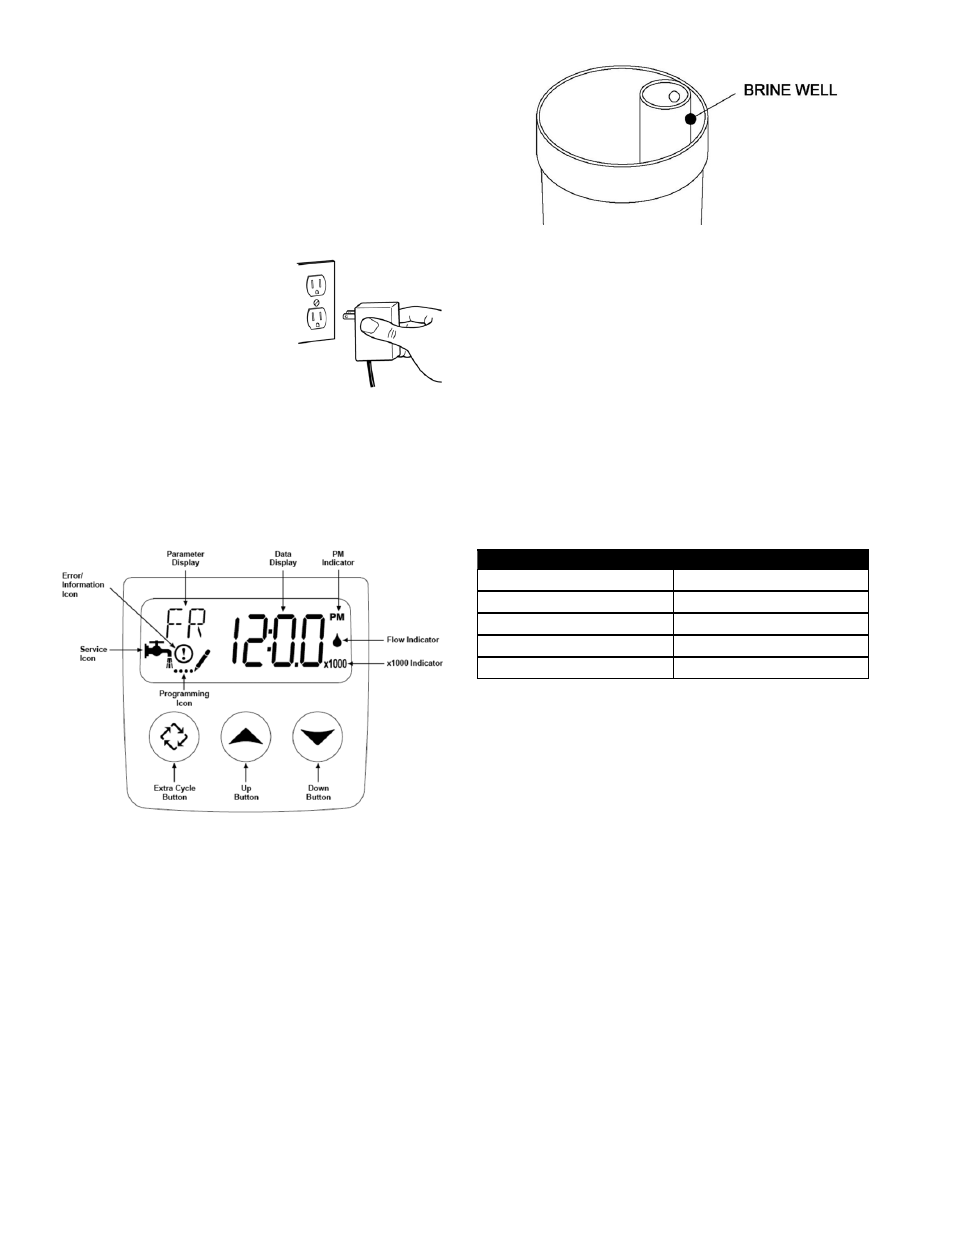
20. Connect electrical power by plug-
ging the power cord into a
(120 VAC) outlet.
21. Set the time of day. Press and hold either the Up or Down but-
tons until the programming icon replaces the service icon and
the parameter display reads TD. Adjust the displayed time with
the Up and Down buttons. When the desired time is set, press
the Extra Cycle button to resume normal operation. The unit will
also return to normal operation after 5 seconds if no buttons are
pressed.
Figure 5
22. Although the material used in the manufacturing of this water
softener will not contaminate your water supply, the softener
could become contaminated during shipment and installation.
The media inside the resin tank may also have become disturbed
during shipping. The following procedure will help re-position the
media, sanitize, flush and condition your water softener:
a) Remove the brine tank cover and add salt to the tank. Use
only nugget, pellet, or coarse solar salt designed for water
softener use with a purity of 99.5% or higher.
b) Add three gallons of water to the brine tank for 32K, 45K,
& 60K systems, and add 5 gallons of water for 90K & 120K
systems.
c) Remove the brine well cover. Pour 1-1/2 ounces of common
household bleach into the brine well and replace the cover
(see figure 6).
Figure 6
d) Turn ON the gas or electric supply to the water heater.
e) Manually initiate a regeneration by pressing and holding the
“Extra Cycle” button on the front of the controller for approxi-
mately 5 seconds (see figure 5). Release the “Extra Cycle”
when you hear the valve start to cycle. The controller will
automatically step the valve through the proper cycles. This
will take approximately two hours.
23. It will be necessary to enter the controller master programming
function (see separate ProFlo SXT service manual included
with system) and program the hardness setting to match the
compensated feed water hardness of the water supply. The
compensated hardness is:
Feed water hardness in grains per gallon times the compensation
factor plus 2 grains for each ppm of iron rounded up to the next
whole number.
Example: Feed water hardness = 17 grains, iron = 0.5 ppm
The compensated hardness is 17 x 1.1 + 1 = 19.7 so the hardness
setting would be 20 grains.
Note: This step can be performed at the same time as step 21
above if desired.
FeeD Water HarDness
compensatIon Factor
1 – 20 grains
1.1
21 – 40 grains
1.2
41 – 70 grains
1.3
71 – 100 grains
1.4
> 100 grains
1.5