Recommended replacement schedule, Uv module, Uv bulb – Watts PWDWUV3 User Manual
Page 5: Ultra violet bulb replacement, Filter element cartridges, Filter change, Replacement filter packs
5
Ultra Violet Bulb Replacement
Warning: Do not touch UV Lamp or Quartz Tube with bare
fingers or hands. Fingerprints on the lamp or tube may reduce
lamp effectiveness. Handle with clean cloth or gloves.
Step A Turn off the incoming water supply.
Step B Unplug transformer from the power outlet and disconnect
transformer wire harness from the UV lamp at the plastic
connector.
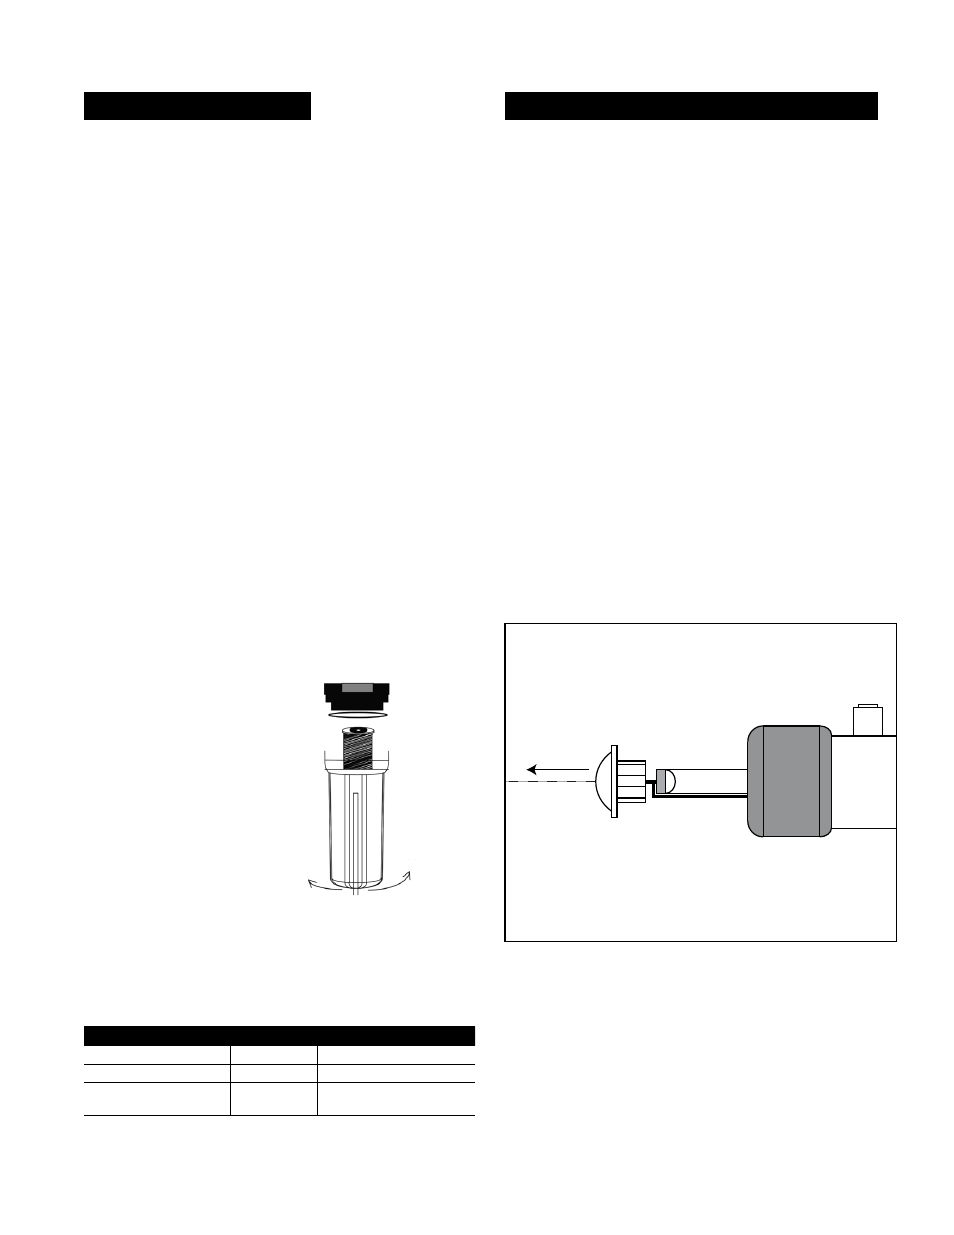
Step C Remove UV lamp from housing by pulling on the UV wire
harness away from the UV housing. Use caution when
removing lamp not to break glass. Discard of old lamp.
Note: DO NOT TOUCH NEW UV LAMP GLASS WITH BARE
HANDS, THIS WILL DAMAGE THE LAMP.
Step D Install new lamp by pushing it into the UV housing using
the white end cap.
Step E Plug the transformer power cord connector into the UV
module wire harness connector and plug the transformer
into an electrical outlet. The white UV end cap will light up
when in service (Plugged in). If light does not come “on”
see troubleshooting on page 15.
Turn on the incoming water supply and follow up with
page 4, Start Up Instructions.
Do not over-tighten filter housing, overtightening may damage
O-ring(s), cause water leaks, or affect system performance.
Step F Snap UV housing body back into single mounting clip.
Reconnect the
1
⁄
4
" blue tubing back on to the UV housing
body.
Figure E: UV Tube Assembly
Recommended Replacement Schedule
Filter Element Cartridges
Watts recommends changing the filter element cartridges at least
every 6 months or 1350 gallons (5100 liters).
Stage 1: EDP# 7100331 (5-micron Sediment Filter)
Stage 2: EDP# 7100452 (1-micron Carbon Block)
UV-Lamp: Every 12 months or 9000 hours.
Cap & Quartz Tube: Every 24 months
Annual Filter Pack includes Sediment, Carbon Block and UV Lamp -
EDP# 7100112.
Filter Change
Step A Turn off incoming feed water supply to unit. Note: There
will be water in the unit filter housing. Lift the faucet
handle to relieve the water pressure.
Step B Remove filter housing from lid by turning it to the left, as
shown in Figure D.
Step C Remove used filter cartridges and discard. Discard the fil-
ter gaskets. Note: Do not discard filter-housing O-ring.
Step D Clean inside of filter housing with warm soapy water. Rinse
the filter housing with clean warm water to remove soap.
Step E Lubricate O-ring with water-soluble lubricant (i.e. K-Y
Jelly
®
or Silicone lubricant). Note: Do not use Petroleum
based lubricants such as Vaseline
®
.
Do not over-tighten filter housing, overtightening may damage
O-ring(s), cause water leaks, or affect system performance.
Step F Seat O-ring in groove in filter housing.
Step G Insert new filter cartridges into filter housing.
Step H Screw filter housing onto lid (as shown in Figure D).
Step I Repeat Step 4: Start Up
Figure D:
Filter Bowl Removal
Replacement filters for this and many other filtration systems
can be purchased directly from Watts. Additionally, Watts sells
filtration and reverse osmosis systems suitable for almost any
individual or commercial application.
to loosen
to tighten
Replacement Filter Packs
Model
Frequency
description
PWMB10M5
6 Months
5-micron sediment filter
PWCB10LEAD
6 Months
1-micron carbon block filter
PWFPKUV3
Annual
Includes all filters and
UV Replacement Lamp
note: Water conditions may require more frequent cartridge replacement
UV BULB
UV MODULE
UV Module
UV Bulb