B6 tail gyro, Tail gyro – DJI Ace Waypoint User Manual
Page 15
©2012 DJI Innovations. All Rights Reserved.
15 |
B6
Tail Gyro
When system is powered on, you must not move your helicopter or sticks on transmitter until the system initialization is
finished (about 5 second).
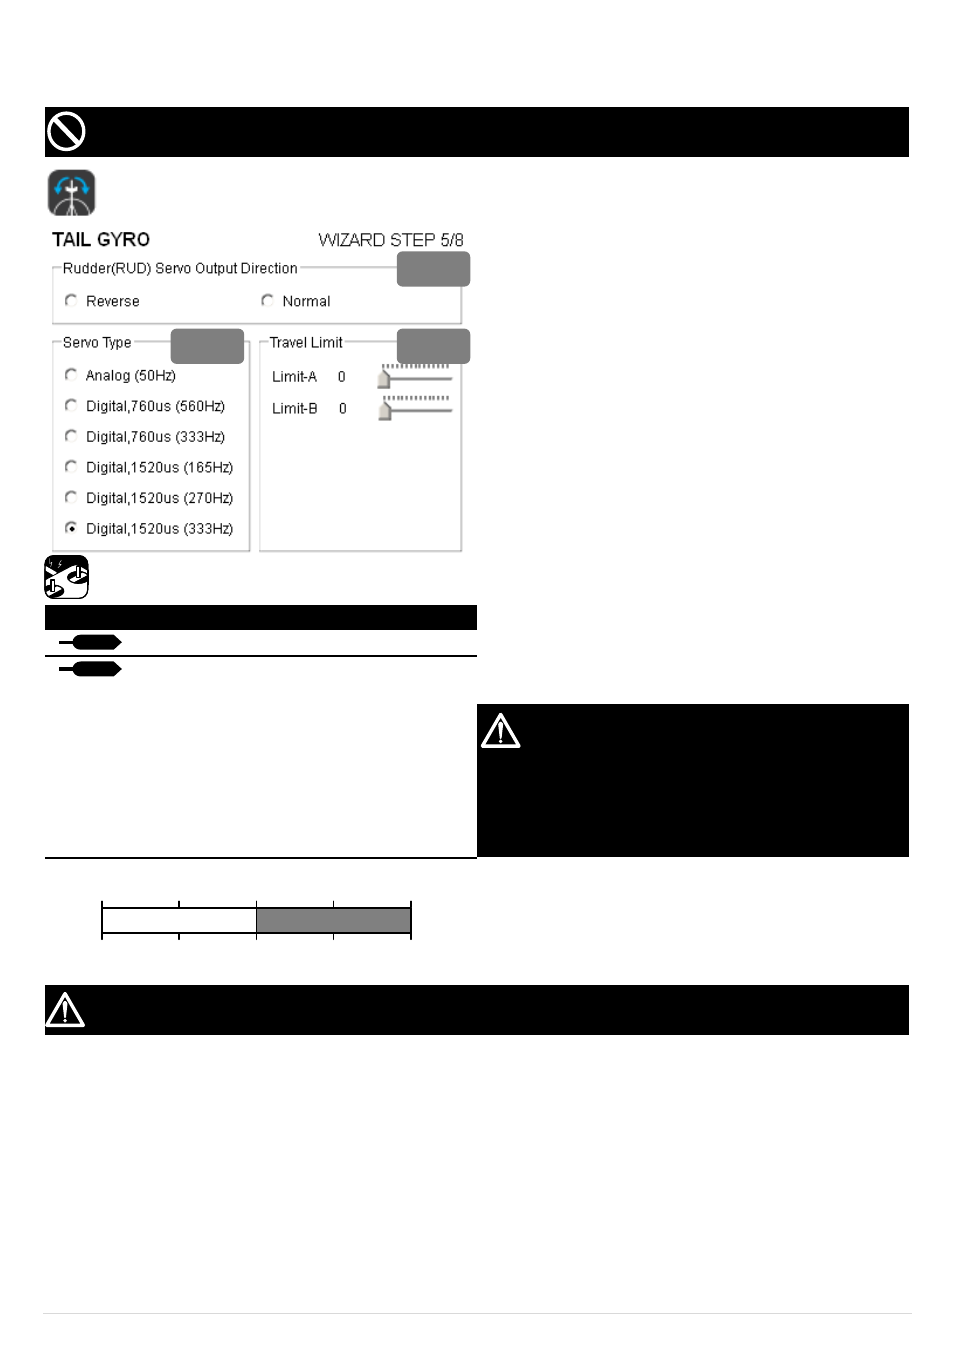
In Assistant Software, page-Tail Gyro:
STEP1: Please properly set your rudder servo type before you
connect your tail-gyro servo to it, otherwise your servo
might be damaged due to incorrect servo type chosen.
STEP2: We have [LimitA] and [LimitB] (Range: -140 to +140),
which represent end-points of the tail rotor pitch. The
initial value for both is 50. Adjust these two limit value,
make sure your rudder servo can work the full range for
your tail rotor pitch, without any mechanical binding.
Otherwise, the performance of the tail-gyro will be
affected. You can identify which side of the tail rotor
pitch is represented by LimitA / LimitB like this:
1. Set one of them to 0, another to 50.
2. Move your rudder stick on your transmitter.
3. One side of the tail rotor pitch will not move.
4. This side should be related to the LimitA / LimitB
whichever you are giving value 0 to.
STEP3: Move your rudder stick, and check whether the tail rotor
pitch is working to your expected direction. If not, please
change to proper direction.
TX
Transmitter related channels
Input
Operation
Description
R
Stick
Rudder command
G
Switch
STEP1: Gyro working mode
selection: Rate Mode /
Head-Locking Mode
STEP2: Gyro sensitivity setting
STEP3: Quickly slide it from rate
mode to head-locking mode for 3
times, the command stick center
position would be reset.
You must also finish the SYSTEM CHECK procedure in
later steps, before you fly your helicopter. You might find
the Controller Output Check for tail rudder result in
opposite rudder moving directions, click [Reverse]
button to make corrections. Please see Page 18 .
Rate Mode
Head-locking Mode
G Channel Value
Gyro Sensitivity & Working Mode
0%
50%
100%
0%
50%
100%
50%
100%
50%
100%
STEP4: Switch your Tail-Gyro working mode to [Rate Mode],
take-off your helicopter and hover. If your helicopter
drifts on YAW direction obviously, then adjust your tail
servo linkage until the helicopter stops drifting. Or you
can use trim to fine-tune the rudder servo.
If you used trim during the Tail-Gyro working in Rate Mode, please power off the Ace Waypoint and re-start it before you wish
to use Head-Locking Mode.
STEP5:
Gyro Sense setting: Set your gyro sense via transmitter, with the channel which you plug into input port-G on Ace Waypoint
MC. We suggest you start from 45% in [Head-locking mode], take off the helicopter, reduce the Gyro sense if tail got
vibrating; if the tail response too slow and drift then increase it. Land you helicopter and switch to [Rate mode], then take off
the helicopter again, fine-tune the rudder servo to make the tail stop drifting and land again. Switch the tail gyro between
[rate mode] and [Head-locking Mode] by 3 times, then center position of Tx will be recorded, now you finished the gyro
sense setting. You can identify the Tail-Gyro working mode on the status bar of Ace Waypoint Assistant, but that gyro sense
percentage may not be the same as your Tx reading due to different Tx manufacture.
STEP3
STEP1
STEP2