Agio International Alumicast Swivel Chair User Manual
Agio International Furniture
MODEL # 50-1575911-742
Page 2
IMPORTANT!! PLEASE READ ENTIRE INSTRUCTION SHEET BEFORE ASSEMBLY!!
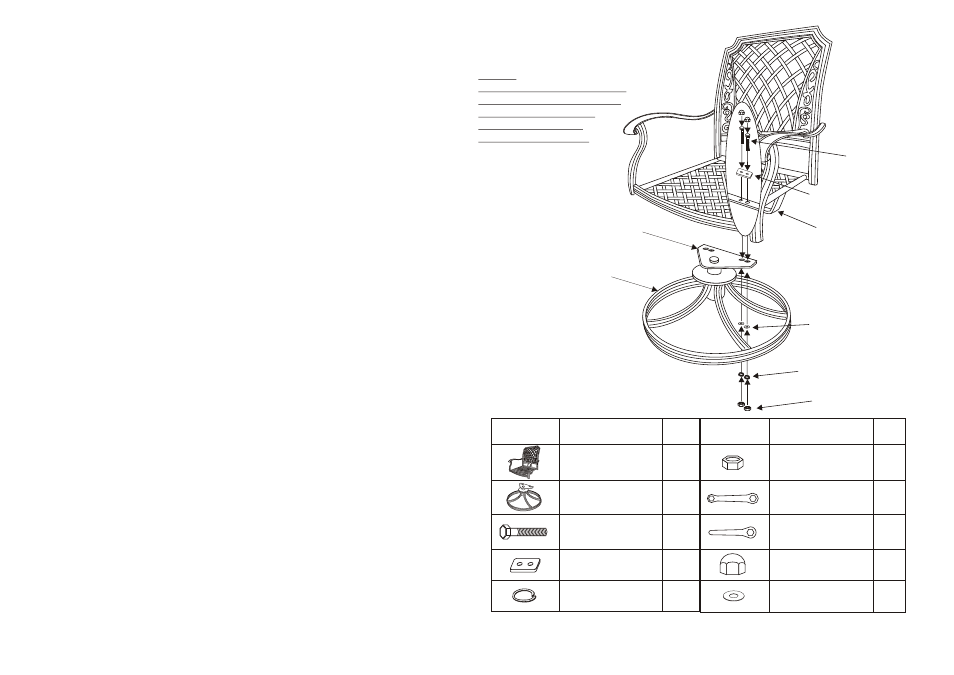
SEAT DESIGNS MAY
VARY BUT THE ASSEMBLY
IS THE SAME
PARTS LIST
DESCRIPTION
1
1
PARTS LIST
DESCRIPTION
QTY./PCS
QTY./PCS
CHAIR FRAME
CHAIR BASE
NUT
4
4
HEX WRENCH-1
1
PVC BOLT COVER
WASHER
1
8
BOLT
4
2
METAL PLATE
SPRING WASHER
4
HEX WRENCH-2
Step 1: Remove all protective materials and place all parts on a non-
abrasive surface to avoid scratching before or during assembly.
Note parts and compare against the parts list. If you are missing
any parts or are unsure how to proceed with assembly, please call
our Customer Service Center immediately at 1-800-416-3511.
Do not attempt to assemble the chair if any parts are damaged
or missing.
Step 2: Starting with the chair base, position it in front of you as shown in
illustration with the holes in the swivel plate facing towards the rear
of chair base (away from you). Important Note: Make sure that
the swivel plate is situated all the way into the chair base. It may
have vibrated out of place during shipment. With the help of
another person, position the chair frame onto the chair base with the
front of the seat facing you (see diagram) and the two sets of holes in
the "U" bar portion of the chair frame aligned with the two sets of
holes in the swivel plate. This is very important for a safe, balanced
swiveling motion. If chair frame has been positioned properly onto
the chair base, all arrows on both the “U” bar and the swivel plate will
be pointing in the same direction.
Step 3: Carefully examine the diagram. Attach a metal plate to two (2) bolts
and guide the bolts through the top one set of holes in the "U" bar
located at the bottom of the chair frame. From beneath the swivel plate,
add a spring washer and a nut to the end each bolt. Do not tighten nuts
completely at this time. Hand tighten only! Repeat procedure with other
set of holes on opposite side.
Step 4:At this time tighten all nuts and bolts with the hex wrenches provided.
Do not over tighten. Over tightening may strip the bolts and cause
damage to the swivel plate.
Step 5:Your chair should now be ready for use. If you do not feel your chair
is swiveling properly, double-check your assembly procedure, especially
steps 2 and 3. If you have any questions, please call our Customer Service
Center at 1-800-416-3511.
SWIVEL PLATE
CHAIR BASE
SPRING WASHERS
WASHERS
METAL PLATE
NUTS
"U" BAR
BOLTS
NOTE:
MAKE SURE ARROWS ON
BOTH THE "U" BAR AND
SWIVEL PLATE ARE
POINTING IN THE
SAME DIRECTION.