Mayline Under-Board Rule Attachment User Manual
Page 2
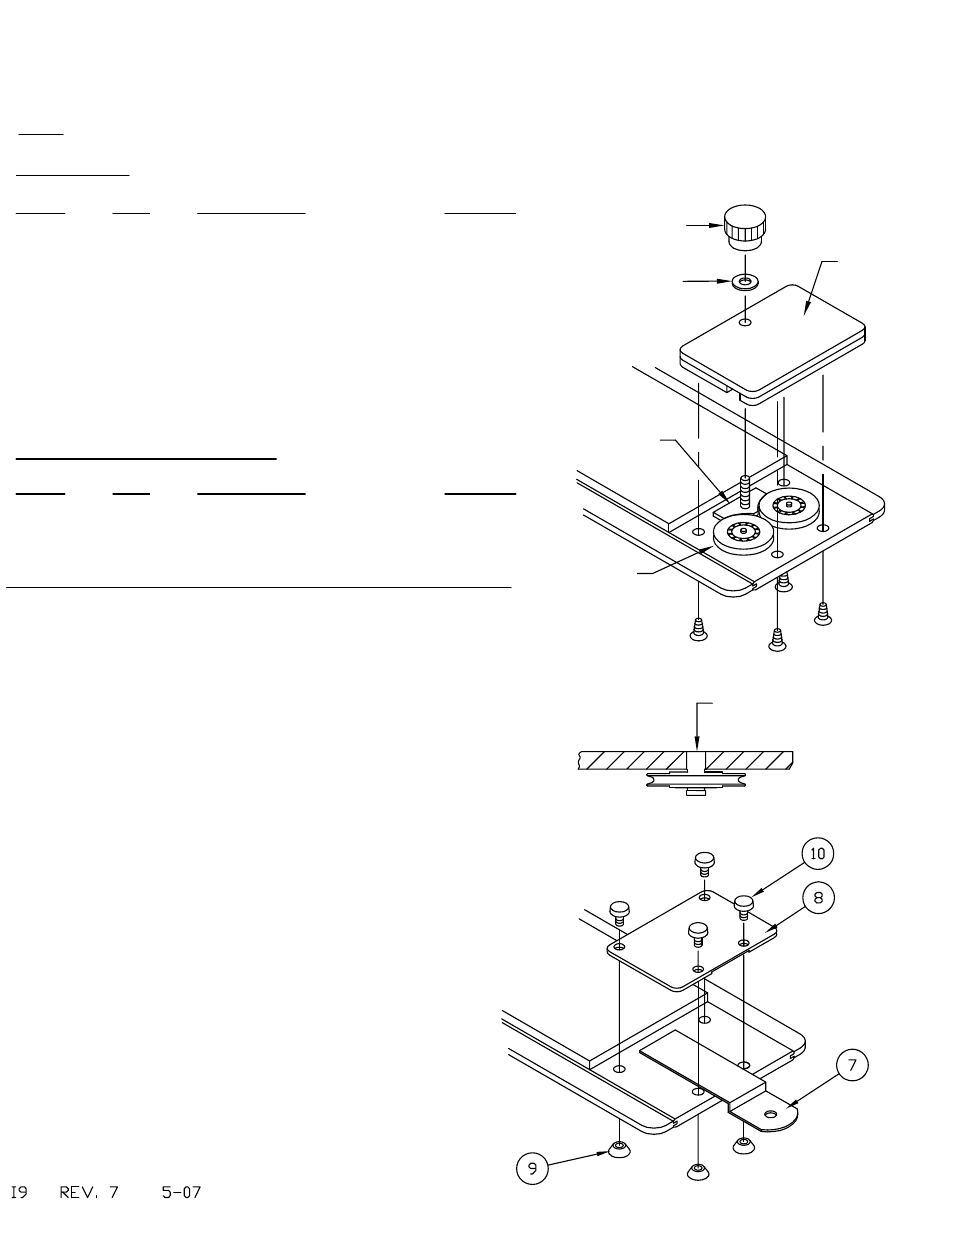
1. Remove Brake Knob and Washer (if so
equipped).
2. Remove four Screws to remove Pulley
Housing. (See Fig #1). Remove Brake Shoe
(if so equipped).
3. With blade upside down, remove two
Pulleys by tapping out with a hammer and
punch (See Fig #2).
4. Remove Cable assembly.
5. Attach End Plate (8) and Sliding Bar (7) with
four Screws (10) and four Tapered Bushings
(9). Bushings can be held in place with your
finger while tightening screws. Leave two outer
screws loose enough to allow bar to slide in
and out until attached to board. (See Fig. #3)
6. Repeat for other end of straightedge.
7. See other side of this sheet for ' Attachment
Instructions '.
INSTRUCTIONS TO CONVERT ABOVE-BOARD
PARALLEL RULE to UNDER-BOARD
ATTACHMENT
When ordering components, specific color and/or size information may be required.
Contact a Mayline Customer Service Representative. 1-800-822-8037
COMPONENTS:
REF. # QTY. DESCRIPTION PART No.
1 1 CABLE COIL ASSEMBLY A1072
2 1 UPPER RIGHT PULLEY A1085
3 1 UPPER LEFT PULLEY A1086
4 1 LOWER RIGHT PULLEY A1087
5 1 LOWER LEFT PULLEY A1088
6 2 ATTACHMENT CLAMP KIT A1089
7 2 REGAL SLIDING BAR B30
8 2 REGAL END PLATE B8M
9 8 #6-32 TAPERED BUSHING Q41
10 8 #6-32 x 3/16 SCREW X350
HARDWARE BAG (PART No. A104)
*for individual item, order that part number
REF. # QTY. DESCRIPTION PART No.
E1 4 WASHER W26*
E2 8 #6 x 1/2 SCREW X37*
NOTE: Please count and inspect all pieces before disposing of any carton or packing materials.
Brake Knob
Washer
Pulley
Housing
Brake Shoe
Ballbearing
Pulley
Fig. #1
Fig. #2
Tap out
Fig. #3
CATALOG No.
7302D