2 web browser setting sample, Gw a (10) gw b (20) – AirLive VoIP-400 Series User Manual
Page 30
ITG User’s Guide
4.2 Web Browser setting sample
This section describes how to use web browser to build a sample scenario dial plan in ITG. We
suggest some steps to setup dial plan at web browser setting,
1. Please draw down scenario to have a VoIP call application
2. Local gateway: IP setup
3. Local gateway: local telephone number setup
4. Local gateway: remote gateway IP & remote telephone number setup
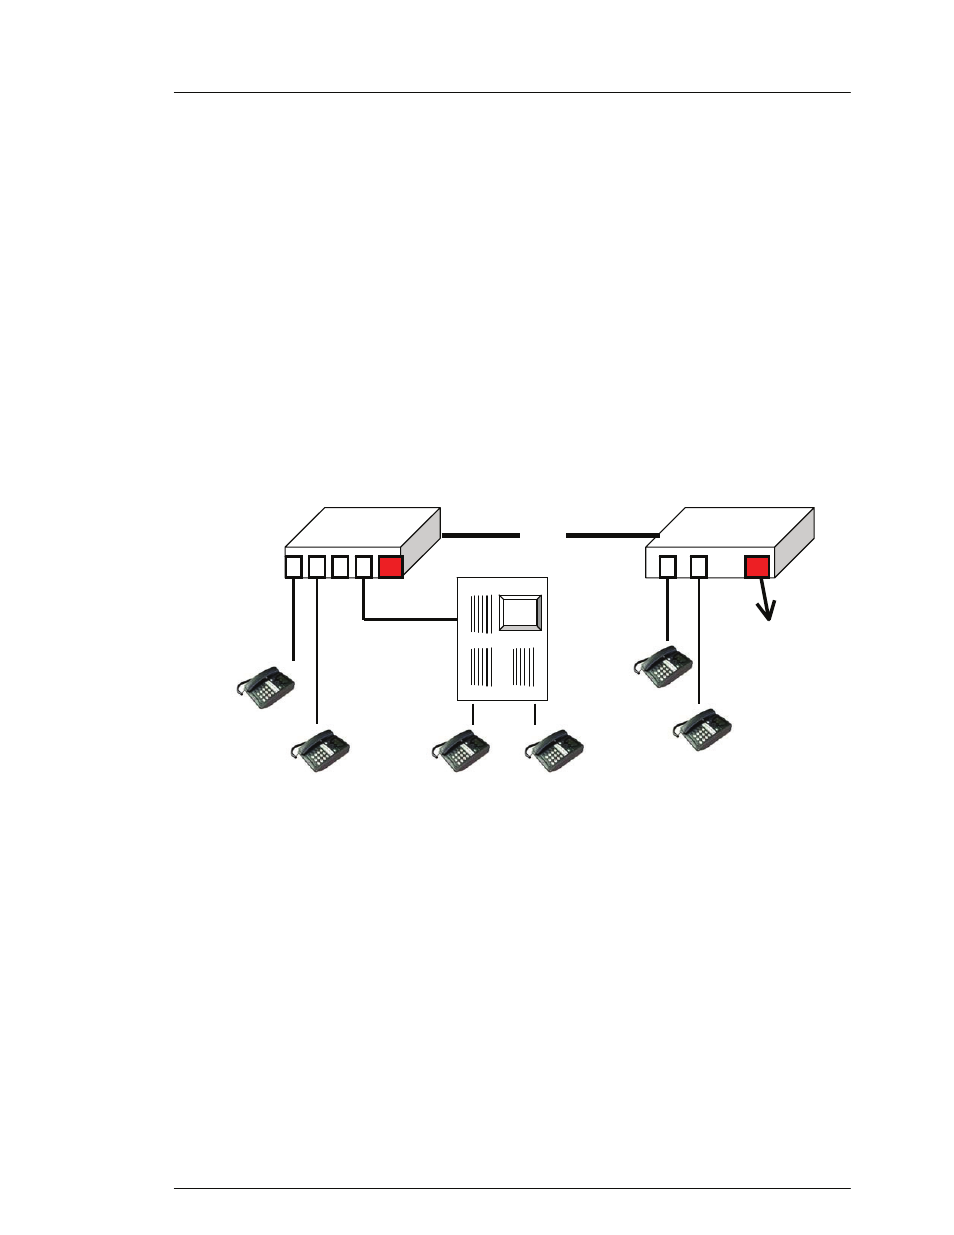
Please draw down scenario to have a VoIP call application
In order to describe the dial plan of Internet Telephony Gateway, we would like to have the
following scenario to step by step the gateway setting by web browser. In case, you don’t have
PBX on hand, please ignore GW A Port 1 setting.
GW A (10)
GW B (20)
FXS
FX
O
Hub
FXS
FXS
PBX
FXS
Port 3
Port 2
301
C
Port 0
801
Port 1
551
Port
0
LAN &
Console
550
201
800
Scenario description: There are two gateways connected by a Hub.
Gateway A, 4 ports ITG, is configured as following:
1. Gateway A, ID=10, IP: 192.168.0.20, mask IP: 255.255.255.0, gateway IP 0.0.0.0 (virtual
IP)
2. Port 0 of FXO is connected to PBX. There are two telephone sets connected by PBX, their
phone numbers are 800 and 801.
3. Port 2 of FXS has a telephone set connected, its phone number is 201
4. Port 3 of FXS has a telephone set connected, its phone number is 301
Gateway B, ID=15, 2 ports ITG, is configured as following:
1.
Gateway B IP: 192.168.0.55, mask IP: 255.255.255.0, gateway IP 0.0.0.0 (virtual IP)
2.
Port 0 of FXS has a telephone set connected, its phone number is 550
3.
Port 1 of FXS has a telephone set connected, its phone number is 551
Local gateway: IP setup, we are setting gateway A.
1. Please select Main Menu\ Configure System Settings\ ITG IP Settings from Main Menu
30
Configuring ITG from a Web Browser