Easyroute quickstart, Basic functions, 2n® easyroute installation and connection – 2N Wireless 3G router 2N EasyRoute_new design - Quick start, 1664 v1.00 User Manual
Page 2: 2n® easyroute connection layout, Outgoing call, Indication leds
2N
®
EasyRoute QuickStart
Basic Functions
· The device allows to connect analog phone,
answering machine, external line of PBX
or other device with FXO interface into
GSM/UMTS network.
· Call can be connected by voice channel of
GSM/UMTS network or by internet
connection using VoIP. (VoIP - only fax
version - ERF)
· The data function of 2N® EasyRoute is to
connect your PC or small LAN to the
Internet via a 3G (UMTS) or GSM network.
· 2N® EasyRoute is equipped with a fast
Ethernet 4 port switch and DHCP server,
allowing you to create a wired network with
4 PCs without any additional hardware.
· 2N® EasyRoute includes a WiFi module for
you to add PCs to your LAN using the WiFi
technology.
· 2N®
EasyRoute
offers
the
FAX
transmission option via a VoIP network
using the T.38 protocol (ERF version).
·
2N® EasyRoute firmware can be updated
f
Read the CD-ROM User Manual carefully to get familiar with all system
functions.
2N® EasyRoute supports the 3G WCDMA/HSDPA, GSM GPRS/EDGE
technologies for data connection. The connection speed and quality
depend on the UMTS/GSM provider, accessible services, signal coverage
and network status. The parameters included in the User Manual
(Technical Parameters) are the maximum values; for detailed information
about accessible services contact your mobile provider.
2N® EasyRoute Installation and Connection
· Proper Location
- Install 2N® EasyRoute with respect to a
good UMTS/GSM signal strength.
- Place 2N® EasyRoute out of range of
sensitive devices and human bodies for
electromagnetic interference reasons.
- 2N® EasyRoute is designed for indoor
use. Do not place it near heat sources
and on direct solar radiation. It may not
be exposed to rain, flowing water and
moisture, aggressive gas, solvents etc.
· Needed Accessories
INCLUDED IN THE 2N®EASYROUTE BOX
· 1 2N®EasyRoute device
· 1 power adapter (12V/2A DC)
· 1 SMA antenna
· 1 UTP wire (Ethernet network wire)
· 1 CD with manual
· 1 telephone cable
NOT INCLUDED IN THE 2N®EASYROUTE
BOX
· SIM card
· Information on Internet connection. Often
used: APN: Internet and Dial: *99#
· External Antenna Connection
Screw the enclosed antenna into the
SMA antenna connector. Tighten the
antenna connector gently with your
hand, never use a wrench!
· SIM Card Installation
SIM card slot is placed on connector
panel of 2N® EasyRoute. Insert the
SIM card as shown in the picture and
make sure that the card is locked
properly. Select SIM card and provider
services, such as call forwarding, call
barring, preferred networks, SMS
centre, etc. using your mobile phone
before inserting your SIM card in 2N®
EasyRoute. If you use a PIN protected
SIM card, enter the PIN into 2N®
EasyRoute using the WEB configuration
(see Internet setup points 5 and 6)
before inserting SIM to avoid SIM lock
after repeated switch on (after switch
on, the PIN stored in 2N® EasyRoute is
used automatically). If the SIM gets
locked, unlock it by entering the PUK
into your mobile phone.
· Telephone Line Connection
2N® EasyRoute can be connected to any
FXO-interface
equipment
(standard
telephone set, answering machine, PBX
external line, etc.). 2N® EasyRoute is
equipped
with
the
Calling
Line
Identification Presentation (CLIP) via FSK
and so it is advantageous to connect a
terminal that is able to display the CLI.
· Data Connection
Use an Ethernet cable to connect your
PC for initial setting. For WiFi
connection, enable this function in the
WEB setup of 2N® EasyRoute (see
Internet setup).
· Power Supply Connection
2N® EasyRoute is 12V DC voltage
powered. Connect the attached power
adapter (12V/2A DC) to the power
supply connector.
Do not activate the power supply until the antenna is connected to 2N®
EasyRoute to avoid the UMTS/GSM module damage.
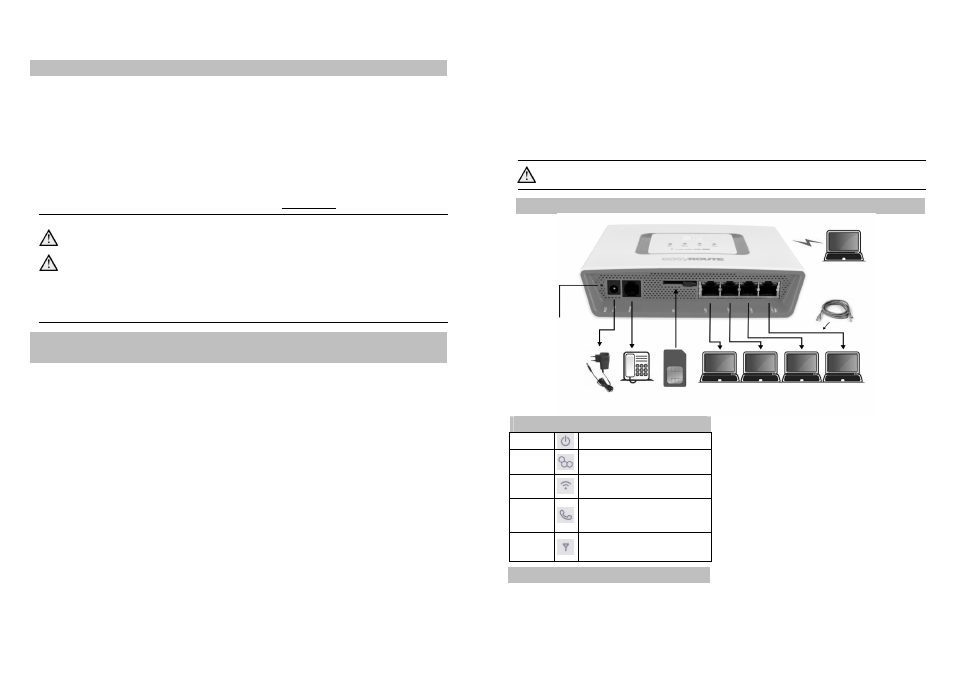
2N® EasyRoute Connection Layout
Outgoing Call
1. Suppose that the SIM card has been
inserted, the PIN entered or not
requested
and
2N®
EasyRoute
registered to a UMTS/GSM network
(yellow flashing).
2. Hook off the telephone; you can hear
the dialtone and the phone line LED
starts flashing.
3. Dial the subscriber number. 2N®
EasyRoute supports tone and/or pulse
dialling. When you make a dialling
delay longer than 5s (programmable),
the connection is established.
4. If the called subscriber is available, you
can hear the ringing tone. If not, you
can hear the busy tone or some of the
provider’s messages.
5. When the called subscriber answers the
call, the call is established. The phone
line LED is permanently on during the
call.
6. Hang up to terminate the call. The
phone line LED goes off. If the called
subscriber is the first to hang up, you
can hear the busy tone.
Indication LEDs
Power
supply
Blued led – power on
GSM
UMTS
Yellow flashes – network active
Length of flash – traffic indication
WiFi
Green flashes – network active
Length of flash – traffic indication
Phone
line
No light – standby
Yellow flashes quickly – ringing
– line off-hook
Yellow light – call
Signal
strength
Blued led – 1 – min signal strength
4 – max signal strength
Power adapter
IN: 110V/240V AC
OUT: 12V/2A DC
UTP cable
(Ethernet)
WiFi connection
for PCs or other
mobile devices
Wired connection for 4 PCs or Laptops (Ethernet)
Analogue
phone
SIM
RESET
button