Figure 9, Figure 10, Figure 8 – DuraVent Combustion Air Systems for PelletVent Pro User Manual
Page 9
9
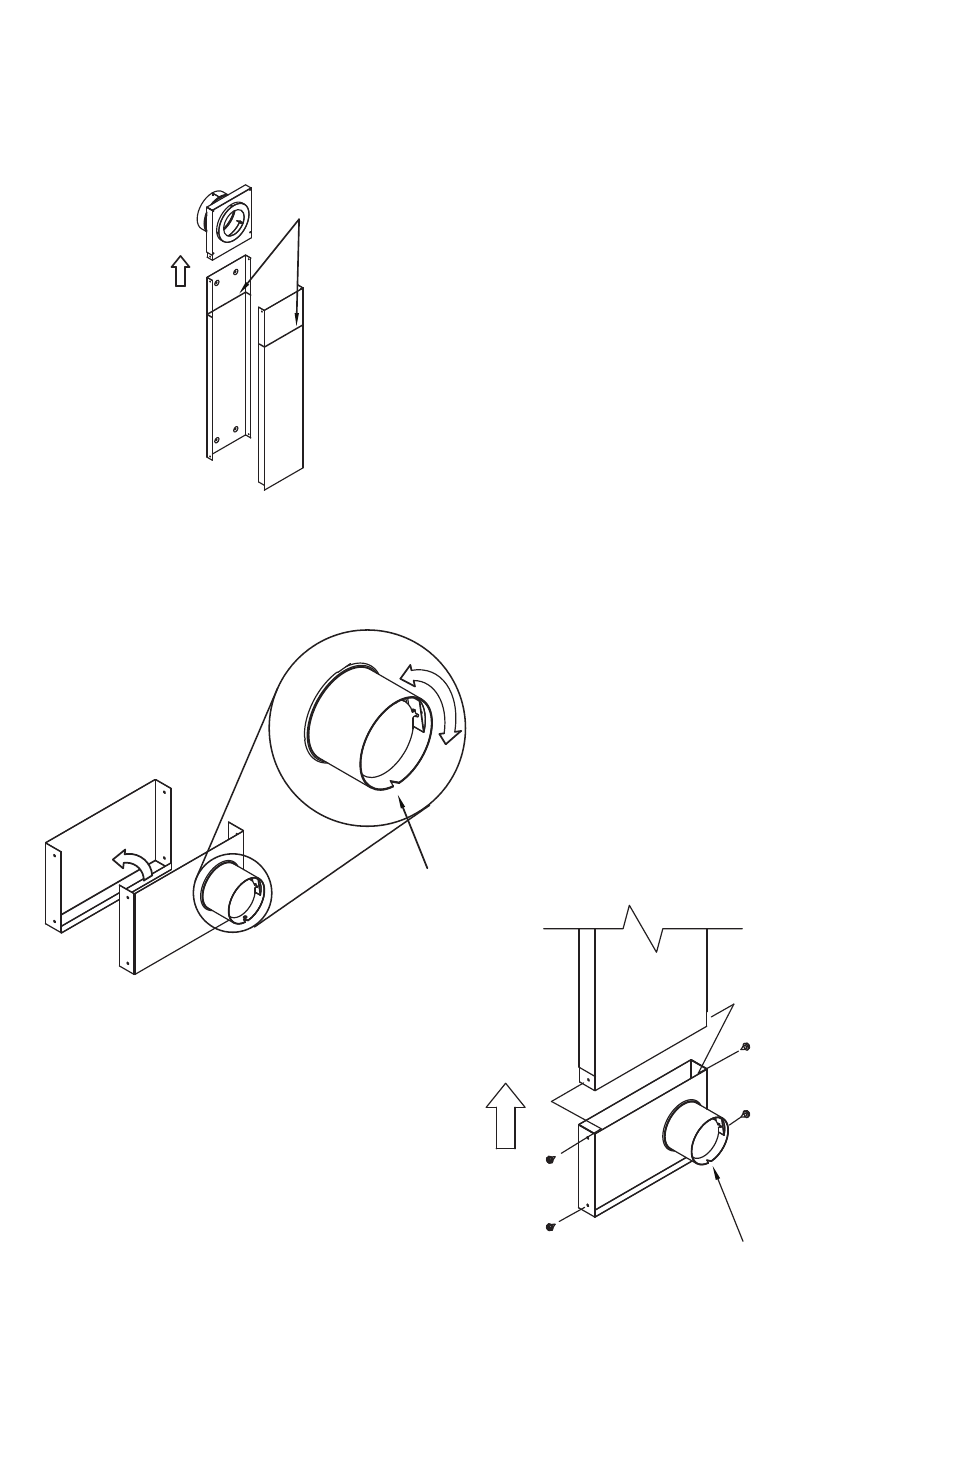
be pre-drilled in order to use the (2) 3/8” black
screws needed to secure Wall Channel to Wall
thimble.
Step 5. Install Channel tee. the Channel tee
is installed into the bottom of the Wall thimble
or the Adjustable Wall Channel, depending
on your installation. the Channel tee is in
two parts, the front faceplate with branch and
the back portion (Fig 9). the front portion is
the faceplate of the Channel tee and has the
branch and damper that allows the air to flow
from the thimble to the flex. the back portion
fits against the wall and holds the front portion
securely in place. the branch can be switched
to the left or right side depending on which
side of your appliance the air-inlet is located.
Figure 9
Figure 8
Figure 10
Figure 9
IMPORTANT: YOU MUST
ROTATE BRANCH SO
"V"-NOTCH IS AT BOTTOM
(6 O'CLOCK POSITION) TO
HAVE PROPER AIR FLOW.
CHANNEL TEE, FRONT
FACEPLATE WITH BRANCH.
FACEPLATE FITS INSIDE
BACK PORTION.
CHANNEL TEE,
BACK PORTION
FACEPLATE CAN BE
POSITIONED WITH BRANCH
ON LEFT OR RIGHT SIDE.
Figure 8
IF SHORT SECTION OF
WALL CHANNEL IS
NEEDED, USE LOWER
PORTIONS AND CUT
ALONG TOP EDGE FOR
DESIRED LENGTH.
WALL CHANNEL,
LOWER FRONT
PORTION. NOTE
EXTENDED EDGE
FACES DOWN.
REDRILL HOLES
TO SECURE WALL
CHANNEL..
WALL CHANNEL,
LOWER BACK
PORTION. SECURE
TO WALL USING
(2) 1-1/2" WOOD
SCREWS THROUGH
BOTTOM DIMPLES.
Figure 10
IMPORTANT: MAKE SURE
"V"-NOTCH FACES DOWNWARD
FOR PROPER AIR FLOW.
SECURE CHANNEL
TEE TO WALL
CHANNEL WITH (2)
3/8" SCREWS.
SECURE BACK
PORTION AND FRONT
FACEPLATE
TOGETHER WITH (2)
3/8" SCREWS.
If SHOrt SeCtIOn Of
WAll CHAnnel IS neeDeD,
USe lOWer POrtIOnS
AnD CUt AlOnG tOP eDGe
fOr DeSIreD lenGtH.
IMPORTANT: yOU
mUSt rOtAte
BrAnCH SO "V"
nOtCH IS At
BOttOm (6 O'ClOCK
POSItIOn) tO HAVe
PrOPer AIr flOW.
CHAnnel tee,
BACK POrtIOn
fACePlAte CAn
Be POSItIOneD
WItH BrAnCH On
left Or rIGHt
SIDe.
CHAnnel tee,
frOnt fACePlAte
WItH BrAnCH
fACePlAte fItS
InSIDe BACK
POrtIOn.
WAll CHAnnel,
lOWer BACK POrtIOn.
SeCUre tO WAll
USInG (2) 1-1/2" WOOD
SCreWS tHrOUGH
BOttOm DImPleS.
SeCUre CHAnnel tee
tO WAll CHAnnel WItH
(2) 3/8" SCreWS.
SeCUre BACK POrtIOn
AnD frOnt fACePlAte
tOGetHer WItH (2) 3/8"
SCreWS.
IMPORTANT: mAKe SUre "V"
nOtCH fACeS DOWnWArD
fOr PrOPer AIr flOW.
WAll CHAnnel,
lOWer frOnt
POrtIOn. nOte:
eXtenDeD eDGe
fACeS DOWn. reDrIll
HOleS tO SeCUre
WAll CHAnnel.