Parts and controls, Main unit – Aiwa XR-EC10 User Manual
Page 5
5
En
PARTS AND CONTROLS
Main unit
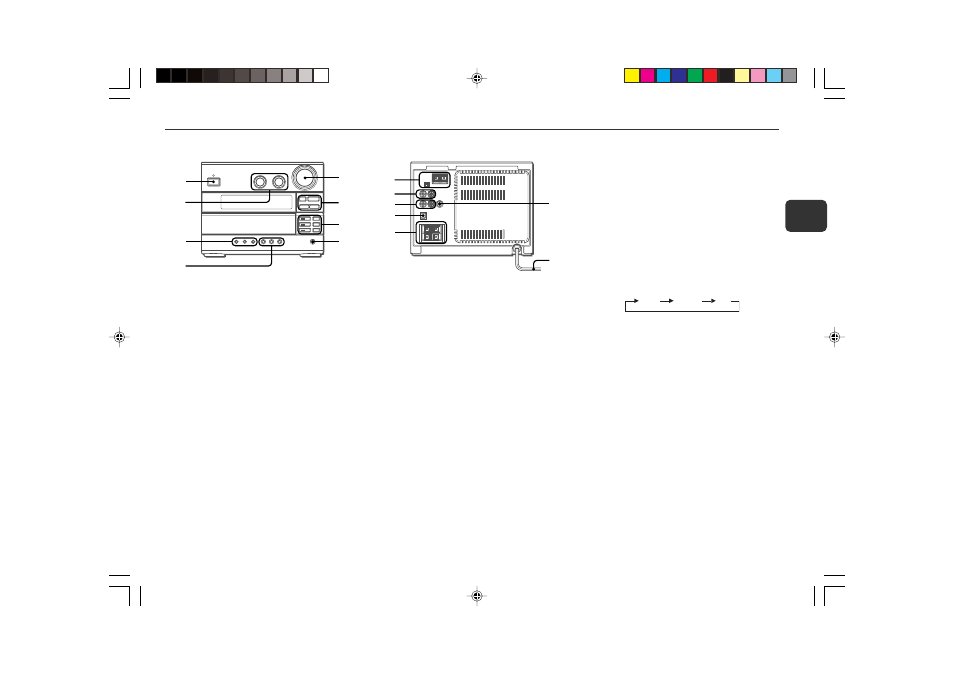
1
4
5
6
8
3
2
7
5
VOLUME
Adjusts the volume.
6 s
CLEAR
CD: stops playback.
Radio: clears a preset station.
CD
E
Starts and pauses play.
f
/
r
,
t
/
g
(TUNING DOWN, UP)
CD: skips to a previous or a succeeding track when
pressed, searches a track in fast forward or reverse
playback when held down.
Radio: manually tunes up or down within the band.
7 z
OPEN/CLOSE
Opens or closes the disc tray CD1, CD2 and CD3.
DISC DIRECT PLAY
Plays a single disc when pressed one of the buttons
(CD1/CD2/CD3).
8
PHONES jack
Plug in optional headphones set with a stereo mini plug
(ø3.5 mm). Speaker output is canceled.
1
POWER
6
STANDBY/ON
Switches the unit on and off (standby).
2
BASS, TREBLE
Adjusts the bass or treble level.
3
DISPLAY
Changes the display in CD playback mode.
ECO/DIMMER
Selects ECO mode and dimmer mode.
SET
Determines the mode.
Stores the received station to preset.
4
PRESET
Tune in a preset station.
TUNER/BAND
Selects Radio function and the radio band.
AUX
Selects the function of external equipment connected to
LINE IN jacks.
%
$
@
9
#
0
!
9
AM LOOP jack and FM 75
Ω
terminal
Plug in the supplied AM and FM antennas.
0
LINE IN jacks
Accept analog sound signals from external equipment.
Connect external equipment using an optional connecting
cable with RCA phono plugs (red plug to R jack, white
plug to L jack). Refer also to the operating instructions
for your equipment.
To switch function to external input, press AUX.
To change a source name in the display of the
AUX function
Hold down AUX and press POWER while the power is
on.
AUX
VIDEO
TV
!
LINE OUT jacks
Analog sound signals for all functions can be output
through these jacks. Use a cable with RCA phono plugs
to connect audio equipment.
Signals input through the LINE IN jacks are not output
from the LINE OUT jacks.
@
DIGITAL OUT (OPTICAL) jack
CD digital sound signals can be output through this jack.
Use an optical cable to connect digital audio equipment.
Remove the dust cap from the DIGITAL OUT (OPTICAL)
jack. Then connect an optical cable plug to the DIGITAL
OUT (OPTICAL) jack.
#
SPEAKERS
3
terminals
Connect the supplied speaker cords.
$
SUB WOOFER
3
jack
Connect an optional sub woofer with a built-in amplifier
to the jack.
%
AC power cord
01_04_09_XREC10_UC_En
02.3.15, 7:05 PM
5