Martin Universal Design U-145N Avanti Master Studio Art Easel User Manual
Page 2
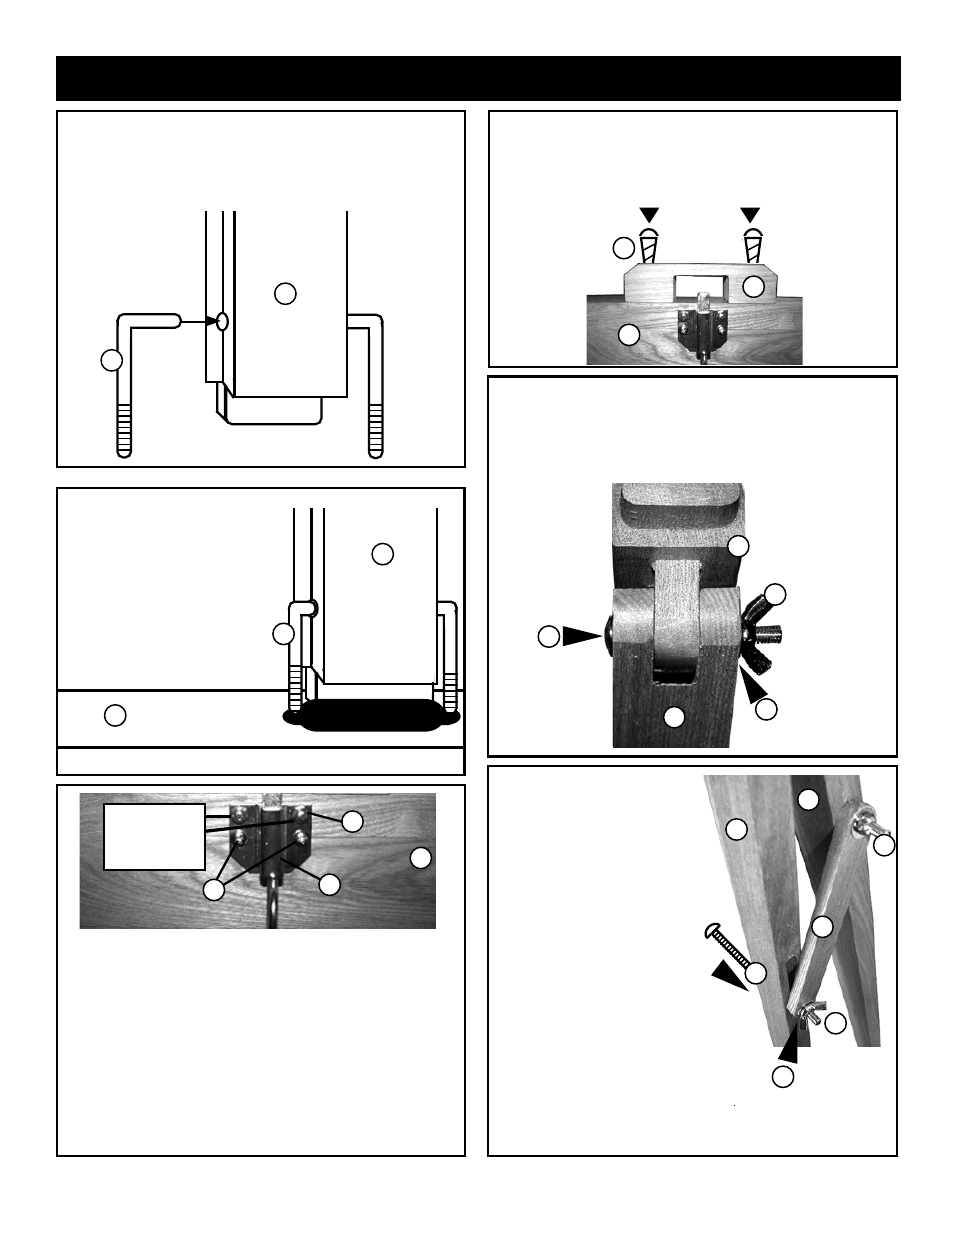
STEP 2. Then proceed to
insert the long ends of the “L”
brackets [M] down into the oval
hole lining up the center mast
notch with the lower canvas
support oval hole.
SEE FIG 2.
FIG 2
Top edge of lower
canvas support
with oval hole
FIG 1
STEP 1. Attach lower canvas support [H] to center mast
column [A] using the 2 ea. “L” Bolt [M] provided.
First insert the shorter end of the “ L” Bolt into the holes on
the sides of the center mast column [A].
STEP 5. Attach Rear Spike Leg [C] to Metal/Wood
Ratchet Column [D] by lining up notch and joiner, continue
by inserting a 2-1/8” bolt [P] through all holes and secure
with Washer [S] and Wing Nut [R]. See FIG 5 below.
For recommended assembly lay all wood parts on flat surface with all holes facing up.
Page 2
STEP 3. Attach Metal Loop Mechanism [T] to bottom of
Lower canvas support [H] making sure the two threaded
ends of the “L” bolts [M] go through the top two holes of
the Loop Mechanism [S]. Secure by attaching the 2 ea.
Hex Nuts [N] to the threaded ends of the “L” Brackets.
Tighten the Hex Nuts [N] by using the flat wrench
supplied. Secure by screwing in 2 ea. Small screws [U]
into lower holes below Hex Nuts. See FIG 3 illustration
for location.
FIG 3
STEP 4. Attach “U” bracket [K] to rear of lower canvas
support [H] by using 2 ea. Long screws [V]. Secure
using screwdriver provided. See FIG. 4
T
N
Top holes for
threaded ends
of “L” bolts
and hex nuts.
H
A
M
M
A
H
U
H
K
V
D
C
R
P
S
FIG 5
STEP 6. Attach 2 ea. Wood
Brackets [J] to Ratchet/Center
Column assembly by inserting
a 3” bolt [Q] through one hole
of wood bracket and continue
by inserting bolt through
Ratchet Column and Rear
Spike Leg. Continue through
other side while attaching
another wood bracket. Secure
with Washer [S] and Wing Nut
[R].
PLEASE NOTE: Bolt is to go
through slot on Center
Column. Repeat with other 3”
bolt for remaining hole.
FIG 6
J
D
C
Q
S
R
R
NOTE: These Wing Nuts will be used
for the tilt adjustment of the easel
once assembled by loosening and
then re-tightening at desired angle.