Model number: 1210 – Decolav 1210 User Manual
Page 4
MODEL NUMBER: 1210
4
INSTALLATION INSTRUCTIONS
Customer Service: 561-274-2110
www.decolav.com
LET YOUR DREAMS COME ALIVE, YOUR PASSIONS BECOME
REALITY, BE THE ENVY OF YOUR NEIGHBORS
®
Apply plumber’s putty
or caulking here
Lavatory
Countertop
Mounting Clip Detail
Mounting
Clip
Threaded Knurl
Machine Screw
Washer
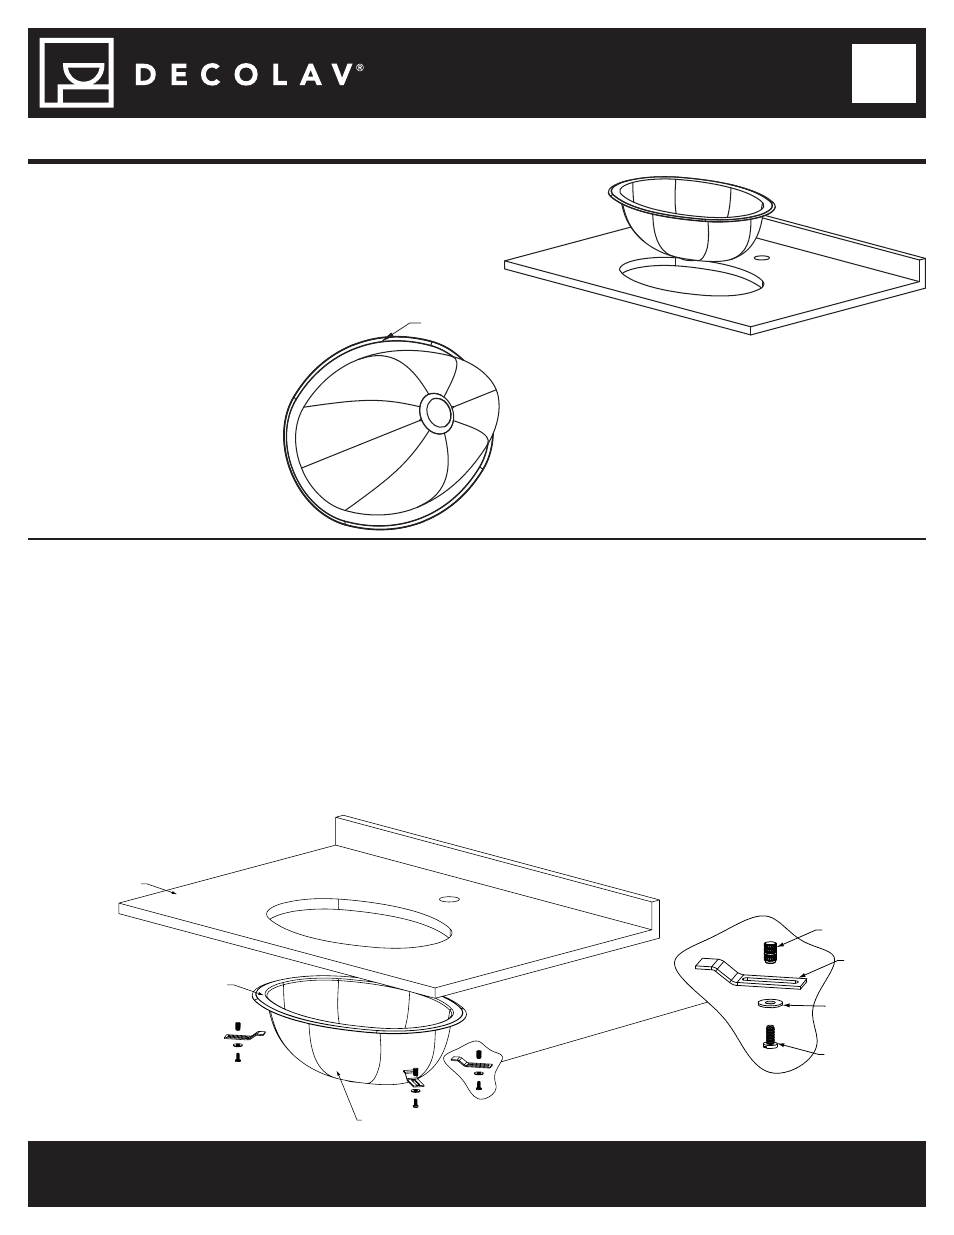
Figure #2
• STEP #4 (Undermount)
o Refer to Figure #2, Mounting Clips Detail [Installation for solid surface countertops with a minimum
thickness of 1" (25mm). Installer must supply anchors for thinner countertops.]
o For solid surface, drill anchors hole 3/8" dia. x 1/2" deep. Apply small amount of Epoxy (not
provided) to closed end of Threaded Knurl (C). Insert threaded knurl (threaded open end exposed).
o Apply Plumber’s Putty or Caulking around the topside of rim near the edge as shown.
o Carefully raise Lavatory in place, align, and press fi rmly.
o Wipe off excess sealant.
o Attach Undermount Clips (B) to hold Lavatory in place.
o
NOTE: FOR WOOD COUNTERTOPS USE WOOD SCREWS AND ANCHORS, WOOD SCREWS NOT
PROVIDED.
o
N
OTE: ALLOW SEALANT TO SET BEFORE PROCEEDING!
Apply Plumber’s Putty
or Caulking Here
• STEP #3 (Drop-In)
o Apply Plumber’s Putty or Caulking around the
underside of rim near the edge as shown.
o Carefully lower Lavatory in place, align,
and press fi rmly.
o Wipe off excess sealant.
o Refer to Figure #1.
o Proceed to Step #5.
o NOTE: ALLOW
SEALANT TO
SET BEFORE
PROCEEDING!
Figure #1