Page 3, Ada handrail installation guidelines for – AZEK ADA Handrail User Manual
Page 3
ADA HANDRAIL INSTALLATION GUIDELINES for
AZEK Premier
AZEK Trademark
AZEK Reserve
Page 3
© 2013 AZEK Building Products. All rights reserved
AZEK Premier AZEK
AZEK Reserve
Trademark
ADA COMPLIANT RAILING SYSTEM for
© 2012 All rights reserved. AZEK Building Products, Inc.
www.AZEK.com
Page 3
Cut the rail and post returns at desired location.
1. For level installation, refer to Straight Joiner”,
for angled installation refer to Adjustable Joiner”.
2. Install bracket as described in Hand Rail
Bracket” instructions.
3. Refer to Straight Wall Return” to attach end
of post return to post face.
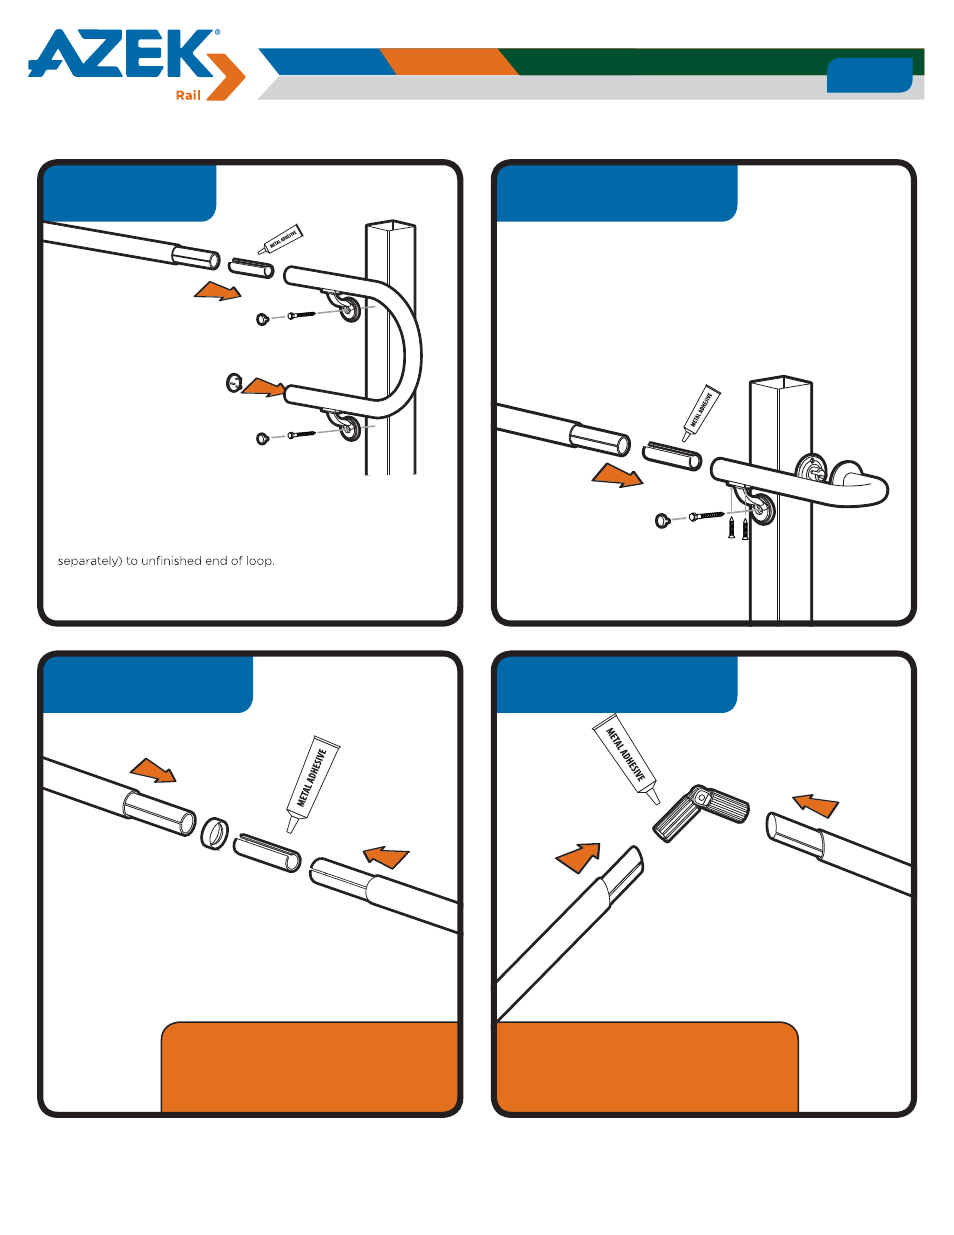
Cut the aluminum and PVC tube to proper length.
1. Apply adhesive to all metal contact surfaces.
2. Optional: Position joint ring between rail sections.
3. Slide joiner into both aluminum rail supports until
the joint is tight.
1. Cut the aluminum and PVC tube to proper
length at desired angle.
2. Apply adhesive to all metal contact surfaces
3. Slide rails together until the joint is tight.
A PVC adhesive may be used to ensure
a tight seem on the exterior tube.
Ensure adhesive cures per adhesive
manufacturers instructions.
A PVC adhesive may be used to ensure
a tight seem on the exterior tube.
Ensure adhesive cures per adhesive
manufacturers instructions.
1.
1.
1.
2.
2.
2.
3.
3.
3.
3.
3.
Straight Joiner
Adjustable Joiner
180° Post Return
End Loop
Cut the rail and loop at
desired location.
1. For level installation, refer
to Straight Joiner”, for
angled installation refer to
Adjustable Joiner”.
2. Install top bracket as described in Hand Rail Bracket”.
3. Repeat for the bottom bracket.
4. Using PVC adhesive, attach hand rail end cap (sold
1.
2.
3.
4.