Setting the date/time, Updating the oven menu, The info mode – TurboChef Technologies i3 EN User Manual
Page 24: Figure 28: loading...finished, Figure 27: load menu screen, Figure 26: inserting smart card/usb device, Figure 25: set date/time, Smart card usb port smart card reader slot
16
Setting the Date/Time
Having an accurate date and time is important for
logging oven counts, diagnostics, and fault conditions,
should any occur. The oven time and date are set at
the time of manufacture; however, the operator may
at some point be required to make an adjustment.
From screen 2 of the info mode (Figure 21), press
the L4 soft key to access the “Set Date/Time” screen
(Figure 25).
To set the date and time,
1. use the L3 and r3 soft keys (middle left and
middle right) to navigate between fields.
2. use the number keypad to enter the month, day,
and year, followed by the hour and minute.
NoTE: The clock is 24-hour (20:30=8:30 p.m.).
3. Select “Save” to save your changes or “Cancel”
to exit the screen.
NoTE: The oven will not retain the time if it is left
unplugged for two or more weeks.
Updating the Oven Menu
From screen 2 of the info mode (Figure 21, page
14), press the r1 soft key to access the “Load Menu”
screen (Figure 27).
NoTE: This feature can be turned on or off via the
“options” screen (Figure 24).
To load a menu to the oven from a
smart card
,
1. Insert the smart card (Figure 26).
2. Press the L1 soft key (Figure 27).
3. Verify the oven beeps and reads “FINISHED”
(Figure 28).
To load a menu from a
uSb drive
,
1. Verify the menu on the uSb drive is named
MENu.bIN.
2. Verify the menu on the uSb drive is in a folder
named TC_MENuS. This folder must not be a
sub-folder of any other folder.
3. Insert the uSb drive (Figure 26).
4. Press the L4 soft key (Figure 27).
5. Verify the oven beeps and reads “FINISHED.”
BACK
STOP
ENTER
1
2
A B C
3
D E F
4
G H I
5
J K L
6
M N O
BACK
STOP
ENTER
7
P Q R S
8
T U V
9
W X Y Z
0
Press to return to “Shutting Down”
10
SAVE TO CARD
LOAD FROM CARD ++++++++FINISHED
Press to return to Info 2 screen
SAVE TO USB
LOAD FROM USB
Figure 28: Loading...Finished
BACK
STOP
ENTER
1
2
A B C
3
D E F
4
G H I
5
J K L
6
M N O
BACK
STOP
ENTER
7
P Q R S
8
T U V
9
W X Y Z
0
Press to return to “Shutting Down”
10
SAVE TO CARD
LOAD FROM CARD
Press to return to Info 2 screen
SAVE TO USB
LOAD FROM USB
Figure 27: Load Menu Screen
R1
R2
R3
R4
R5
L1
L2
L3
L4
L5
R1
R2
R3
R4
R5
L1
L2
L3
L4
L5
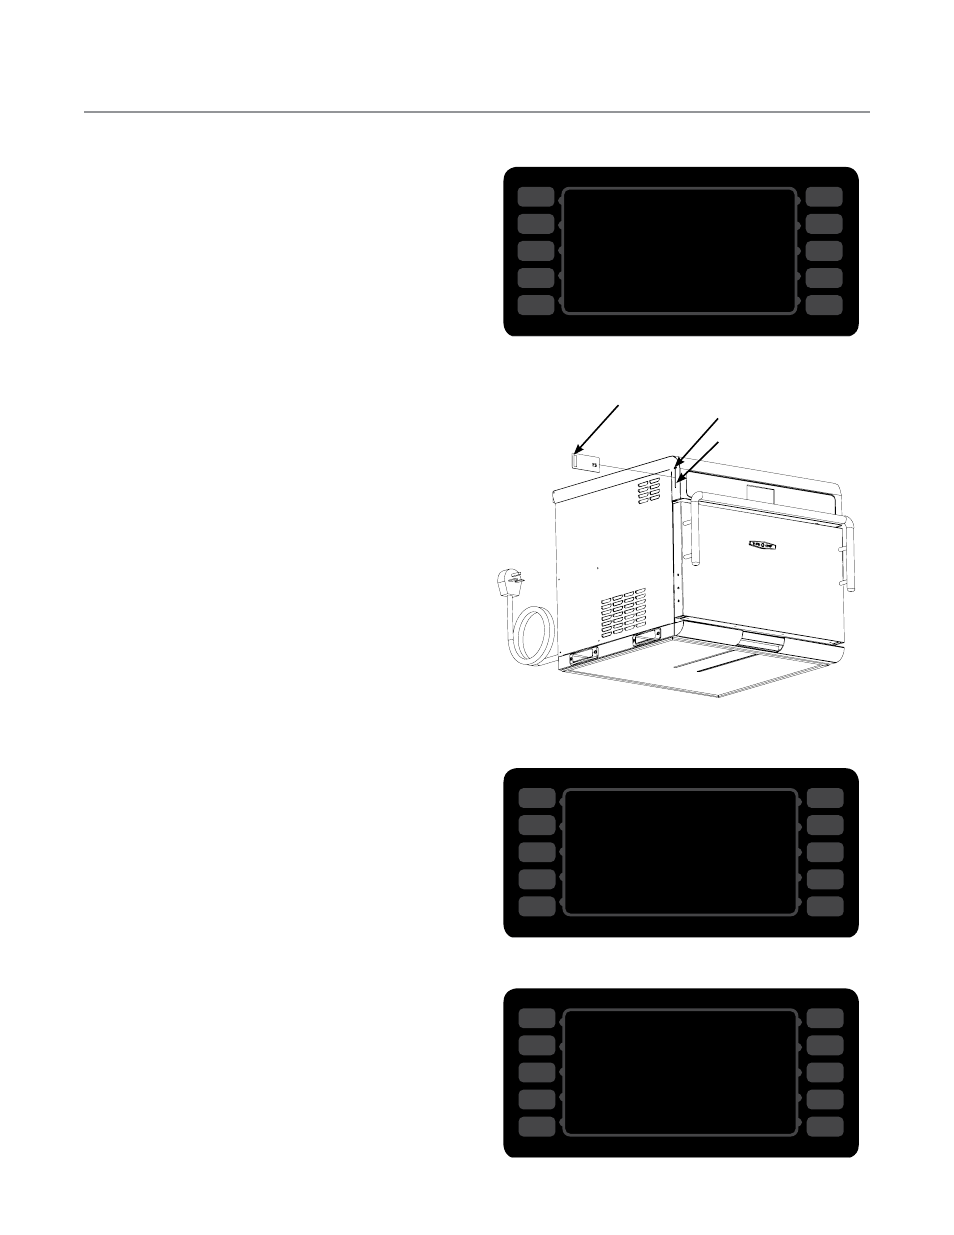
Figure 26: Inserting Smart Card/USB Device
Smart Card
USB Port
Smart Card Reader Slot
THE INFO MODE
_
BACK
STOP
ENTER
1
2
A B C
3
D E F
4
G H I
5
J K L
6
M N O
BACK
STOP
ENTER
7
P Q R S
8
T U V
9
W X Y Z
0
SET DATE/TIME
Press to return to “Shutting Down”
Press to return to previous screen
8
Press to confirm change
Press to enter number
0 9 / 2 9 / 0 8 2 0 : 3 0
Press to return to previous field (hours/minutes/AMPM)
Press to advance to next field (hours/minutes/AMPM)
MM / DD / YY HH:MM
CANCEL
SAVE
<
>
Figure 25: Set Date/Time
R1
R2
R3
R4
R5
L1
L2
L3
L4
L5