Sanitizing the system and lines – A.J. Antunes & Co TAC-02 9700906 User Manual
Page 2
TAC-02 SySTem (P/N 9700906)
1-877-392-7854 Fax: 630-784-1000
Page 2 of 2
P/N 1011030 Rev. A 03/12
iNLeT WATeR PLumBiNG
The plumbing leading to the TAC System must be flushed clear
of all debris before connecting to the inlet connection of a water
system. Hold a bucket at the inlet water line and slowly open
the inlet water valve. Allow the pipe to flush until all debris is
removed.
mouNTiNG THe SySTem
Before mounting the TAC System, please consider the items
listed below:
• The Housing must be mounted with sufficient access for
element replacement. The Housing is 24 inches tall. An
additional 2 inches should be allowed below the bowl to
allow proper access when changing elements.
• The kit must be mounted with hardware capable of support-
ing 10 lbs or more of weight.
• The mounting bracket supplied with the system must be
mounted in the UP position (See Figure 2). The bracket
comes with short screws for attaching to the head and long
screws for attaching the bracket to the wall.
NoTe: only the short screws should be used for mounting
the Head to the Bracket.
• The Head can be mounted with the inlet on the left or on
the right. When the inlet is on the left, the red pressure
relief button is on the left. Refer to Figure 2 for help in locat-
ing the Inlet and Outlet ports.
• The TAC System must be installed upstream of all equip-
ment using hot water.
• The inlet water should only be connected to the “INLET”
port on the Head. The filtered water should only be con-
nected to the “OUTLET” port on the Head. See Figure 2.
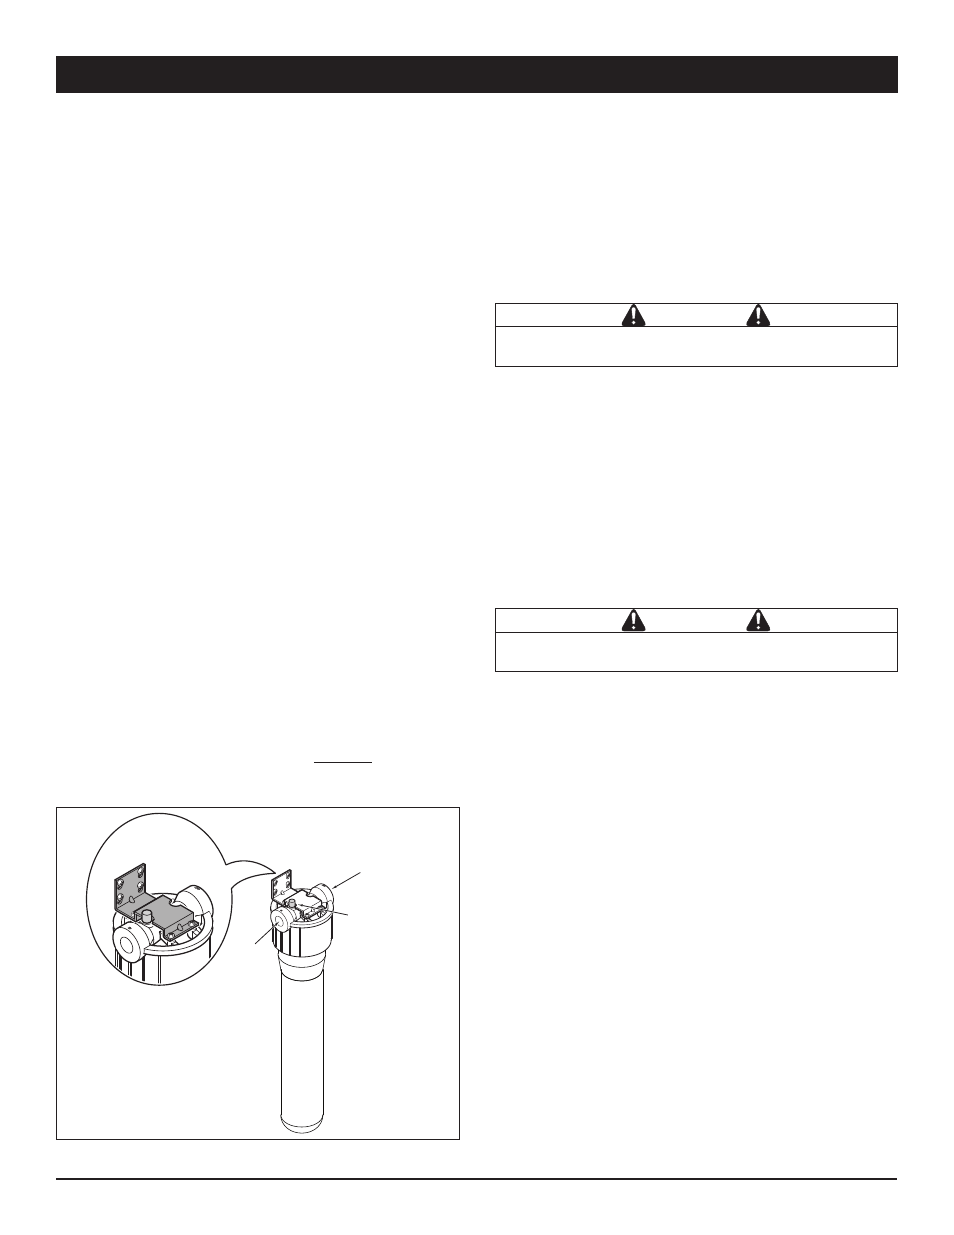
Attach the mounting bracket to the Head
BeFoRe attaching to
the wall.
ATTACHiNG To THe iNLeT
Both the Inlet and Outlet connections have a 3/4” NPT female
thread. Be careful not to overtighten a fitting into the Head.
Plastic fittings are recommended for connecting to the Head.
Use a pipe thread sealant approved for use in drinking water
applications with plastic fittings.
Sanitizing the System and Lines
INLET
OUTLET
Red Pressure
Relief button
Attach Bracket to
Wall in this position
Figure 2. mounting Bracket (up Position oNLy)
CAuTioN
Do NoT connect the inlet water to the outlet port on the
head.
The plumbing must be sanitized to eliminate possible contami-
nation that may have occurred during the installation process.
Liquid chlorine bleach (regular bleach, unscented 6% sodium
hypochlorite) can be used to sanitize the plumbing. The amount
of bleach to use depends on the system installed and the
amount of plumbing downstream of the TAC System. Generally
10 drops (one-half ml) of bleach is sufficient to sanitize the bowl
and associated plumbing.
NoTe: When sanitizing the TAC System, make sure the TAC
cartridge is not installed or is removed from the housing
before sanitizing.
CAuTioN
make sure the follow any handling or safety instructions
supplied with the bleach.
1. Direct the water line from the outlet of the Head to a
drain.
2. Unscrew the Housing counter clockwise to remove the
Housing from the Head.
3. Pour the liquid chlorine bleach into the bowl.
4. Screw the Housing (containing the bleach) into the Head.
Tighten the bowl until it stops. The Housing will come to a
hard stop at the end of the thread. Use the filter wrench if
necessary. Do not overtighten the housing.
5. Slowly turn on the water supply and pressurize the sys-
tem. Allow water to flow out of the Housing until the odor
of bleach is present.
6. Turn off the water supply and let the system stand without
water flow for at least 15 minutes to allow the bleach to
sanitize the pipes.
7. After 15 minutes without water flow, turn on the water
supply and flush until the presence of bleach is gone.
8. Shut off the water supply and depressurize the system.
NoTe: Refer to document 1011029, provided with this
system, for instructions on replacing and rinsing the TAC
Cartridge.
A. J. ANTuNeS & Co. www.ajantunes.com 180 Kehoe Blvd., Carol Stream, Illinois 60188