Installing or replacing the tac cartridge, Maintaining the system – A.J. Antunes & Co TAC-05 9700905 User Manual
Page 3
A. J. ANTuNeS & Co. www.ajantunes.com 180 Kehoe Blvd., Carol Stream, Illinois 60188
TAC-05 SySTem (P/N 9700905)
1-877-392-7836 Fax: 630-784-1000
Page 3 of 4
P/N 1010462 Rev. E 03/12
1-800-253-2991
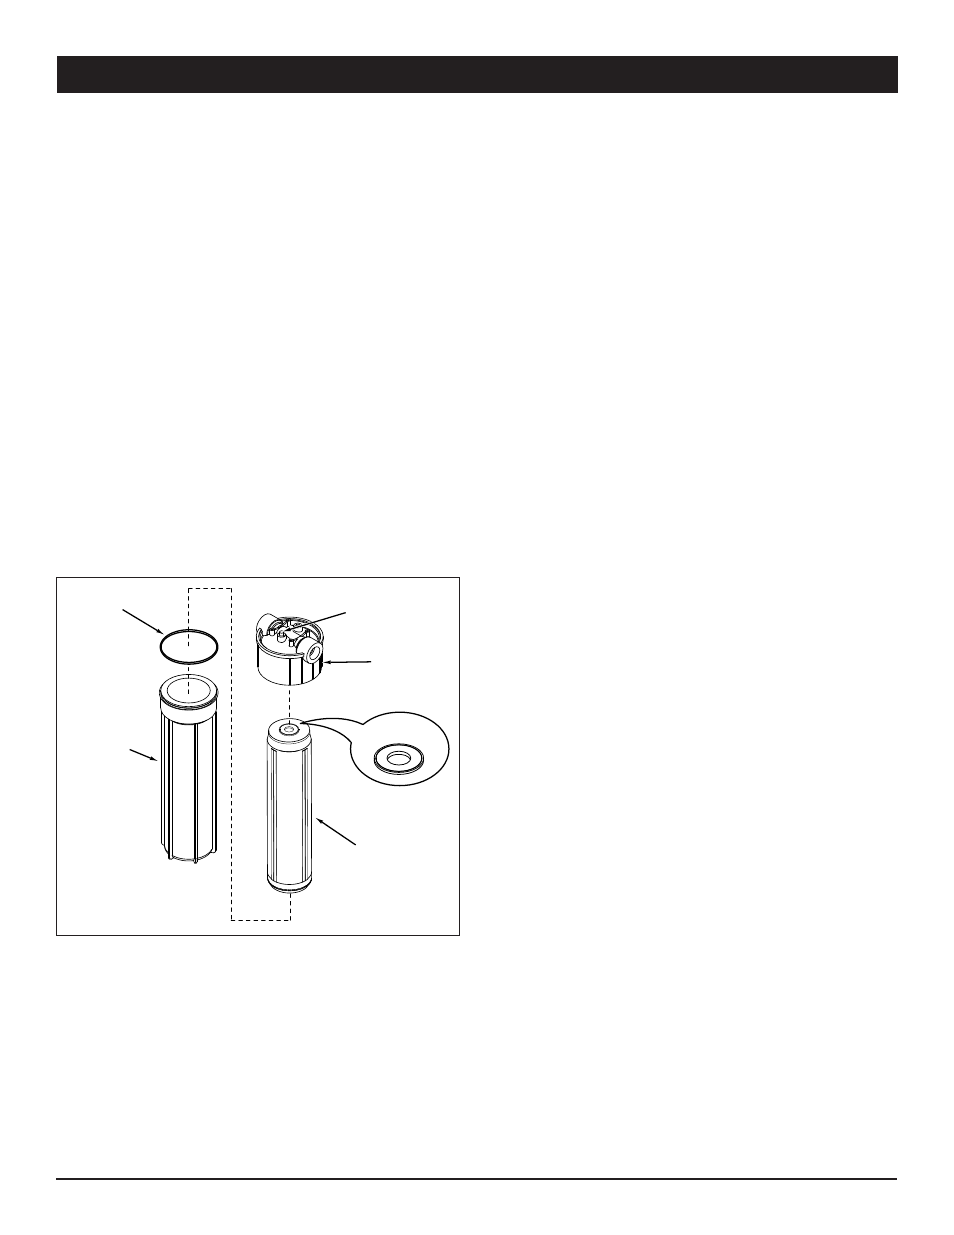
installing or Replacing the TAC Cartridge
NoTe: Remove the plastic wrap from the TAC Cartridge before use.
make sure the end seal gasket is in place on the end of the TAC
Cartridge and not retained in the packaging.
1. Unscrew the TAC Cartridge Housing counter clockwise to remove
the housing from the TAC Housing Head.
2. Inspect the O-ring on the TAC Housing and replace if it is
cracked, twisted, or missing.
3. The O-ring is pre-lubricated at the factory. However, it can be
lubrcated with an approved food grade lubricant if needed. Install
the O-ring onto the TAC Housing.
4. Unwrap the new TAC Cartridge and place it into the TAC
Housing.
NoTe: make sure the end seal gasket is retained on the end of the
TAC Cartridge in the recessed groove. Be careful that the gasket
does NoT fall off when placing the TAC Cartridge into the housing.
5. Screw the TAC Housing containing the new TAC Cartridge into
the TAC Housing Head. Tighten the housing until it stops. The
housing will come to a hard stop at the end of the thread. Use
the Filter Wrench if necessary.
NoTe: Do NoT overtighten the TAC Housing Head.
maintaining the System
RiNSiNG THe TAC CARTRiDGe
The newly installed TAC Cartridge must be rinsed before returning the
system to operation.
NoTe: Direct the system outlet to a drain during this process. Do
NoT use the water resulting from rinsing process.
1. Direct water from the outlet to a drain.
2. Turn on the water to the system. Allow water to flow through
the TAC Cartridge and TAC Housing for 5 minutes to flush out
trapped air.
3. To help remove trapped air from the TAC housing, press and
hold the Red Pressure Relief Button on the top of the housing
until water just begins to come out then release the button. See
Figures 2 and 3.
ReTuRNiNG SySTem To oPeRATioN
After making the connection to the outlet of the system, open a faucet
or tap downstream to the system. Allow the pipe to flush to remove any
debris. The system is now ready for use.
FRequeNCy oF CARTRiDGe RePLACemeNT
The TAC Cartridge should be replaced once a year to allow for continual
scale reduction on equipment using hot water.
O-ring
TAC
Housing
TAC
Cartridge
(Single)
TAC
Housing
Head
Red Pressure
Relief Button
Gasket
Male Connector
Stem Adaptor
Figure 3. TAC System Components