Belső kijelző működési leírás – Nikon PROSTAFF User Manual
Page 95
188
189
Hu
Ro
Cz
Dk
No
Fi
Pl
Ru
Nl
Se
It
De
Hu
Ro
Cz
Dk
No
Fi
Pl
Ru
Nl
Se
It
De
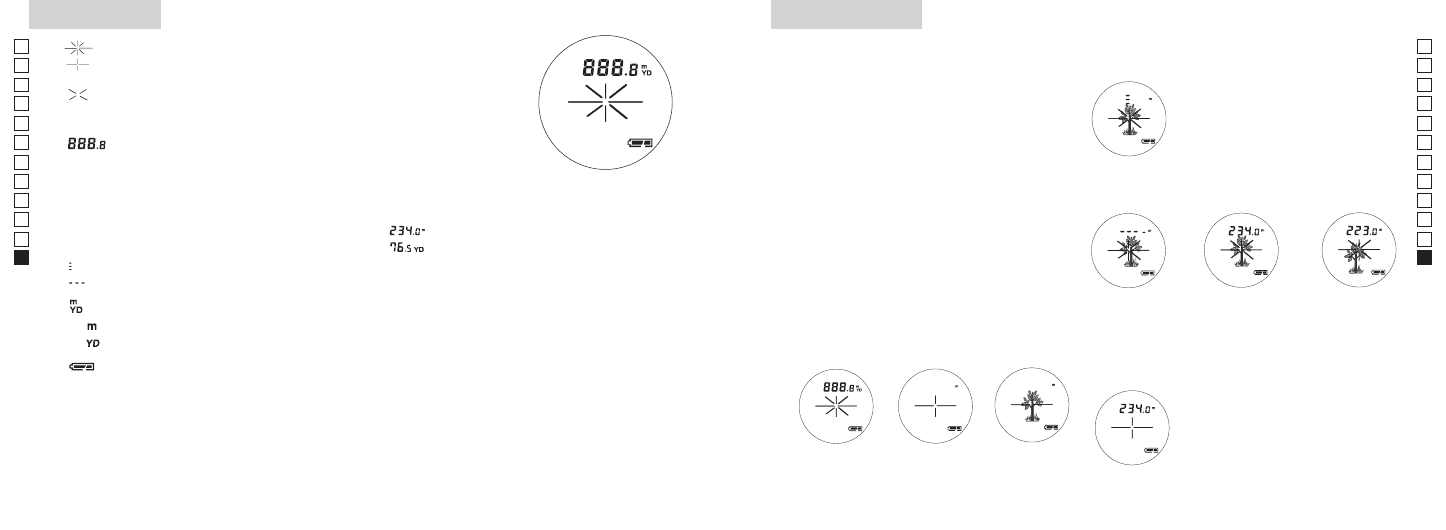
1. 『
』- Céltárgy jelzése/lézer kibocsátása
『
』- Irányítsa rá a gépet a céltárgyra. Állítsa be a célt a hajszálkereszt
közepére.
『
』- A lézeres mérés közben jelenik meg (Egyszeri mérésnél folyamatosan
látható, folyamatos mérés közben villog).
Figyelmeztetés: Ne nézzen bele a tárgylencsékbe, mikor ezt a jelet látja.
2.『
』: Távolság/mérési állapot kijelző
Digitálisan, méterben/yardban jelzi a mért távolságot. Hasonlóképpen kijelzi a
mérési állapotot is a következőképpen: "Mérés folyamatban", "Sikertelen mérés",
vagy "Nem lehet mérni"
(Távolság)
Eredmények kijelzése: ( ≧ 100 m/yard) pl. 234 méter = 『
』
Eredmények kijelzése: (<100 m/yard) pl. 76,5 yard = 『
』
『 』 - Mérés folyamatban
『
』 - Hibás a mérés vagy nem lehet távolságot mérni.
3. 『
』Kijelzett mértékegységek:
『
』A méterben mért távolságot mutatja.
『
』A yardban mért távolságot mutatja.
4. 『
』 Az elem állapotát jelzi. (lásd az "Elem cseréje" c. részt).
* Bár az LCD előállításához a legkorszerűbb technológiát alkalmazzuk, a port nem lehet teljes mértékben
eltávolítani. Egy LCD általában ugyanazt vagy a valamivel kisebb nagyítást mutatja, azonban ezen egység
LCD kijelzőjét erősen felnagyítja a szemlencse. Emiatt e termék használatakor hibaként por jelenhet meg. Ez
azonban nem befolyásolja a mérés pontosságát.
Belső kijelző
Működési leírás
Vigyázat – az itt meghatározottaktól eltérő
ellenőrzési, beállítási, kivitelezési eljárások
alkalmazása veszélyes sugárterhelést
eredményezhet.
1. Helyezzen be egy elemet az elemrekeszbe (lásd
az "Elem cseréje" c. részt).
2.
Dioptria beállítása
Állítsa be a dioptriát úgy, hogy tiszta képet kapjon
az LCD-n.
Először ütközésig forgassa el balra a dioptriabeállító
gyűrűt. Ezután nézzen bele a Nikon lézeres
távolságmérőbe, és az LCD bekapcsolásához
nyomja meg a főkapcsolót. Jobbra forgassa el a
dioptriabeállító gyűrűt, amíg a kijelző fókuszba nem
kerül.
Ha a dioptriát nem szabályozza be látásának
megfelelően, képtelen lesz a céltárgyat helyesen
fókuszba állítani.
3. Mérés
Mérés előtt győződjön meg az egység beállításáról.
Measurement
1. Press the POWER button for power-on.
(Power turns off 8 seconds after the last
operation.)
Immediately after power-on.
(Initializing)
Stand-by.
Target focusing.
2. Aim at the target
.
3. Press POWER button once to start
continuous measurement for 8 seconds.
(Single measurement mode is not
available with this laser rangefinder.)
Measuring.
4. For 8 seconds, the internal display shows “distance” and “fail to measure” indicator alternately.
(Laser irradiation mark is blinking.)
Failure to measure or
unable to measure distance.
Displays the measured
figure. (Target 1)
Displays the measured
figure. (Target 2)
5. After continuous measurement, the measured results are displayed for 8 seconds, then power
turns off.
If you press the POWER button during power-on (while the internal display is lit), another
8-second measurement starts.
1. Nyomja meg a POWER
gombot a bekapcsoláshoz.
2. Állítsa a keresőt a
céltárgyra.
Közvetlenül a
bekapcsolás után
(inicializálás)
Készenléti állapot. Céltárgy becélzása.
3. A mérés elindításához nyomja meg egyszer a POWER gombot.
A gombot lenyomva tartva akár kb. 8 másodperces folyamatos mérést
végezhet.
Mérés.
4. Mérés közben a belső kijelzőn a "távolság" és a "hibás mérés"
kijelzések váltakoznak (a lézersugárzás jelzése villog).
Hibás a mérés vagy
nem lehet távolságot
mérni.
Megjelenik a mért
alak. (1. céltárgy)
Megjelenik a mért
alak. (2. céltárgy)
Measurement
1. Press the POWER button for power-on.
(Power turns off 8 seconds after the last
operation.)
Immediately after power-on.
(Initializing)
Stand-by.
Target focusing.
2. Aim at the target
.
3. Press POWER button once to start
continuous measurement for 8 seconds.
(Single measurement mode is not
available with this laser rangefinder.)
Measuring.
4. For 8 seconds, the internal display shows “distance” and “fail to measure” indicator alternately.
(Laser irradiation mark is blinking.)
Failure to measure or
unable to measure distance.
Displays the measured
figure. (Target 1)
Displays the measured
figure. (Target 2)
5. After continuous measurement, the measured results are displayed for 8 seconds, then power
turns off.
If you press the POWER button during power-on (while the internal display is lit), another
8-second measurement starts.
5. Mérés után 8 másodpercre megjelennek a mért eredmények,
aztán a gép kikapcsol. Ha megnyomja a POWER gombot a
bekapcsolt állapotban (míg a belső kijelző aktív), egy másik
mérés indul el.