PerTronix JBA Exhaust 40-3028 User Manual
Installation instructions, Parts list
INSTALLATION INSTRUCTIONS
**Installation recommendation:
JBA recommends in most cases that the vehicle be taken to a reputable exhaust shop.
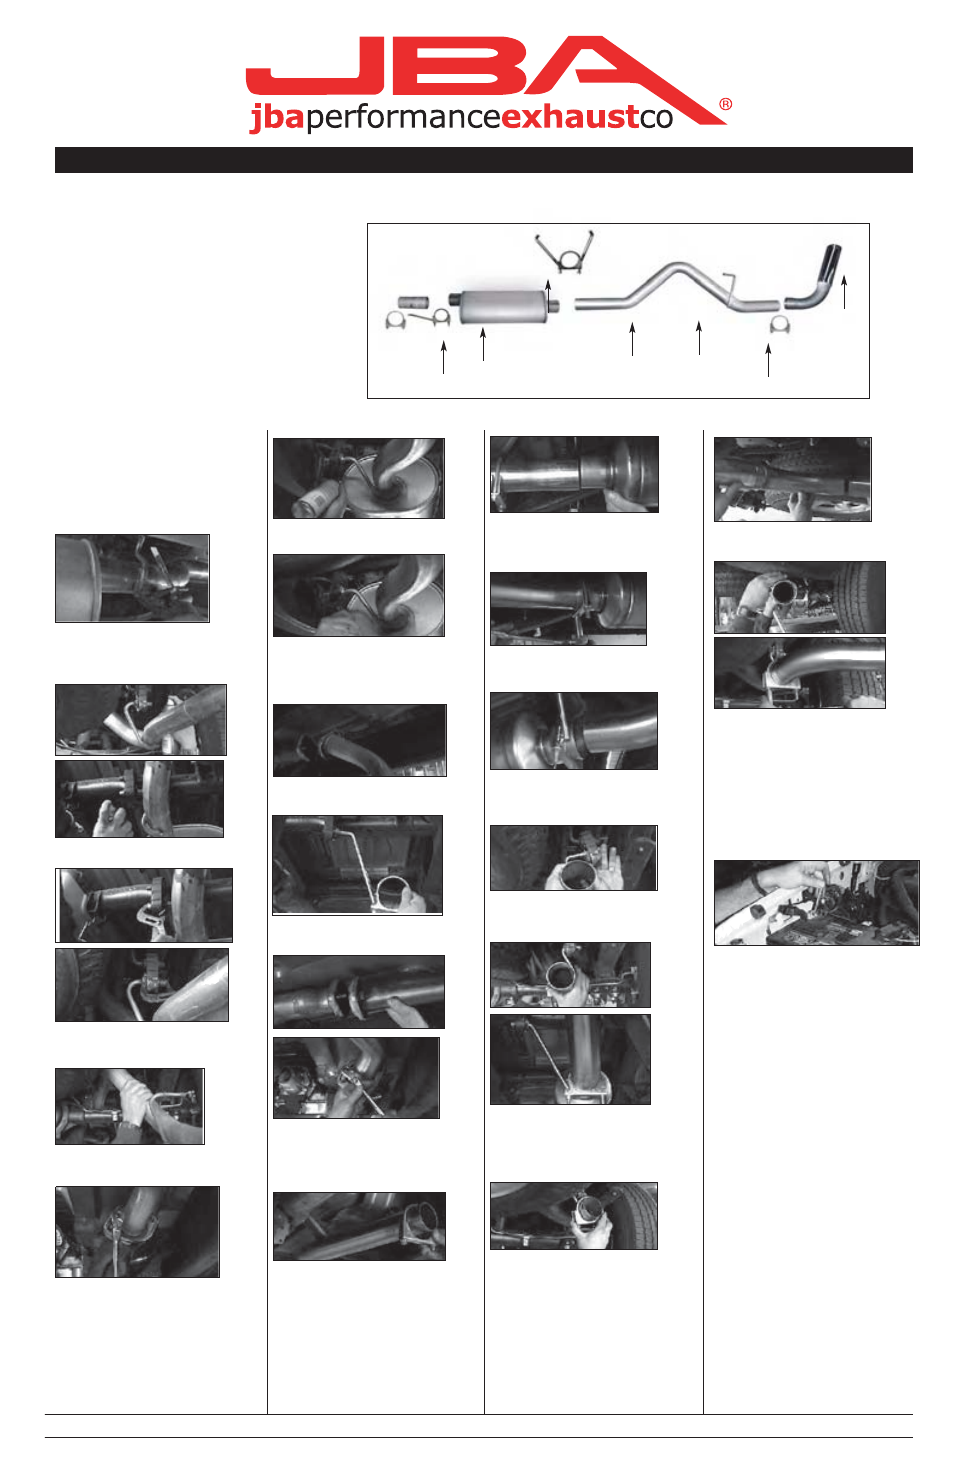
40-3028
96-00 Chevrolet Tahoe / GMC Yukon
4 Door, V-8 5.7L 2/4 wd
T
T
T
T OOLS RECOMMENDED:
Parts List
ratchet
A. Head pipe
1
9/16" deep socket
B. Muffler 24"
1
15mm deep socket
C. Tail pipe with
1
pair of channel lock pliers
D. Turn out with hanger
1
F
B
F
reciprocating saw or hack saw
E. Front muffler clamp/hanger 3"
1
A
C
rubber mallet
F...
3" clamp
2
D
E
spray lubricant or penetrating oil
anti-seize
prybar
T
T
T
T O
O
O
O ST
ST
ST
START
ART
ART
ART::::
2. Disconnect negative battery cable and
2. Disconnect negative battery cable and
2. Disconnect negative battery cable and
2. Disconnect negative battery cable and
allow vehicle exhaust to cool.
allow vehicle exhaust to cool.
allow vehicle exhaust to cool.
allow vehicle exhaust to cool.
1. Remove and inventory new Evolª
1. Remove and inventory new Evolª
1. Remove and inventory new Evolª
1. Remove and inventory new Evolª
exhaust.
exhaust.
exhaust.
exhaust.
8. S
8. S
8. S
8. Spray lubricant on front muf
pray lubricant on front muf
pray lubricant on front muf
pray lubricant on front muffler hanger
fler hanger
fler hanger
fler hanger
grommet.
grommet.
grommet.
grommet.
14. With the JBA logo to the rear of the
vehicle, slip muf
vehicle, slip muf
vehicle, slip muf
vehicle, slip muffler (B) on head pipe (A).
fler (B) on head pipe (A).
fler (B) on head pipe (A).
fler (B) on head pipe (A).
NO
NO
NO
NOTE:
TE:
TE:
TE:
Y
Y
Y
You may have to t
ou may have to t
ou may have to t
ou may have to tap it with a
ap it with a
ap it with a
ap it with a
rubber mallet.
rubber mallet.
rubber mallet.
rubber mallet.
20. Install turnout (D) slip joint over end
all turnout (D) slip joint over end
all turnout (D) slip joint over end
all turnout (D) slip joint over end
of t
of t
of t
of tail pipe (C).
ail pipe (C).
ail pipe (C).
ail pipe (C).
3. With vehicle raised and properly sup-
3. With vehicle raised and properly sup-
3. With vehicle raised and properly sup-
3. With vehicle raised and properly sup
ported, using a reciprocating saw or hack
ported, using a reciprocating saw or hack
ported, using a reciprocating saw or hack
ported, using a reciprocating saw or hack
saw
saw
saw
saw, cut the t
, cut the t
, cut the t
, cut the tail pipe approximately 1"
ail pipe approximately 1"
ail pipe approximately 1"
ail pipe approximately 1"
behind rear muf
behind rear muf
behind rear muf
behind rear muffler hanger
fler hanger
fler hanger
fler hanger....
9. With muf
9. With muf
9. With muf
9. With muffler and head pipe properly
fler and head pipe properly
fler and head pipe properly
fler and head pipe properly
supported, using a p
supported, using a p
supported, using a p
supported, using a pair of channel lock
air of channel lock
air of channel lock
air of channel lock
pliers, remove hanger rod from bottom
pliers, remove hanger rod from bottom
pliers, remove hanger rod from bottom
pliers, remove hanger rod from bottom
hole of grommet.
hole of grommet.
hole of grommet.
hole of grommet.
15. Position 3" clamp (F) on muffler (B)
fler (B)
fler (B)
fler (B)
and using a 9/16" deep socket, tighten
and using a 9/16" deep socket, tighten
and using a 9/16" deep socket, tighten
and using a 9/16" deep socket, tighten
completely
completely
completely
completely....
NO
NO
NO
NOTE:
TE:
TE:
TE:
use anti-seize on threads.
use anti-seize on threads.
use anti-seize on threads.
use anti-seize on threads.
n.
4. S
4. S
4. S
4. Spray lubricant on front and rear t
pray lubricant on front and rear t
pray lubricant on front and rear t
pray lubricant on front and rear tail
ail
ail
ail
pipe rubber grommet.
pipe rubber grommet.
pipe rubber grommet.
pipe rubber grommet.
10. Remove muf
10. Remove muf
10. Remove muf
10. Remove muffler and head pipe
fler and head pipe
fler and head pipe
fler and head pipe
assembly
assembly
assembly
assembly....
16. Install t
all t
all t
all tail pipe (C) into rear slip joint
ail pipe (C) into rear slip joint
ail pipe (C) into rear slip joint
ail pipe (C) into rear slip joint
on muf
on muf
on muf
on muffler (B).
fler (B).
fler (B).
fler (B).
NO
NO
NO
NOTE:
TE:
TE:
TE:
ttttail pipe (C)
ail pipe (C)
ail pipe (C)
ail pipe (C)
should be inst
should be inst
should be inst
should be installed with the hanger to
alled with the hanger to
alled with the hanger to
alled with the hanger to
the rear of the vehicle.
the rear of the vehicle.
the rear of the vehicle.
the rear of the vehicle.
24. Using a soft cloth, remove all print
t cloth, remove all print
t cloth, remove all print
t cloth, remove all prints
s
s
s
from turnout tip.
from turnout tip.
from turnout tip.
from turnout tip.
21. Position turnout (D) to desired positio
23.
22. Position 3" clamp (I) over turnout (D)
Af
Af
Af
After inst
ter inst
ter inst
ter installation, it is recommended
allation, it is recommended
allation, it is recommended
allation, it is recommended
that all clamp
that all clamp
that all clamp
that all clamps be retightened and joint
s be retightened and joint
s be retightened and joint
s be retightened and joints
s
s
s
be t
be t
be t
be tack welded in three spot.
ack welded in three spot.
ack welded in three spot.
ack welded in three spot.
slip joint and tighten completely using a
slip joint and tighten completely using a
slip joint and tighten completely using a
slip joint and tighten completely using a
9/16" deep socket.
9/16" deep socket.
9/16" deep socket.
9/16" deep socket.
NO
NO
NO
NOTE:
TE:
TE:
TE:
use anti-seize
use anti-seize
use anti-seize
use anti-seize
on threads.
on threads.
on threads.
on threads.
5. Using a p
5. Using a p
5. Using a p
5. Using a pair of channel lock pliers,
air of channel lock pliers,
air of channel lock pliers,
air of channel lock pliers,
remove hanger rods from bottom holes of
remove hanger rods from bottom holes of
remove hanger rods from bottom holes of
remove hanger rods from bottom holes of
front and rear t
front and rear t
front and rear t
front and rear tailpipe rubber grommet
ailpipe rubber grommet
ailpipe rubber grommet
ailpipe rubber grommets.
s.
s.
s.
6. Remove t
6. Remove t
6. Remove t
6. Remove tail pipe assembly from the
ail pipe assembly from the
ail pipe assembly from the
ail pipe assembly from the
rear of vehicle.
rear of vehicle.
rear of vehicle.
rear of vehicle.
all head pipe (G) hanger into
all
1
1
1
11. Inst
1. Inst
1. Inst
1. Inst
bottom hole of rubber grommet.
bottom hole of rubber grommet.
bottom hole of rubber grommet.
bottom hole of rubber grommet.
12. Inst
12. Inst
12. Inst
12. Install head pipe over studs and inst
all head pipe over studs and inst
all head pipe over studs and inst
all head pipe over studs and inst
flange nut
flange nut
flange nut
flange nuts and align flange. using a
s and align flange. using a
s and align flange. using a
s and align flange. using a
15mm socket and ratchet, tighten nut
15mm socket and ratchet, tighten nut
15mm socket and ratchet, tighten nut
15mm socket and ratchet, tighten nuts
s
s
s
completely
completely
completely
completely....
NO
NO
NO
NOTE:
TE:
TE:
TE:
we recommend using
we recommend using
we recommend using
we recommend using
anti-seize on threads.
anti-seize on threads.
anti-seize on threads.
anti-seize on threads.
17. Install t
all t
all t
all tail pipe (C) hanger rod into
ail pipe (C) hanger rod into
ail pipe (C) hanger rod into
ail pipe (C) hanger rod into
bottom hole of rear rubber hanger
bottom hole of rear rubber hanger
bottom hole of rear rubber hanger
bottom hole of rear rubber hanger
grommet.
grommet.
grommet.
grommet.
18. With tail pipe (C) aligned to desired
ail pipe (C) aligned to desired
ail pipe (C) aligned to desired
ail pipe (C) aligned to desired
position, using a 9/16" deep socket,
position, using a 9/16" deep socket,
position, using a 9/16" deep socket,
position, using a 9/16" deep socket,
tighten nut
tighten nut
tighten nut
tighten nuts on rear muf
s on rear muf
s on rear muf
s on rear muffler hanger (F)
fler hanger (F)
fler hanger (F)
fler hanger (F)
completely
completely
completely
completely....
NO
NO
NO
NOTE:
TE:
TE:
TE:
use anti-seize on threads.
use anti-seize on threads.
use anti-seize on threads.
use anti-seize on threads.
25. Lower vehicle and reatt
26. Run vehicle until exhaust reaches
ach the
ach the
ach the
ach the
negative battery cable.
negative battery cable.
negative battery cable.
negative battery cable.
operating temperature and retighten the
operating temperature and retighten the
operating temperature and retighten the
operating temperature and retighten the
two 15mm flange nut
two 15mm flange nut
two 15mm flange nut
two 15mm flange nuts.
s.
s.
s.
NO
NO
NO
NOTES:
TES:
TES:
TES:
1)
1)
1)
1) All exhaust systems will exp
All exhaust systems will exp
All exhaust systems will exp
All exhaust systems will expand about
and about
and about
and about
1" rearward when exhaust temperature
1" rearward when exhaust temperature
1" rearward when exhaust temperature
1" rearward when exhaust temperature
st
st
st
start to rise.
art to rise.
art to rise.
art to rise.
2) Use
2) Use
2) Use
2) Use Anti-seize on threads of clamp
Anti-seize on threads of clamp
Anti-seize on threads of clamp
Anti-seize on threads of clamps E,
s E,
s E,
s E
F and G
F and G
F and G
F and G....
,
7. Using a 15mm socket and ratchet,
7. Using a 15mm socket and ratchet,
7. Using a 15mm socket and ratchet,
7. Using a 15mm socket and ratchet,
remove flange nut
remove flange nut
remove flange nut
remove flange nuts from head pipe.
s from head pipe.
s from head pipe.
s from head pipe.
13. Install 3" clamp with hanger (G) over
head pipe (A).
19. Install 3" clamp (G) over end of t
all 3" clamp (G) over end of t
all 3" clamp (G) over end of t
all 3" clamp (G) over end of tail
ail
ail
ail
pipe (C).
pipe (C).
pipe (C).
pipe (C).
W
W
W
We
e
e
e rrrrec
ec
ec
ecommend tak
ommend tak
ommend tak
ommend taking the truck t
ing the truck t
ing the truck t
ing the truck to a muffler shop and ha
o a muffler shop and ha
o a muffler shop and ha
o a muffler shop and having all slip c
ving all slip c
ving all slip c
ving all slip connec
onnec
onnec
onnections tack w
tions tack w
tions tack w
tions tack welded
elded
elded
elded....
04/07