PerTronix JBA Exhaust 40-2536 User Manual
Installation instructions, Start
INSTALLATION INSTRUCTIONS
**Installation recommendation: JBA recommends in most cases that the vehicle be taken to a reputable exhaust shop.
40-2536
04-07 Ford F-150 4.6/5.4L 3v V8
Start:
1. Remove and inventory new
JBA exhaust system.
2. Disconnect negative battery
cable and allow vehicle to cool.
3. Loosen the clamp connecting
the factory intermediate pipe to
the head pipe assembly.
For 30-2535 and 50-2535 Only
For Super cab/short bed trucks
relocate the front muffler hanger
to the hole on the side of the
frame.
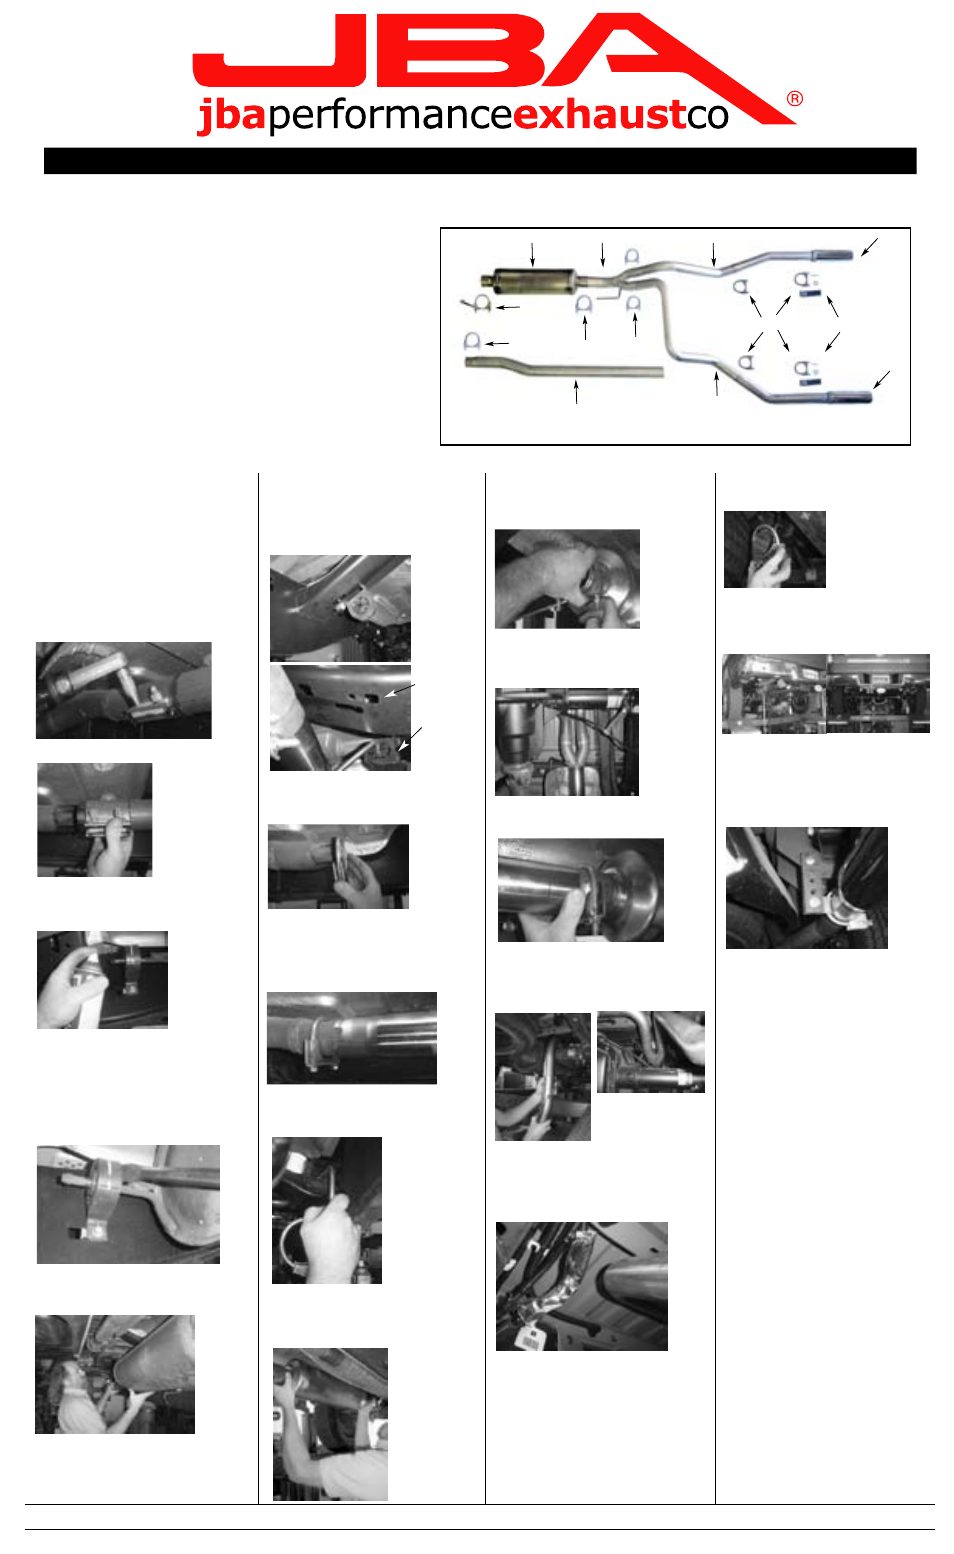
Parts List:
A. Intermediate pipe
1
B. JBA high flow muffler
1
C. Y-pipe transition
1
D. Passenger side axle pipe
1
E. Passenger side tail pipe w/ tip
1
F Driver side axle pipe
1
G Driver side tail pipe w/ tip
1
H 3" Clamp
1
I
3" Clamp w/ hanger
1
J. 2-1/2" clamp
7
K. Hanger w/ hardware
2
L. Heat shield 8" (not shown)
1
21. Align the tail pipes for
clearance around spare tire and
rear axle. Adjust tips to be even
with bumper and equal distance
from center.
22. Secure the tail pipes in place
by tightening the 2.5" clamps.
23. Using a soft cloth, remove
all prints from the exhaust tip.
24. Check all clamps and
connections for proper fit and
alignment. Double check all
clamps are tightened and that all
hangers are secure in rubber
grommets. It is recommended
that after installation of this
system you have all slip
connections tack welded by a
muffler shop.
NOTES:
1.) It may be necessary to
loosen and realign the spare tire
for proper clearance.
2.) All exhaust systems expand
about 1" rearward when exhaust
temperature rises.
3.) Use anti-seize on threads of
stainless steel clamps.
TOOLS RECOMMENDED:
ratchet
socket set
channel lock pliers
rubber mallet
spray lubricant
anti-seize (for stainless)
pry bar
We recommend taking the vehicle to a muffler shop and having all slip connections tack welded.
9.20.07
4. Then slide the clamp back.
5. Spray the rubber isolator
hangers with WD40 or similar
lubricant.
6. Using a pry bar, push the
exhaust system back until the
exhaust hangers drop free from
the rubber isolators.
Caution:
Be careful not to let the exhaust
system fall on you or damage
the rear fender.
7. Carefully lower the exhaust
system and remove it from the
vehicle.
11. Slip the JBA muffler (B) onto
the intermediate pipe (C) with
the "inlet" sticker towards the
front of the vehicle.
12. Snug the 3" clamp with
hanger (G) on the front of the
JBA muffler (B).
13. Slip the supplied Y-pipe over
the end of the JBA muffler and
insert hanger into rubber
isolator
8. Slip the supplied 2-1/2" clamp
on to the factory head pipe
assembly.
9. Install the supplied
intermediate pipe (A) onto the
factory head pipe (cut to length
for your vehicle. Make sure to
line up the keyway.
17. Check the alignment of the
installed system then tight the
clamps on the intermediate pipe
(A) and muffler (B).
18. Slip the 2.5" clamp over the
rear of the axle pipes.
14. Slip a 3" clamp on the front
of the Ypipe (C).
15. Install the driver side and
passenger side axle pipes into
the new JBA ypipe and secure
with supplied 2.5" clamps.
16. Re-arrange rear axle vent
line, brake line and vapor line to
allow proper clearance for tail
pipe. Protect the lines with the
supplied 8" heat shield.
10. Insert the 3" clamp with
hanger into the front rubber
isolator hanger.
19. Slide the JBA tail pipes with
tips over on to the axle pipes
with 1" clearance on rear
bumper.
20. Position supplied hanger as
shown with 2.5" clamp in place.
Mark the position of the top hole
on hanger. Drill a hole in spring
hanger (5/16), and fasten
hanger with hardware supplied.
Old position
New position
A
H
J
J
K
J
I
B
C
D
F
G
E
Cut intermediat pipe (A) to length indicated.
Measure from keyway.
Cut "A" length:
Std Cab / SB: 22-1/4"
Std Cab / LB: 39-1/4"
Ext Cab / SB: 39-1/4"
Ext Cab / LB: 51-1/4"
SuperCrew:
33-3/4"