Installing the switch in a rack – Allied Telesis AT-FS716L User Manual
Page 29
AT-FS716L Fast Ethernet Switch Installation Guide
29
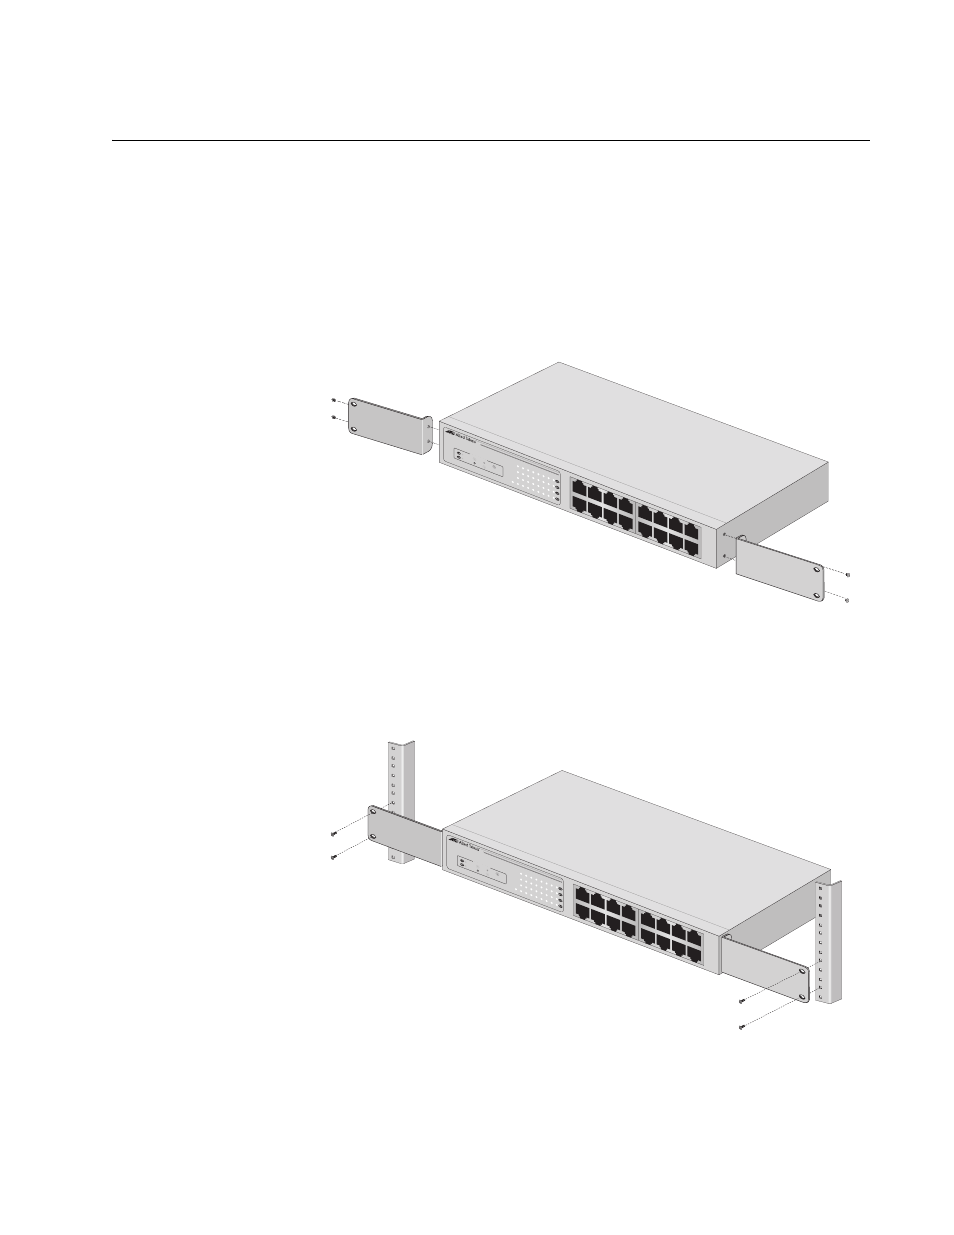
Installing the Switch in a Rack
Perform the following procedure to install the switch in a standard 19-inch
rack.
1. If attached, remove the rubber feet, data cables, and power cord from
the switch.
2. Attach the two mounting brackets (provided) to the sides of the switch
using the bracketmounting screws (provided), as shown in Figure 6.
Figure 6. Attaching Brackets for Rackmounting
3. Mount the switch in a 19-inch rack using rackmounting screws (not
provided), as shown in Figure 7.
Figure 7. Rackmounting the Switch
The switch is now ready for cabling and powering up.
1
3
5
7
9
11
13
15
2
4
6
8
10
12
14
16
AT-FS716L
16 P
ort 10
/10
0 M
bps
Fast Eth
erne
t Sw
itch
10 LIN
K
ACT
100 LIN
K
AC
T
FDX
HDX
PO
RT
ACTIVI
TY
COL
POW
ER
1
3
5
7
9
11
13
15
2
4
6
8
10
12
14
16
1014
1
3
5
7
9
11
13
15
2
4
6
8
10
12
14
16
AT-FS71
6L
16 Por
t 10
/100 Mbps
Fast Ethe
rne
t Switch
10 LINK
ACT
100 LINK
AC
T
FDX
HDX
POR
T AC
TIVIT
Y
COL
POW
ER
1
3
5
7
9
11
13
15
2
4 6
8
10
12
14
16
1015
- AT-GS908M (54 pages)
- AT-x230-10GP (80 pages)
- AT-GS950/10PS (386 pages)
- AT-GS950/48PS (64 pages)
- AT-GS950/16PS (386 pages)
- AT-GS950/48PS (386 pages)
- AT-9000 Series (1480 pages)
- AT-9000 Series (258 pages)
- IE200 Series (70 pages)
- AT-GS950/48 (410 pages)
- AT-GS950/8 (52 pages)
- AT-GS950/48 (378 pages)
- AT-GS950/48 (60 pages)
- SwitchBlade x8106 (322 pages)
- SwitchBlade x8112 (322 pages)
- SwitchBlade x8106 (240 pages)
- SwitchBlade x8112 (240 pages)
- AT-TQ Series (172 pages)
- AlliedWare Plus Operating System Version 5.4.4C (x310-26FT,x310-26FP,x310-50FT,x310-50FP) (2220 pages)
- FS970M Series (106 pages)
- 8100L Series (116 pages)
- 8100S Series (140 pages)
- x310 Series (120 pages)
- x310 Series (116 pages)
- AT-GS950/24 (404 pages)
- AT-GS950/24 (366 pages)
- AT-GS950/16 (44 pages)
- AT-GS950/16 (364 pages)
- AT-GS950/16 (404 pages)
- AT-GS950/8 (404 pages)
- AT-GS950/8 (364 pages)
- AT-GS950/8 (52 pages)
- AT-8100 Series (330 pages)
- AT-8100 Series (1962 pages)
- AT-FS970M Series (330 pages)
- AT-FS970M Series (1938 pages)
- SwitchBlade x3106 (288 pages)
- SwitchBlade x3112 (294 pages)
- SwitchBlade x3106 (260 pages)
- SwitchBlade x3112 (222 pages)
- AT-S95 CLI (AT-8000GS Series) (397 pages)
- AT-S94 CLI (AT-8000S Series) (402 pages)
- AT-IMC1000T/SFP (23 pages)
- AT-IMC1000TP/SFP (24 pages)
- AT-SBx3106WMB (44 pages)