Installation – Yetter 6150 Series Markers User Manual
Page 6
6
INSTALLATION
HYDRAULIC SET-UP
FOR MARKERS
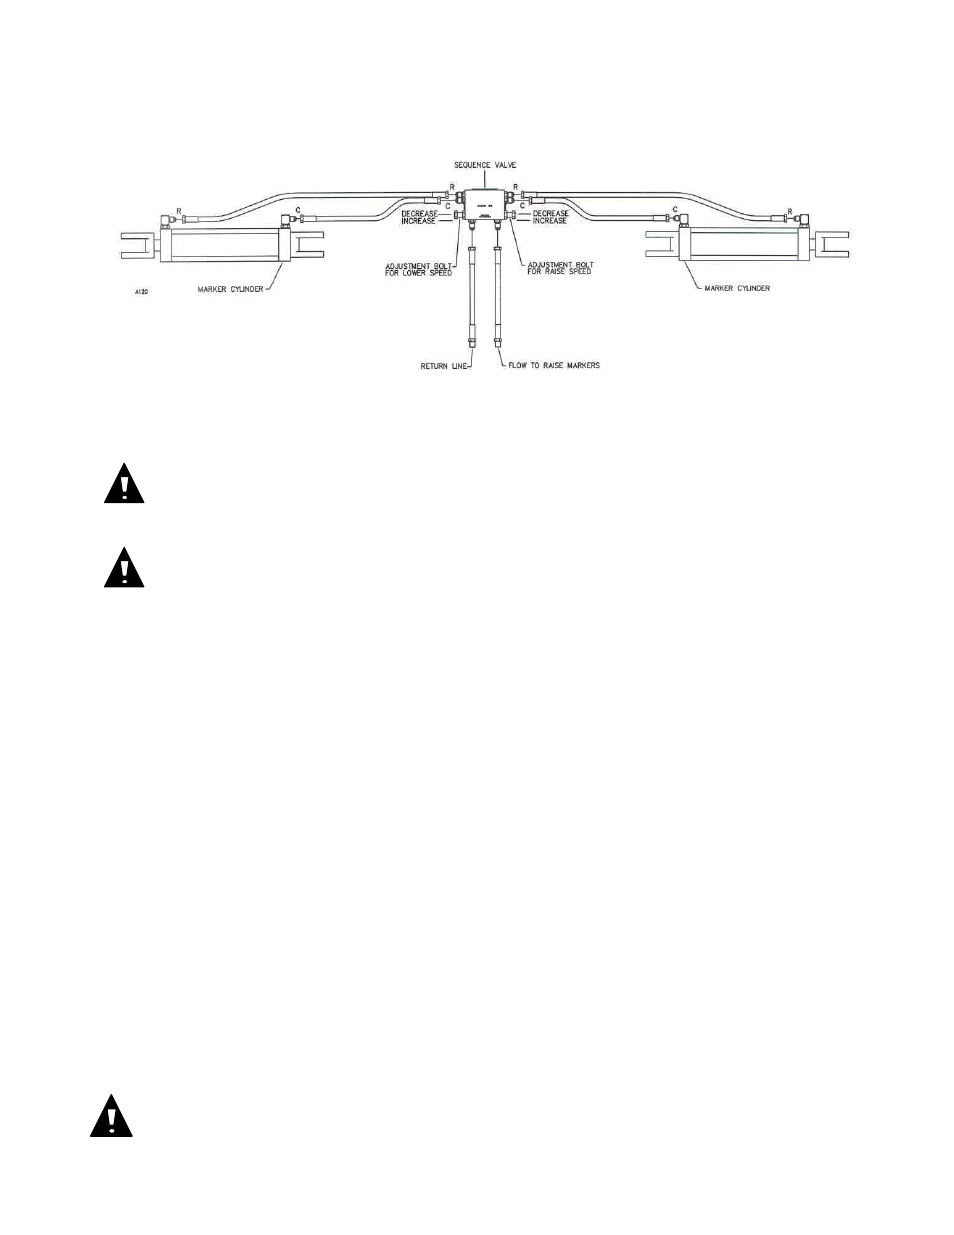
HYDRAULIC INSTALLATION
HYDRAULIC HOOK UP
DANGER:
Inspect and replace worn or frayed hydraulic hose. Keep all connections tight, escaping
hydraulic fluid under pressure can have sufficient force to penetrate the skin and cause serious injury.
Fluid escaping from a small hole can almost be invisible. Use a piece of cardboard or wood rather
than hands to search for suspected leaks. Failure to heed may result in personal injury or death.
WARNING:
Lower the cart to the ground, and remove any pressure in the lines before opening the
hydraulic lines to install the marker hoses.
1.
Connect the port on the front of the sequence valve marked “LOWER” to the tractor or the return side of the drill lift
system. If the markers are to lower with a Yetter Coulter Cart, connect this LOWER port to the return side of the cart
hydraulic system. This is the bottom port of the right-hand (slave) cart cylinder.
2.
IMPORTANT – Be VERY careful when first actuating markers with hydraulic pressure. Cycle hydraulics several
times only slightly lifting marker off stops. Apply pressure for several seconds in raise position to purge air from
hydraulic cylinders. After several cycles, the marker should be completely lowered. When lowering the first time
proceed VERY slowly.
NOTE: Air left in the system will compress when pressurized, this may cause erratic and violent damaging
motion of the marker arms.
3.
Measure the time required for each marker to fold and unfold. If the markers are operating too fast, they must be
slowed down to provide adequate life. Bi-fold markers should take more than 4 seconds to fold and more than 4
seconds to unfold. Tri-fold markers should take more than 8 seconds to fold and more than 8 seconds to unfold.
4.
Some tractors have a provision to control remote cylinder speed with an adjustment near the remote cylinder ports.
If the markers are actuated with a separate tractor valve this adjustment is available.
5.
Restricted fittings are provided in all tri-fold markers to prevent damage from folding and unfolding too fast. If
markers are too slow drill out the restrictor fitting using a 1/16” drill bit.
6.
Adjustable restrictors are also provided in the sequence valve. These are adjusted with the bolts and jam nuts on
each side of the sequence valve. Adjustments of the raise speed are made with the bolt on the left side of the valve
with “RAISE” stamped vertically above it. Adjustments of the lowering speed are made with the bolt on the right side of
the valve with “LOWER” stamped vertically beneath it.
7.
Adjustments are made with these bolts by screwing them clockwise into the valve to reduce operating speed or by
screwing them counterclockwise to increase operating speed. Adjustments should be made in small increments, 1/6 of
turn or less at a time, being sure to retighten the jam nut.
WARNING:
On drills and planters with switch operated hydraulic valves, a new switch operated
hydraulic valve should be installed to operate the markers. If the markers are plumbed with an existing
switch operated valve they may extend or retract unexpectedly when you press the switch, resulting in
damage to equipment or property or possible injury to yourself or others in the vicinity.