Tuff Country 55900 - Toyota Tundra 99-04 4.5 kit User Manual
Page 6
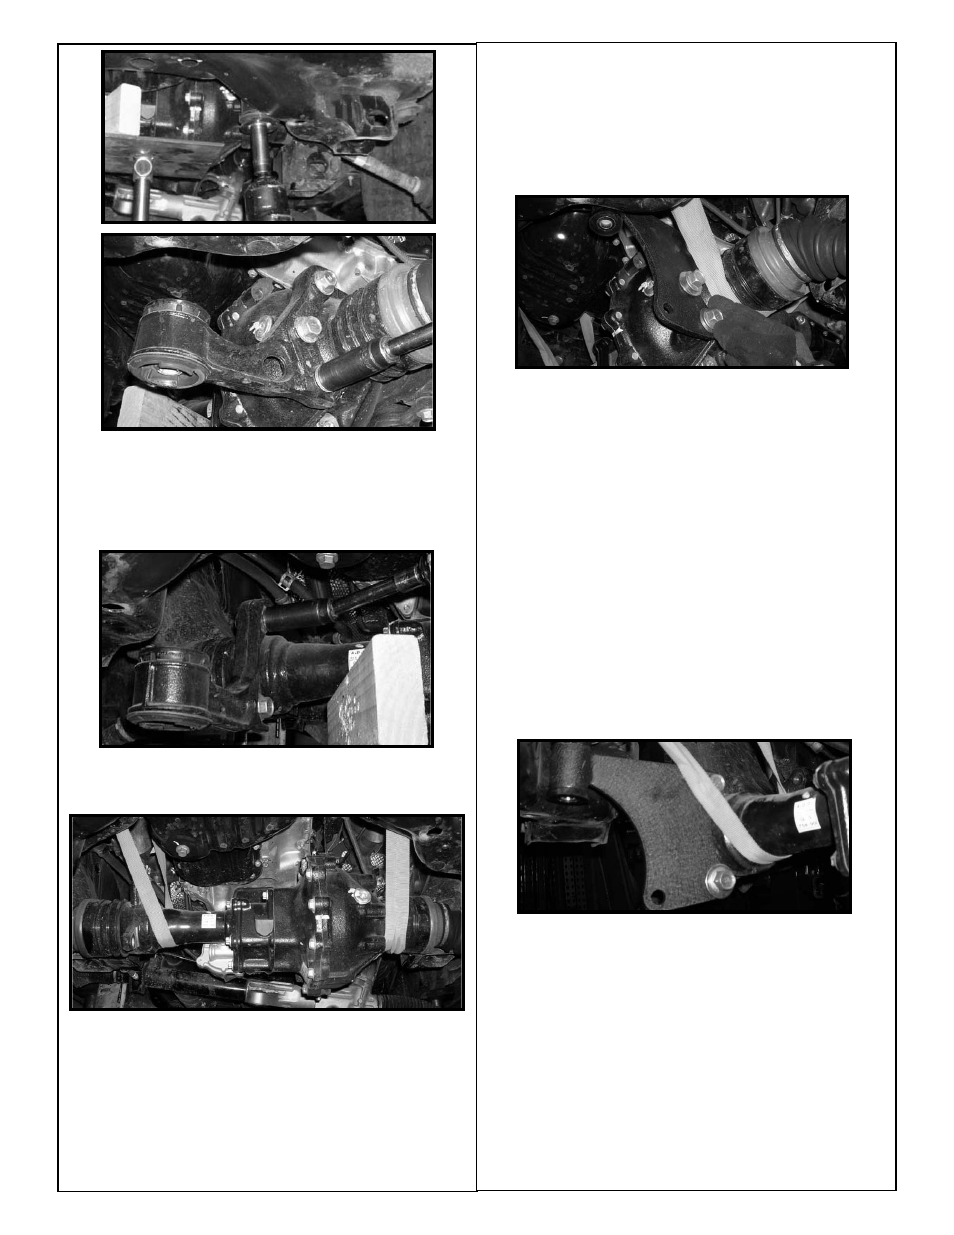
26. Working on the passenger side, remove the hardware
that connects differential drop bracket to the front cross
member and save the hardware. Next, remove the (2) bolts
that connect the differential drop bracket to the differential.
Save the hardware for later re-installation. The differential
drop bracket may be discarded.
27. Using a tie down strap, carefully tie the front differential
up and out of the way so that the hydraulic floor jacks can be
removed and the one piece sub frame can be installed.
28. Locate (1) new driver side differential drop bracket, (2)
PB2408 poly bushings and (1) S10082 sleeve from hard-
ware bag 55900NB2. Install the new poly bushings into the
new driver side differential drop bracket. Next, install the new
sleeve into the newly installed poly bushings. Special Note:
Make sure to use a lithium or moly base grease prior to
inserting the new bushings into the new differential
drop bracket. This will increase the life of the bushing as
well as prevent squeaking.
29. Locate (3) 1/2” USS flat washers from hardware bag
55900NB1. Working on the driver side, install the new driver
side differential drop bracket into the OE location on the front
cross member using the stock hardware. Do not tighten at
this point. Next, secure the driver side of the differential to
the newly installed driver side differential drop bracket.
Secure using the OE bolts and the new 1/2” USS flat wash-
ers. Do not tighten at this point.
30. Locate (1) new passenger side differential drop bracket,
(2) PB2408 poly bushings and (1) S10082 sleeve from hard-
ware bag 55900NB2. Install the new poly bushings into the
new passenger side differential drop bracket. Install the new
poly bushings into the new passenger side differential drop
bracket. Next, install the new sleeve into the newly installed
poly bushings. Special Note: Make sure to use a lithium
or moly base grease prior to inserting the new bushings
into the new differential drop bracket. This will increase
the life of the bushing as well as prevent squeaking.
31. Locate (2) 1/2” USS flat washers from hardware bag
55900NB1. Working on the passenger side, install the new
passenger side differential drop bracket into the OE location
on the front cross member using the stock hardware. Do not
tighten at this point. Next, secure the passenger side of the
differential to the newly installed passenger side differential
drop bracket. Secure using the OE bolts and the new 1/2”
USS flat washers. Do not tighten at this point.
32. Locate the new one piece lower sub frame, (2) 3/4” x 4
1/2” bolts, (2) 3/4” x 5 1/2” bolts, (4) 3/4” unitorque nuts and
(8) 3/4” flat washers from hardware bag 55900NB1. Install
the new one piece sub frame to the front and rear lower con-
trol arm mounting points and secure using the new 3/4” bolts
and hardware. Special Note: The new 3/4” x 5 1/2” bolt is
for the front stock mounting point and the new 3/4” x 4
1/2” bolt is for the rear stock mounting point. Do not
tighten at this point. Also, when installing the new one
piece sub frame, make sure that the stock threaded
spud that comes out of the rear part on the front differ-
ential seats properly into the rear portion of the new one
piece sub frame.