Tuff Country 55900 - Toyota Tundra 99-04 4.5 kit User Manual
Page 13
and hardware. Make sure to use loctite and torque to 18 ft.
lbs. Move back to the hardware attaching the BLR09 to the
frame rail and add some loctite and torque to 12 ft lbs.
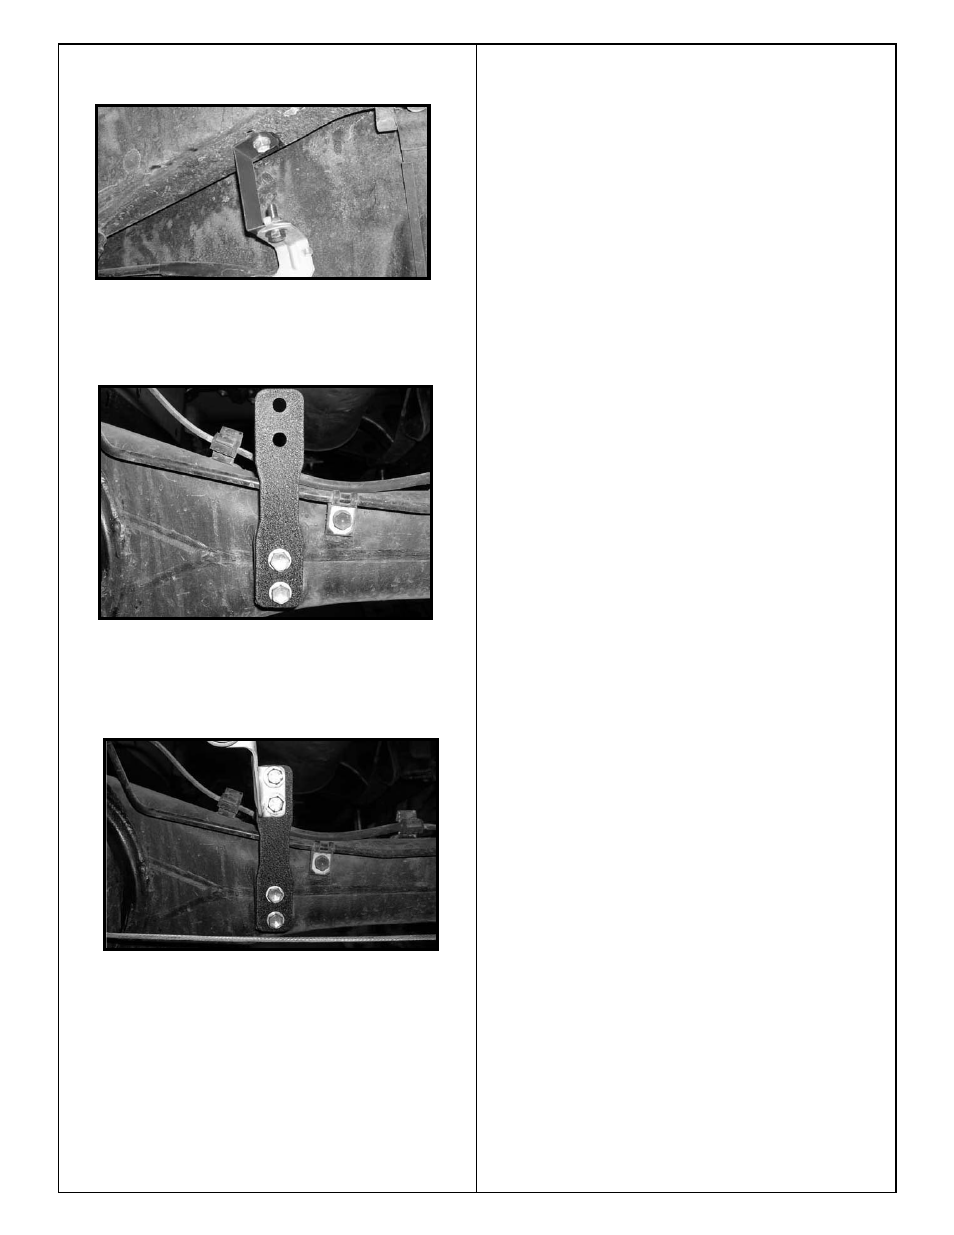
87. Locate the new rear brake proportioning valve bracket
and the OE hardware. Install the new rear brake proportion-
ing valve bracket into the OE location and secure using the
OE hardware. Make sure to use loctite and torque to 12 ft
lbs.
88. Locate (2) 5/16” x 1” bolt, (4) 1/4” USS flat washers and
(2) 5/16” unitorque nuts from hardware bag 55900NB1.
Secure the OE brake proportioning valve bracket to the
newly installed rear brake proportioning valve bracket using
the new 5/16” x 1” bolt and hardware. Make sure to use loc-
tite and torque to 16 ft lbs.
89. Locate the new rear shocks. Special note: Once this
Suspension kit is installed, new longer rear shocks will
be needed. Rear shocks are sold seperatly. If you have
not already ordered your new rear shocks, please contact
Tuff Country or your local Tuff Country dealer and order
the rear shocks. Tuff Country recommends installing a
26” fully extended shock.
Install the new shock boots onto
the new shocks. Special note: The new shock boots are
not included with this suspension system and the new
shock boots need to be ordered as a separate part #. If
you have not already ordered your new shock boots,
please feel free to contact Tuff Country or your local Tuff
Country dealer and order your new shock boots.
Working on the driver side, install the new shock into the
upper location using the new nut and hardware. Do not
tighten at this point. Repeat procedure on the passenger
side.
90. Locate the rear lower shock hardware. Working on the
driver side, install the new shock into the lower location using
the hardware. Torque the lower hardware to 65 ft lbs. and
torque the upper nut to 18 ft lbs. Repeat the procedure on
the passenger side. Special note: On some model
Tundra’s, the lower shock eylet may need a 3/4” shock
bushing. If this is the case on the vehicle you are work-
ing on, locate the new 3/4” shock bushings from hard-
ware bag 55900NB2 and install them into the new
shocks.
91. Re-install the wheels and tires.
92. Safely lower the vehicle to the ground.
93. Check and double check again to make sure that all
steps were performed properly. And then check again.
Congratulations, installation complete!
Special note: After the completion of the installation,
Tuff Country EZ-Ride Suspension recommends taking
the vehicle to an alignment shop and having a proper
front end alignment performed.
Tuff Country EZ-Ride Suspension recommends that a
complete re-torque is done on all bolts associated with
this suspension system. It is the customers responsibil-
ity to make sure that a re-torque is performed on all
hardware associated with this suspension system after
the first 100 miles of installation. It is also the customers
responsibility to do a complete re-torque after every
3000 miles or after every off road use. Neglect of follow-
ing these steps could cause brackets to come loose and
cause serious damage to the suspension system and to
the vehicle.
This Suspension System comes with (1) installation
manual and some post installation procedure literature
and it is the installers responsibility to make sure that
the customer receives the post installation procedure
literature. If a customer would like a copy of the installa-
tion manual, please have them visit our website at
www.tuffcountry.com. Have them go to the customer
care section to download these instructions. If you have
any questions, please feel free to call us at (801) 280-
2777.
If you have any questions or concerns, please feel free
to contact Tuff Country or your local Tuff Country deal-
er.