Doors that were painted doors that were stained – JELD-WEN JCM004 Interior and Exterior Door Slabs and Systems User Manual
Page 2
FINISHING AND REFINISHING INSTRUCTIONS
for Interior and Exterior Door Slabs and Systems (JCM004)
2
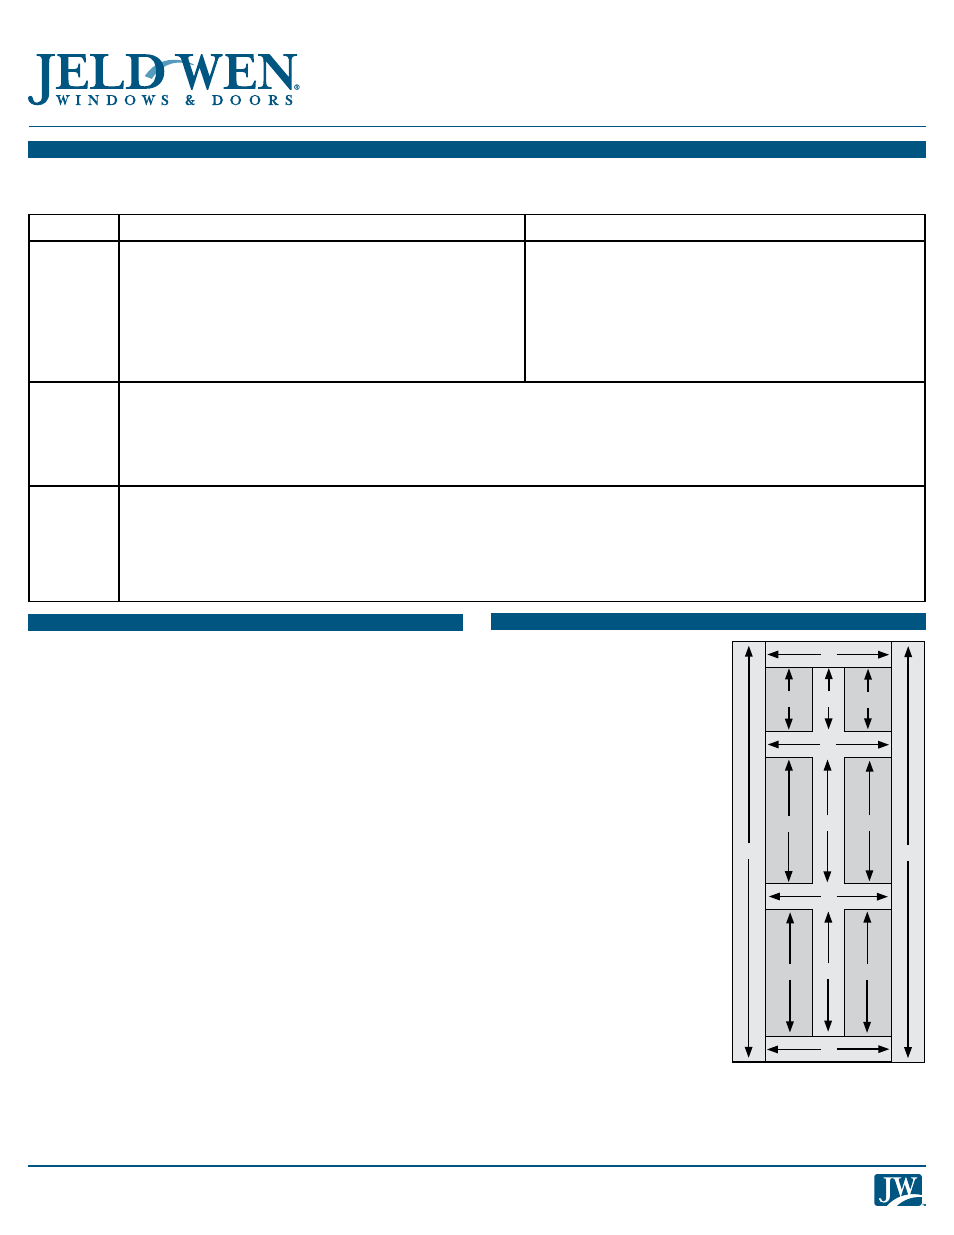
Use the table below to find your
product and desired finish and follow
the instructions in the corresponding
box. The illustration to the right shows
the recommended order to apply
finishing materials to the door by any
method except spraying. Finishing
materials should be first applied, in
the direction of the arrows, to the
door panels (1), then to the vertical
members, or stiles (2), horizontal
members, or rails (3) and finally to the
outer stiles (4). This method has been
tested to yield the best results. You
may, however, use any method that
you choose.
PREPARE THE DOOR
If refinishing a previously finished door slab, use the following recommendations for the product you have. The achieved result will depend on the skill
of the person doing the refinishing. We recommend seeking the help of a skilled professional if unsure. After preparing the previous finish, follow the
finishing instructions in the following sections.
Doors that were Painted
Doors that were Stained
Steel and
Smooth Pro
Fiberglass
1. Scuff sand with 150 grit sandpaper or finer or buff the surface
of the door thoroughly with 0000 steel wool until the entire
surface is dulled and even. Feather out areas where the previous
finish is cracked or peeling by removing all loose material and
sanding outward until the surface is uniformly level.
2. Remove all loose debris with tack cloth (available in store paint
sections) and re-prime bare areas with a good quality water-
based primer appropriate for the substrate. Re-priming the
entire door will provide the best surface for the new top coat.
N/A
Wood
(Authentic
Wood
Custom
Carved and
Molded)
1. Scuff sand with 150 grit sandpaper or finer or buff the surface of the door thoroughly with 0000 steel wool until the entire surface
is dulled and even. Feather out areas where the previous finish is cracked or peeling by removing all loose material and sanding
outward until the surface is uniformly level.
2. Remove all loose debris with tack cloth (available in store paint sections) and re-prime bare areas with a good quality water-based
primer appropriate for the substrate. Re-priming the entire door will provide the best surface for the new top coat.
3. Doors that were stained will need to be stripped and/or sanded to bare wood and then can be re-stained and top coated or painted.
Architectural
and
Design Pro
Fiberglass,
FiberLast and
Finishield
Steel
1. Do not attempt to remove the finish with paint stripper, solvents or other chemicals, instead, buff the surface of the door thoroughly
with 0000 steel wool until the entire surface is dulled and even.
2. Remove all loose debris with tack cloth (available in store paint sections).
3. Doors that were stained can be re-top coated with clear finish or painted if a color change is desired.
4. For Fiberglass doors, refer to the stain kit instructions for refinishing.
PREVIOUSLY UNFINISHED PRODUCTS
• If the door slab has a glass insert, install the provided screw covers
over the screw heads around the glass insert.
• Clean the door with a clean, lint-free cloth, removing all dust and
foreign debris. For light cleaning, a one part vinegar to ten parts
water mixture can be used. For tough dirt removal, use denatured
alcohol making sure all residue is removed by turning the cloth
often while cleaning. Allow the door to dry thoroughly. DO NOT USE
SANDPAPER OR LACQUER THINNER ON ARCHITECTURAL OR DESIGN/
SMOOTH PRO FIBERGLASS, OR FINISHIELD
®
DOORS.
For Wood Doors Only:
• Before applying first finishing coat, lightly block sand with the grain
all surfaces by hand with 220 grit sandpaper or finer. Remove all
handling marks, raise grain, scuffs, burnishes and other undesirable
blemishes. For doors with wood veneers, veneers are very thin and
it can be easy to sand through the veneer. Do not sand veneers any
more than necessary.
• Stile and rail doors have wood panels that can float. If necessary,
adjust panels before finishing by carefully realigning with a wood
block and hammer.
FINISH THE DOOR
1
1
2
1
4
4
1
1
1
3
3
3
3
2
2