Corner mount ce-ptz-cr install guide, Outdoor box mount, Direct mount – Clinton Electronics CE-PTZ-CR User Manual
Page 6: Outdoor box
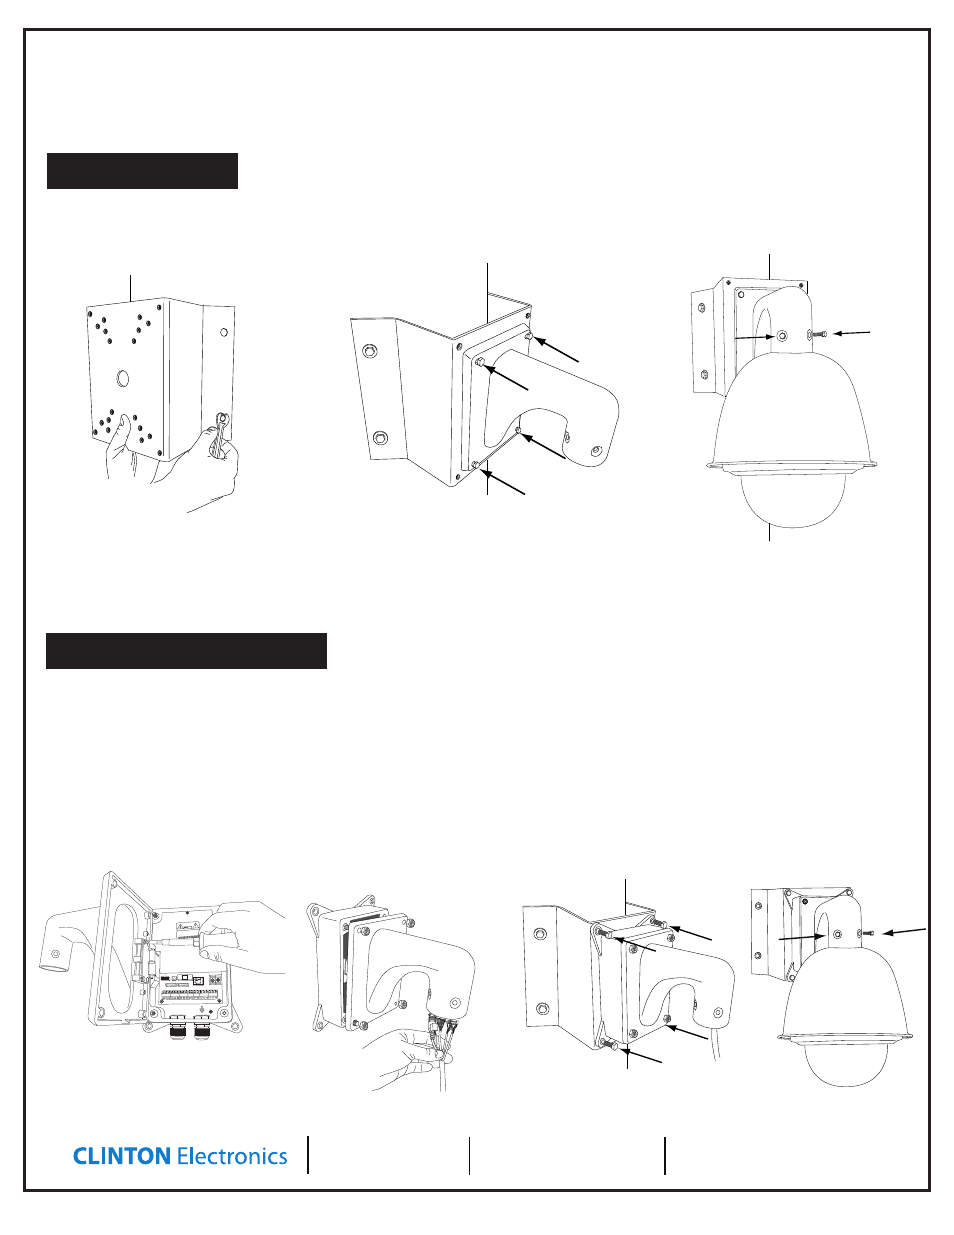
Corner Mount
CE-PTZ-CR
Install Guide
CLINTON Electronics
6701 Clinton Road
Loves Park, IL 61111
1.800.447.3306 Sales
1.800.549.6396 Support
1.800.633.8712 Fax
www.clintonelectronics.com
2. Attach wall mount (CE-PTZ-WM)
to the corner mount using supplied
bolts and washers.
07/20/10
1 2 3 4 5 6 7 8 9 10 11 12 13 14 15 16 17 18 19
H&F
AC24V
AC24V
AC220V
Model CE-PTZ-WP24
1 2 3 4 5 6 7 8 9 10 11 12 13 14 15 16 17 18 19
H&F
AC24V
AC24V
AC220V
Model CE-PTZ-WP24
1 2 3 4 5 6 7 8 9 10 11 12 13 14 15 16 17 18 19
H&F
AC24V
AUX1
AUX2
COM
ALM1
ALM2
ALM3
ALM4
ALM5
ALM6
ALM7
485A
485B
485A
485B
AC24V
AC220V
AC220V
COM
JP2
JP2_2
AC24V FUSE
J1
FUSE
5X20
Outdoor Box
Model CE-PTZ-WP24
0204201792
1 2 3 4 5 6 7 8 9 10 11 12 13 14 15 16 17 18 19
H&F
AC24V
AUX1
AUX2
COM
ALM1
ALM2
ALM3
ALM4
ALM5
ALM6
ALM7
485A
485B
485A
485B
AC24V
AC220V
AC220V
COM
JP2
JP2_2
AC24V FUSE
J1
FUSE
5X20
Outdoor Box
Model CE-PTZ-WP24
0204201792
1. Secure the box’s hinge to the
wall mount bracket
4. Feed PTZ wires
through the mount
assembly, and bolt
to mount using the
supplied bolts
Outdoor Box Mount
3. Feed PTZ wires through the mount
assembly, and bolt to mount using
the supplied bolts.
1. Attach mount using appropri-
ate mounting hardware for your
desired location.
Direct Mount
3. Bolt the outdoor
box assembly to the
corner mount using
the supplied bolts and
washers.
1 2 3 4 5 6 7 8 9 10 11 12 13 14 15 16 17 18 19
H&F
AC24V
AUX1
AUX2
COM
ALM1
ALM2
ALM3
ALM4
ALM5
ALM6
ALM7
485A
485B
485A
485B
AC24V
AC220V
AC220V
COM
JP2
JP2_2
AC24V FUSE
J1
FUSE
5X20
Model CE-PTZ-WP24
1 2 3 4 5 6 7 8 9 10 11 12 13 14 15 16 17 18 19
H&F
AC24V
AUX1
AUX2
COM
ALM1
ALM2
ALM3
ALM4
ALM5
ALM6
ALM7
485A
485B
485A
485B
AC24V
AC220V
AC220V
COM
JP2
JP2_2
AC24V FUSE
J1
FUSE
5X20
Model CE-PTZ-WP24
Follow step 1 above to mount the CE-PTZ-
CR, then follow these steps to mount the
outdoor box.
2. Feed PTZ wires though
mount and make connec-
tions. Close the mount
onto the box and secure
together using the sup-
plied lock nuts.