Svenska, English – Electrolux ZE310EB User Manual
Page 10
11
12
28
31
33
27
30
32
26
29
34
Byte av dammpåse s-bag
®
26 Öppna den främre luckan och lyft ut insatsen med s-bag
®
.
27 Drag i kartongskivan för att ta ur s-bag
®
ur insatsen.
Denna försluter automatiskt s-bag® och förhindrar att
damm läcker ur påsen.
28 Sätt i ny s-bag
®
genom att skjuta in kartongskivan till
ändläget i spåren i insatsen.
29 Sätt tillbaka insatsen i påsbehållaren och stäng luckan.
Obs: Byt s-bag
®
även om den inte är full (den kan vara igensatt)
och efter användning av mattrengöringspulver. Använd endast
originaldammsugarpåsar från Electrolux: s-bag
®
Classic, s-bag
®
Clinic Anti-Allergy, s-bag
®
Classic long performance eller s-bag®
Anti-odour.
Byte av filter
Ju oftare du gör det, desto bättre fungerar dammsugaren. Om
filtren används i ett vanligt hushåll behöver de bytas ut vart
tredje år. Använd aldrig dammsugaren utan filter.
Öppna den främre luckan och lyft ut insatsen med s-bag
®
.
30 Dra filterhållarna uppåt tills de lossnar från spåret.
Dra försiktigt bort det gamla, smutsiga filtret från
filterhållaren och byt ut det mot ett nytt filter.
31 Sätt tillbaka filterhållaren med det nya filtret. Sätt tillbaka
insatsen som håller s-bag
®
och stäng slutligen locket.
Byte av utblåsfilter
Filtren byts alltid mot nya och kan inte tvättas (om inte annat
anges).
32 Sätt tummarna ovanpå lockets bakkant och öppna sedan
locket genom att dra greppen bakåt och uppåt med pek/
långfingrarna.
33 Lyft ur filtret och lägg därefter ett helt nytt filter på plats.
Sätt tillbaka det nya filtret som bilden visar och stäng
locket.
34 För modeller med tvättbart HEPA-filter. Skölj
filterenhetens insida (den smutsiga sidan), bara med
varmt vatten. Använd inte rengöringsmedel och undvik
att vidröra den känsliga filterytan. Slå på filterramen för
att skaka av vattnet. Upprepa rengöringsproceduren
fyra gånger och låt filtret lufttorka. Filtrets ursprungliga
funktion är nu återställd. Sätt i enheten i dammsugaren,
stäng luckan och se till att den sitter ordentligt.
Svenska
Replacing the dust bag, s-bag
®
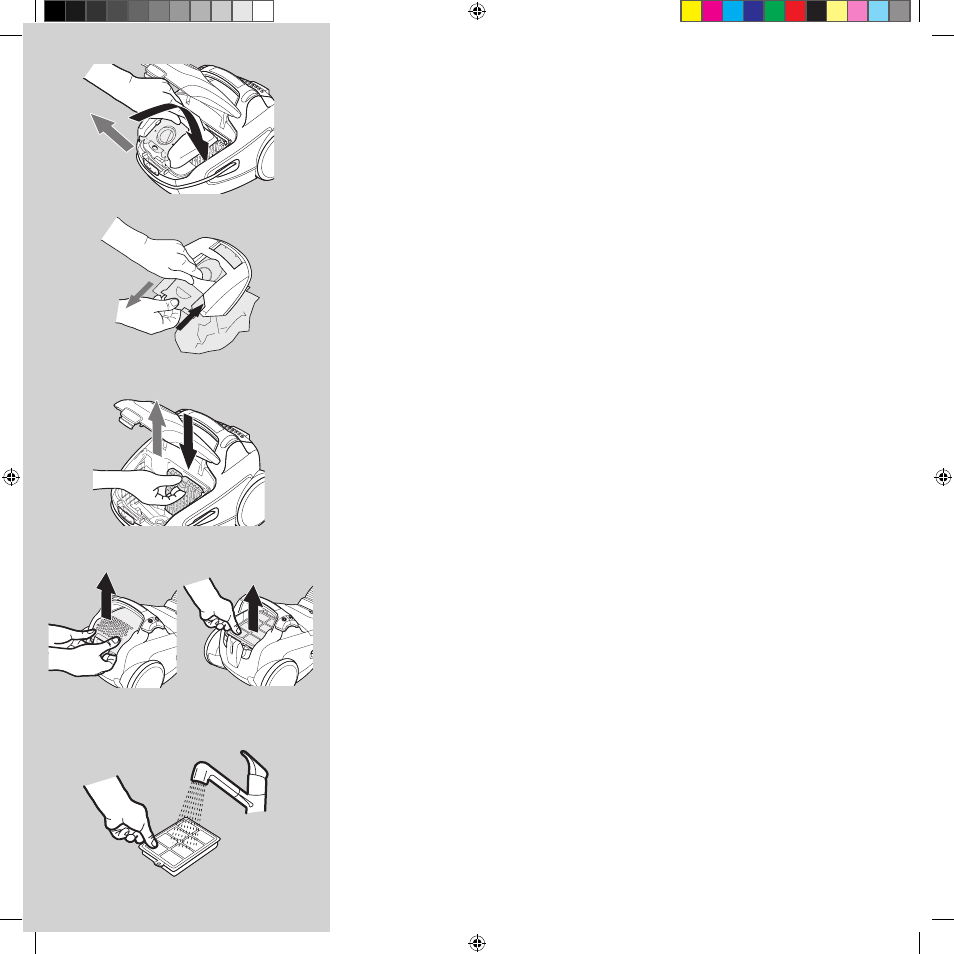
26 Open the front cover and lift out the insert holding the
s-bag
®
.
27 Pull the cardboard to remove the s-bag
®
from the insert.
This automatically seals the s-bag
®
and prevents dust
leaking out.
28 Insert a new s-bag
®
by pushing the cardboard right into
the end of the groove in the insert.
29 Put the insert back into the bag compartment, and close
the cover.
Note. Replace the s-bag
®
even if it is not full (it could be
obstructed). Also replace after vacuuming carpet-cleaning
powder. Be sure to use only an original Electrolux dust bags,
s-bag
®
Classic, s-bag
®
Clinic Anti-Allergy, s-bag
®
Classic long
performance or s-bag
®
Anti-odour.
Replacement of the filter(s)
The more often the better for the efficiency of the cleaner.
In standard household use, the filters should be replaced
approximately every 3 years. Never use the vacuum cleaner
without filter(s).
Open the front cover and lift out the insert holding of s-bag
®
30 Pull the filter(s) holder upwards until coming away from
the groove. Carefully pull the old, dirty filter(s) out of the
filter holder and replace with a new filter(s).
31 Reattach the filter holder containing the new filter(s). Put
the insert holding of s-bag
®
back in the cleaner and then
close the cover.
Replacement of the exhaust filter
The filters must always be replaced with new ones and cannot
be washed (if not mentioned).
32 Place your thumbs on the back edge of the lid and
then open the lid by pulling the handle backwards and
upwards with your index/middle finger.
33 Lift out the filter. Insert a new filter and replace the lid as
shown.
34 In case of models with washable HEPA filter. Rinse the
inside (dirty side) of the filter unit under warm tap water
only. Do not use cleaning agents and avoid touching
the delicate filter surface. Tap the filter frame to remove
excess water. Repeat cleaning procedure four times
and allow the filter to air dry. The original filtering
performance is now restored. Replace the unit back
into the cleaner and close cover ensuring it is properly
fastened.
English
2193664-01.indd 11
6/5/08 12:28:19 PM