How to disconnect the p-touch labeler, Creating a label using p-touch editor, Using the device settings – Brother PT-P700 User Manual
Page 3: Uninstalling the printer driver and the software
6
How to Disconnect the P-touch Labeler
For Windows
®
1.
Exit P-touch Editor Lite by clicking on the
in the top right corner of the window if using
P-touch Editor Lite.
2.
To disconnect the P-touch labeler, click the icon in the computer’s task bar (
,
, or
).
3.
Click [Safely remove USB Mass Storage Device].
4.
When the message indicating that the device can be safely removed is displayed, turn off
the P-touch labeler and disconnect the USB cable.
For Macintosh
1.
Exit P-touch Editor Lite by clicking on the red button in the top left corner of the window, if
using the P-touch Editor Lite.
2.
Select [PT-P700] on the desktop, and then perform one of the following:
• Select [Eject] from the Context menu.
• Drag and drop it in the Trash.
3.
When a message indicating that the device can be safely removed is displayed, turn off the
P-touch labeler and disconnect the USB cable.
7
Creating a Label using P-touch Editor
If you want to use a more advanced application, you are able to install P-touch Editor 5.1 for
Windows
®
and P-touch Editor 5.0 for Macintosh. This software will give you greater label making
functionality. For details on using P-touch Editor, see the Software User’s Guide included on the
CD-ROM (for Windows
®
) or download the Software User’s Guide by visiting the Brother
Solutions Center at http://solutions.brother.com/ (for Macintosh).
Installing the Printer Driver and Software
For Windows
®
1.
Start the computer and put the CD-ROM into the CD-ROM drive.
2.
Follow the on-screen instructions to complete setup.
For Macintosh
You can download the driver, software and manuals by visiting the Brother Solutions Center at
http://solutions.brother.com/.
Macintosh users can access this URL directly by clicking the
icon found in CD-ROM.
Starting P-touch Editor
For Windows Vista
®
/ Windows
®
7
From the Start menu, click [All Programs] - [Brother P-touch] - [P-touch Editor 5.1]. P-touch
Editor 5.1 starts.
For Windows
®
8
Click [P-touch Editor 5.1] on the [Start]/[Apps] screen or double-click [P-touch Editor 5.1] on
the desktop. P-touch Editor 5.1 starts.
For Mac OS X v10.6.8 - v10.8.x
Double-click [Macintosh HD] - [Applications] - [P-touch Editor 5.0] and then [P-touch Editor]
application icon.
8
Using the Device Settings
With [Device settings] in the [Printer Setting Tool], default printer settings can be changed.
1.
Connect the P-touch labeler to be configured to the computer.
2.
For Windows Vista
®
/Windows
®
7: From the Start menu, click [All Programs] - [Brother] -
[Label & Mobile Printer] - [Printer Setting Tool].
For Windows
®
8: On the [Start] or [Apps] screen, click [Printer Setting Tool].
For Mac OS X v10.6.8 - v10.8.x: Click [Macintosh HD] - [Applications] - [Brother] - [P-
touch Utilities] - [Brother P-touch Utility.app].
The main window appears.
3.
Select the P-touch labeler to be configured from the [Printer] drop-down list and then click
[Device settings]. The [Device settings] window appears.
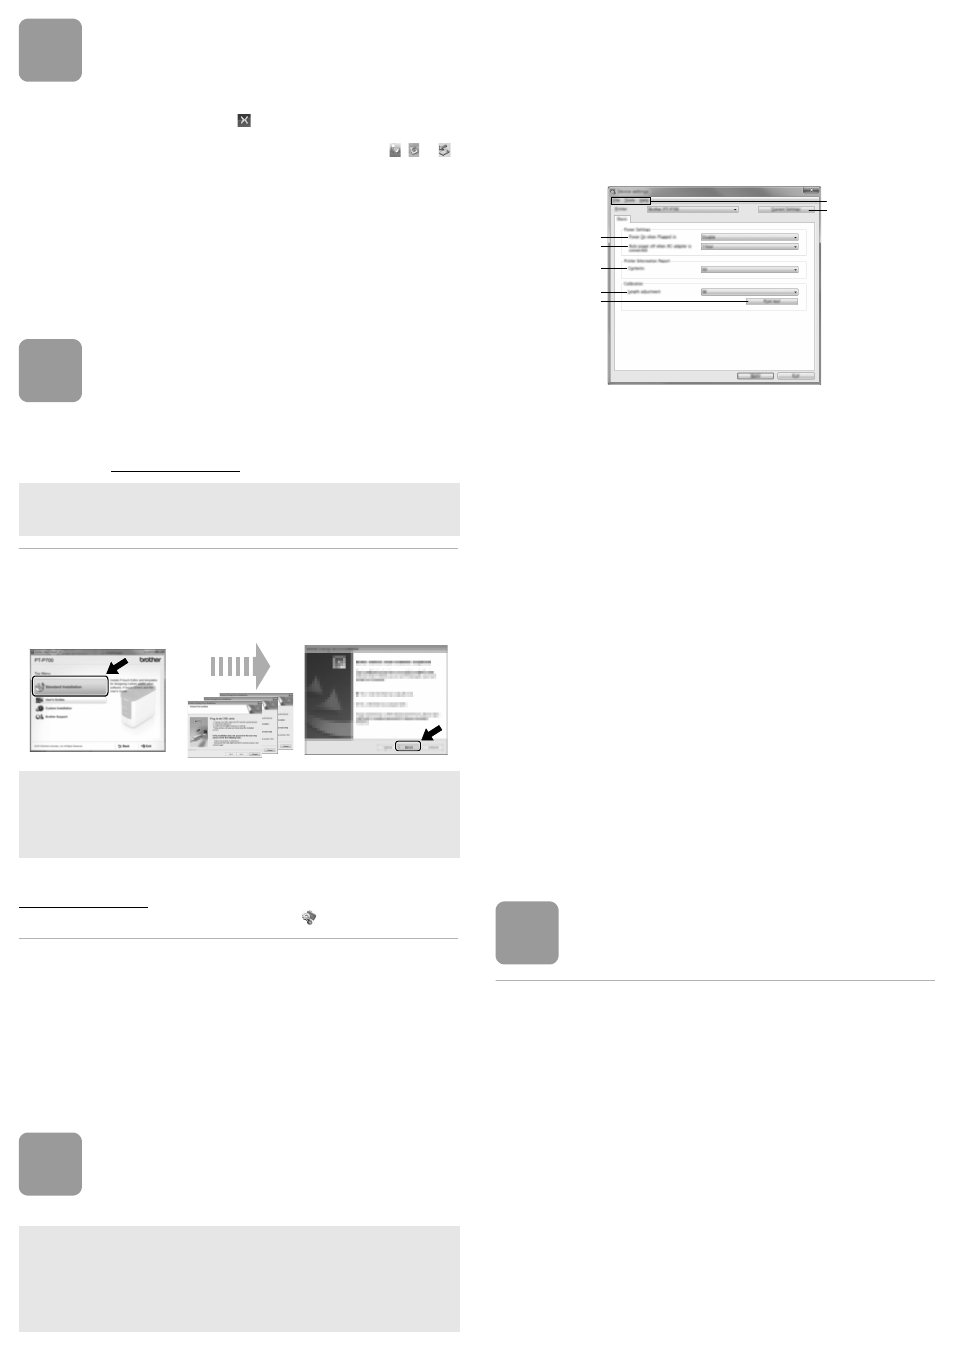
4.
Specify or change the settings. (The screen below is from Windows
®
.)
1
Power On when Plugged in
Select whether or not the printer turns on automatically when the AC power cord is plugged
into an AC power outlet.
Available settings: [Enable], [Disable]
2
Auto power off when AC adapter is connected
Specify the amount of time that passes before the printer turns off automatically.
Available settings: [None], 10/20/30/40/50 minutes, 1/2/4/8/12 hours
3
Contents
Specifies the printer information that will be printed.
Available settings: [All], [Usage Log], [Printer Settings]
4
Length adjustment
Adjusts the length of the printed label to correspond to the length of the label displayed on
the computer.
Available settings: -3% to +3% (1% increments)
5
Print test
Prints a test label to check the results of the length adjustment.
6
Menu Bar
• [File] - [Apply Settings to the Printer]
Applies the settings to the printer. Performs the same operation as when the [Apply]
button is clicked.
• [File] - [Import]
Imports the exported file and applies the settings to this tool.
• [File] - [Export]
Saves the current settings in a file.
• [Tools] - [Print Information Report]
Prints the printer information.
• [Tools] - [Reset to Factory Defaults]
Returns all printer settings to their factory defaults.
• [Tools] - [Option Settings]
If the [Do not display an error message if the current settings cannot be retrieved at
startup] check box is selected, a message will not be displayed next time.
7
Current Settings
Click this button to retrieve the settings from the currently connected printer and display them
in the dialog box.
5.
After changing the settings, click [Apply] - [Exit], and then click [Exit] in the main window
to finish specifying settings.
9
Uninstalling the Printer Driver and
the Software
Uninstalling the printer driver
Perform this procedure only if printing from the PT-P700 is no longer necessary or when re-
installing the PT-P700 printer driver.
For Windows Vista
®
1.
Turn off the P-touch labeler.
2.
From the Start menu, click [Control Panel] - [Hardware and Sound] - [Printers].
3.
Select [Brother PT-P700] and click [Delete this printer], or right-click the icon and click
[Delete].
4.
Right-click the [Printers] window, and then click [Run as administrator] - [Server
Properties...].
If the authorization confirmation window appears, click [Continue].
If the [User Account Control] window appears, type in the password, and then click [OK].
The [Print Server Properties] window appears.
5.
Click the [Drivers] tab, select [Brother PT-P700], and then click [Remove...].
6.
Select [Remove driver and driver package], and then click [OK].
7.
Close the [Print Server Properties] window. The printer driver has been uninstalled.
IMPORTANT
Before connecting the USB cable to the computer, check the Editor Lite lamp is not lit. If the
Editor Lite lamp is lit, press and hold down the Editor Lite button until the lamp goes off.
NOTE
(For Windows
®
8 only)
Use Adobe
®
Reader
®
to open the PDF manuals on the CD-ROM.
If Adobe
®
Reader
®
is installed but cannot open the files, change the “.pdf” file association
to “Adobe
®
Reader
®
” from the control panel.
IMPORTANT
• Before connecting the USB cable to the computer, check the Editor Lite lamp is not lit. If
the Editor Lite lamp is lit, press and hold down the Editor Lite button until the lamp goes
off.
• Make sure that the AC adapter is connected to an AC power outlet.
• Make sure that the printer driver has been installed and is functional.
• Connect this printer to a computer with a USB cable.
1
2
3
4
5
7
6