Unpacking the pt-p700, Parts description, Setting the tape cassette – Brother PT-P700 User Manual
Page 2: Connecting the power supply, Creating a label using p-touch editor lite
1
Unpacking the PT-P700
Check that the package contains the following before using the P-touch labeler. If any item is
missing or damaged, contact your Brother reseller.
2
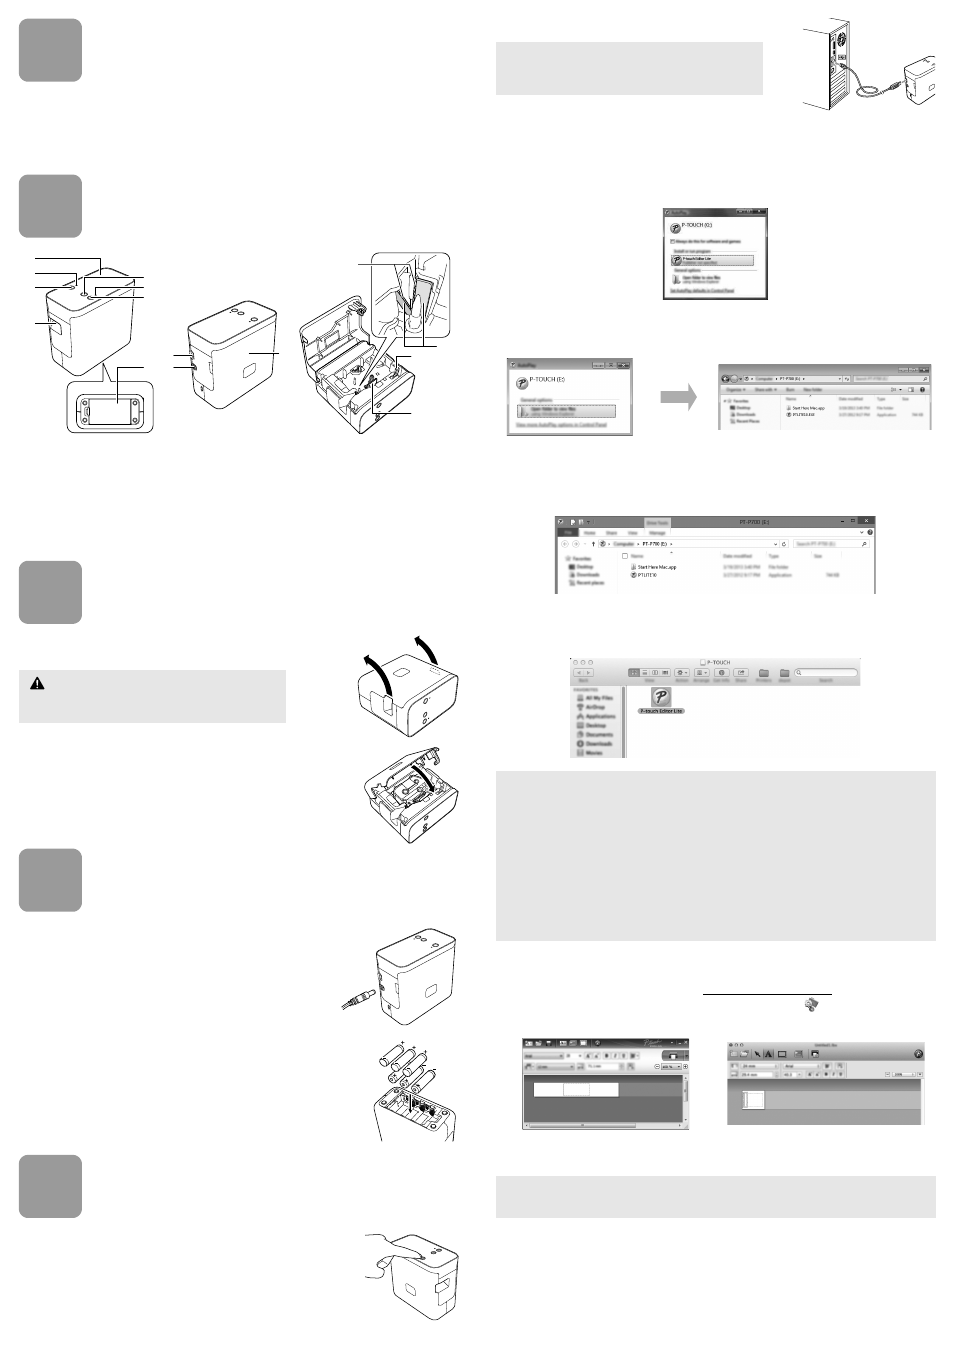
Parts Description
3
Setting the Tape Cassette
1.
Place the P-touch labeler so that the cassette cover is
facing upwards, then open the cassette cover.
2.
Insert a tape cassette and close the cassette cover.
Restore the P-touch labeler to an upright position.
4
Connecting the Power Supply
Using the AC adapter
When using the included AC adapter (AD-E001), insert the
plug on the adapter cord into the AC adapter connector of
the P-touch labeler. Insert the plug into the nearest
standard electrical outlet.
Using the batteries
When using the P-touch labeler with batteries, open the
battery cover on the bottom of the P-touch labeler, insert six
"AA" alkaline batteries (LR6) or Ni-MH rechargeable
batteries (HR6), making sure that their poles point in the
correct directions, and then close the battery cover. Always
replace all six batteries at the same time using new
batteries or fully charged rechargeable batteries.
5
Creating a Label using P-touch Editor
Lite
1.
Turn on the P-touch labeler, then press and hold
down the Editor Lite button until the green Editor Lite
lamp lights up.
2.
Connect the USB cable to the computer.
3.
After the USB cable is connected, a dialog box appears on the computer display. (The
following screens may differ depending on the operating system on your computer.)
For Windows Vista
®
Click [P-touch Editor Lite].
For Windows
®
7
Click [Open folder to view files], and then double-click [PTLITE10].
For Windows
®
8
On the [Start] screen, click [PT-P700], [Open folder to view files], and then double-click
[PTLITE10].
For Mac OS X v10.6.8 - v10.8.x
Double-click [PT-P700] on the desktop and the [P-touch Editor Lite] application icon.
4.
P-touch Editor Lite starts. For details on using P-touch Editor Lite, see the Software User’s
Guide included on the CD-ROM (for Windows
®
) or download the Software User’s Guide by
visiting the Brother Solutions Center at http://solutions.brother.com/ (for Macintosh).
Macintosh users can access this URL directly by clicking the
icon found in CD-ROM.
• PT-P700
• AC adapter (AD-E001)
• USB cable
• CD-ROM
• User's Guide
• Starter tape cassette
1
Top panel
2
Editor Lite lamp
3
Editor Lite button
4
Tape exit slot
5
Feed & Cut button
6
Status lamp
7
Power button
8
Battery cover
9
Mini-USB port
10 AC adapter connector
11 Cassette cover
12 Release lever
13 Print head
14 Tape cutter
15 Cutter blade
CAUTION
Do not put your finger inside the tape exit slot. You
could be injured by the cutter blade.
10
9
11
4
3
1
2
5
6
7
8
12
13
14
15
NOTE
If you are connecting the P-touch labeler via a USB
hub, it may not be detected correctly.
NOTE
• If you do not see the dialog box, it may be hidden behind an open software program
window. Minimize all windows to show the dialog box.
• (For Windows
®
)
It will take longer than usual to start P-touch Editor Lite when connecting the P-touch
labeler to your computer for the first time. If the software does not start automatically
when you connect the P-touch labeler, you may launch it from [My Computer]. Start P-
touch Editor Lite by double-clicking [PTLITE10.EXE].
• (For Windows Vista
®
)
When connecting the device for the first time, perform the scan and then select the
[Always do this for software and games] check box on the dialog box displayed when
the scan finishes. P-touch Editor Lite will start automatically the next time you connect
the P-touch labeler.
(For Windows
®
)
(For Macintosh)
IMPORTANT
Do not turn off the power or disconnect the P-touch labeler while using P-touch Editor Lite.