6 replacing the process heater – Sterlco MDB Series Dryers User Manual
Page 55
9. Re-install the rear and side shrouds. Re-connect the compressed air supply and electrical
power.
Figure 7:
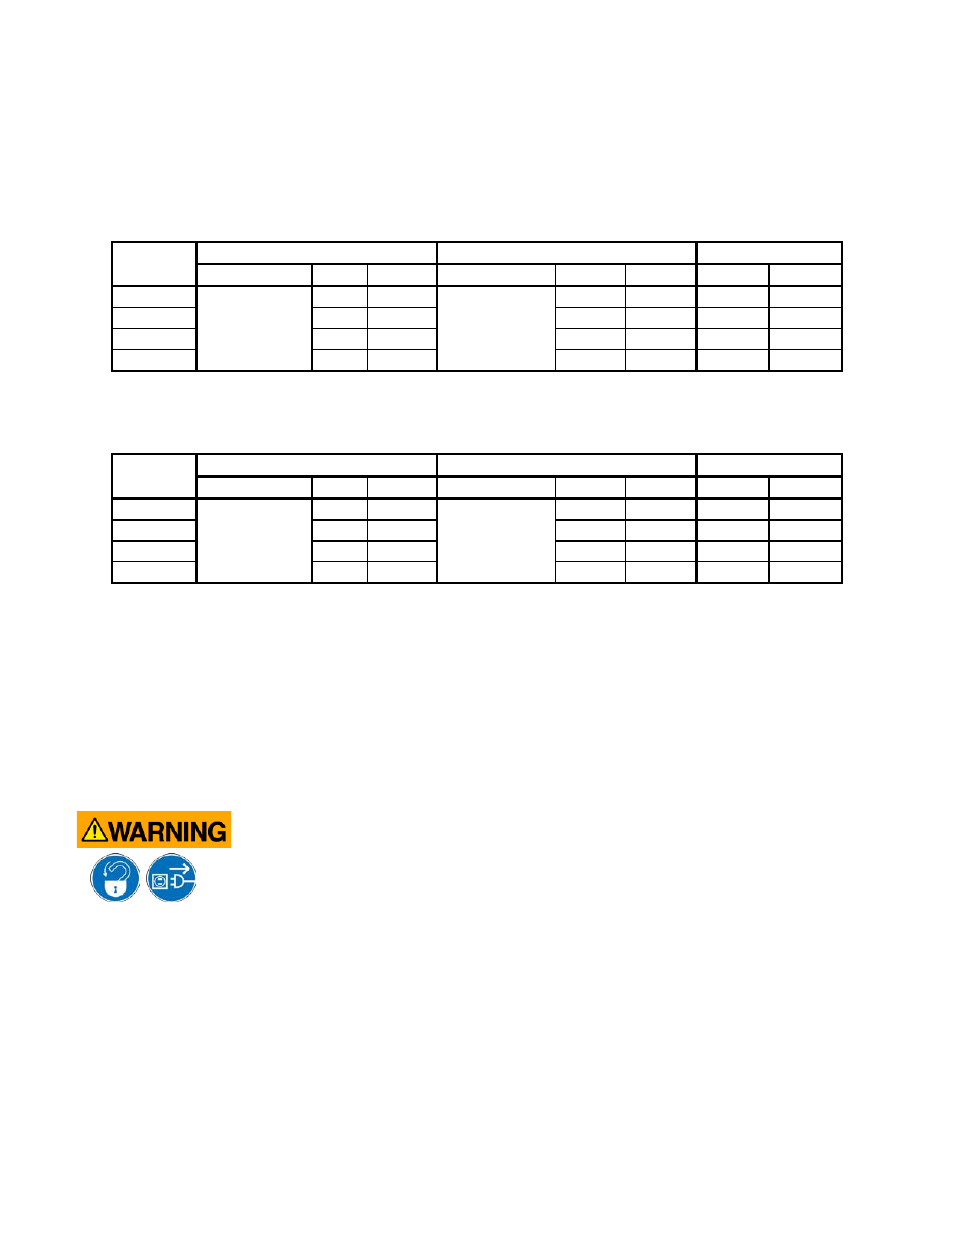
Required Desiccant Amounts per Bed; Type 4X Desiccant (2 beds per unit)
Dryer
Large bead (Type 4X)
Small bead (Type 4X)
Total per bed
CFM
Part no.
lbs.
Kg
Part no.
lbs.
Kg
lbs.
Kg
50
W00000892
1.5
0.68
W00000893
10.5
4.75
12
5.44
100
3.0
1.362
21.0
9.534
24.0
10.896
150
9.0
4.086
30.0
13.620
39.0
17.706
225
9.0
4.086
30.0
13.620
39.0
17.706
Type 13X Desiccant
Dryer
Large bead (Type 13X)
Small bead (Type 13X)
Total per bed
CFM
Part no.
lbs.
Kg
Part no.
lbs.
Kg
lbs.
Kg
50
W00018050
1.5
0.68
W00018051
10.5
4.75
12
5.44
100
3.0
1.362
21.0
9.534
24.0
10.896
150
9.0
4.086
30.0
13.620
39.0
17.706
225
9.0
4.086
30.0
13.620
39.0
17.706
6-6 Replacing the Process Heater
Our dehumidifying dryers use Calrod-type heater elements mounted in a heater tube located in the
top rear of the cabinet. The wattage of the heater varies with model, voltage, temperature range,
etc., but the replacement procedure is the same.
If the process heater is mounted to the hopper, contact the manufacturer for the appropriate
replacement procedure.
Disconnect and lock out power before you replace heater elements!
Use the following procedure to replace the process heater:
1. Remove the bolts securing the process heater access cover.
2. Sketch the heater wiring configuration so you can properly re-wire the heater.
3. Remove the wires to the heater plate assembly being removed or replaced.
4. Remove the bolts securing the heater plate assembly, and slide out the assembly.
5. Remove the heater from the mounting plate by removing the large brass nuts and
washers.
Operation
55