Proximity div., dwyer instruments, inc – Dwyer 265ER User Manual
Page 4
PROXIMITY DIV., DWYER INSTRUMENTS, INC.
P.O. BOX 358 • MICHIGAN CITY, INDIANA 46360 U.S.A.
Phone: 219/879-8000
www.dwyer-inst.com
Fax: 219/872-9057
e-mail: [email protected]
©Copyright 2014 Dwyer Instruments, Inc.
Printed in U.S.A. 4/14
FR# RP-443333-20 Rev. 7
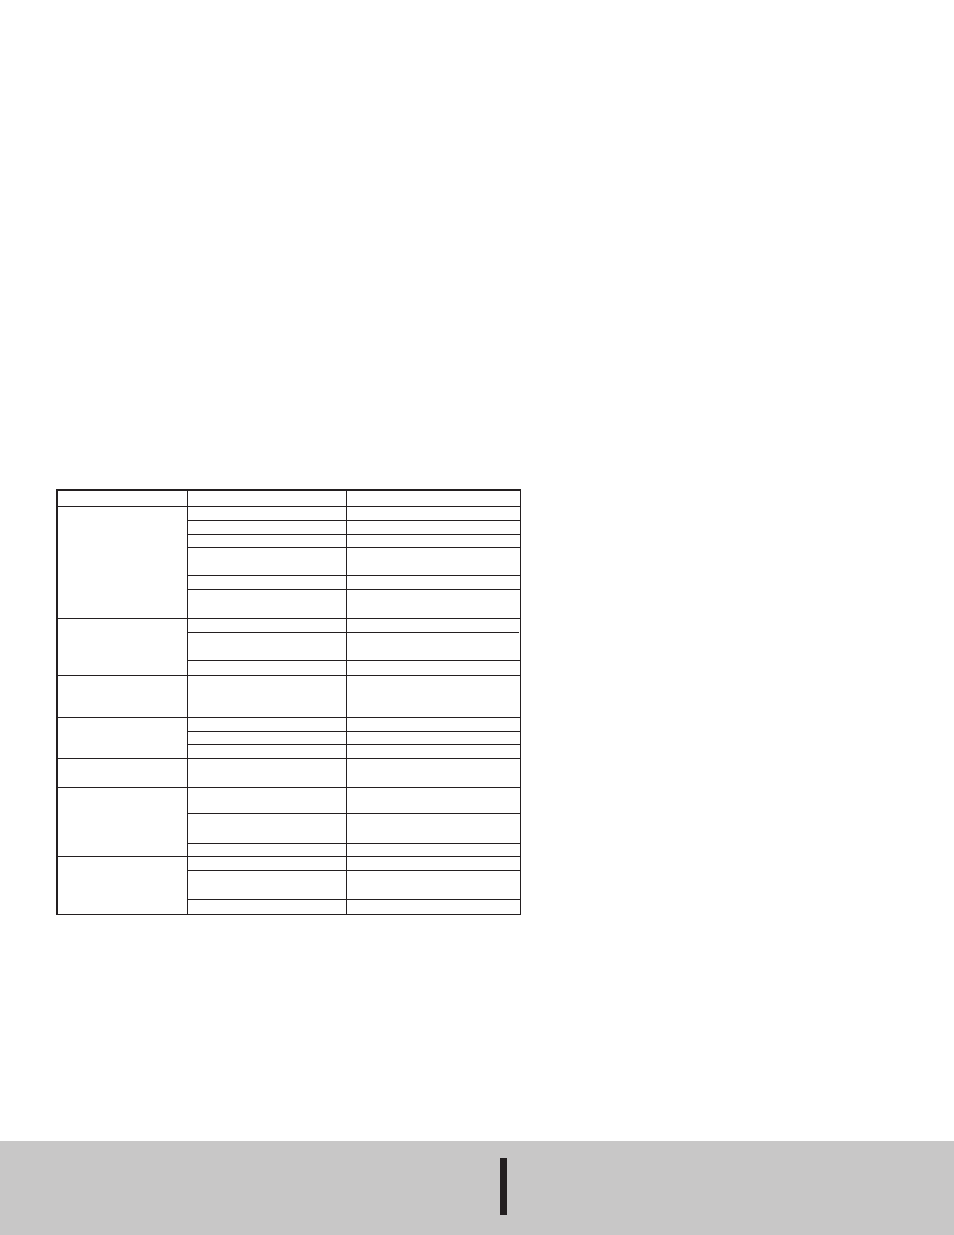
TROUBLESHOOTING
Condition
Not operating with Input
Signal applied
OUT1 pressure raised,
does not come down
Output pressure is
operated by A/M switch
only
Hunting occurs
Actuator is operated by
On/Off only
Linearity is not good
Hysteresis is not good
Cause
Too low or no supply air
Loose connection
Wrong wiring for (+) and (-)
Short or open circuit of terminal
motor
Clogged nozzle
Loose or wrong setting
of feedback lever
Leakage of A/M switch
Wrong contact or search of
Flapper
Clogged fixed orifice
Clogged nozzle
Off-positioned stabilizer spring
Too low of actuator volume
Clogged fixed orifice
Wrong connection of
OUT1 and OUT2 tube
Wrong setting of feed-back
lever
Wrong Zero, Span Adjustment
Supply pressure is unstable
Wrong setting of Seat Adjuster
Loose connection of actuator
and positioner
Cam Shaft is worn out
What To Do
Input or increase supply air
Tighten set screw of terminal
Connect wiring (+) and (-)
Replace Motor Unit
Replace Motor Unit
Correct setting and tighten
Tighten or replace A/M switch
Replace Motor Unit
Clean or replace fixed orifice
Clean nozzle or replace Motor
Unit
Insert stabilizer spring
Insert orifice
Clean or replace fixed orifice
Correct position of tube
Readjust setting of feedback lever
Readjustment of Zero, Span
Adjustment
Replace regulator
Readjust Seat Adjuster
Tighten connection
Replace Cam Shaft
MAINTENANCE
If the supply air is fouled, the positioner may not operate normally. Periodically
check the compressed air cleaning system and make sure that clean air is always
supplied. When disassembling the pilot valve, coat grease to the O-ring of the
sliding section. When the fixed orifice is clogged with carbon particles or others,
remove the pilot valve Auto/Manual changeover screw (built-in fixed aperture)
and clean it by inserting a 32 AWG wire into the aperture. If it must be replaced
with new one, stop the supply pressure and remove the stopper screw of the pilot
valve. Check the positioner once a year. Treatment at an early stage is especially
important if the positioner is used in severe environments, like coastal area. In
the unlikely event the 265ER Series Positioner should fail, the unit can be
returned to the factory for warranty repair if the warranty period has not expired.
Contact our customer service department for a RGA number and to setup the
return.
CAUTION AND HANDLING
Do not apply large vibration or impact to the positioner. The positioner must be
handled very carefully during transportation and operation. If the positioner is
used at temperatures outside of the specification, the sealing materials
deteriorate quickly and also the positioner may not operate normally. Do not
remove the terminal cover at a dangerous position during power conduction. Be
sure that the terminal cover and body cover are installed during the operation. If
you leave the positioner at the operation site for a long time without using it, put
the cover on it so that rain water does not enter the positioner. If the atmosphere
is of high temperature or high humidity, take measures to avoid condensation
inside. The condensation control measures must be taken thoroughly for export
shipment