1122 kg/m, 481 kg/m, 80 kg/m – Dwyer PLS User Manual
Page 3
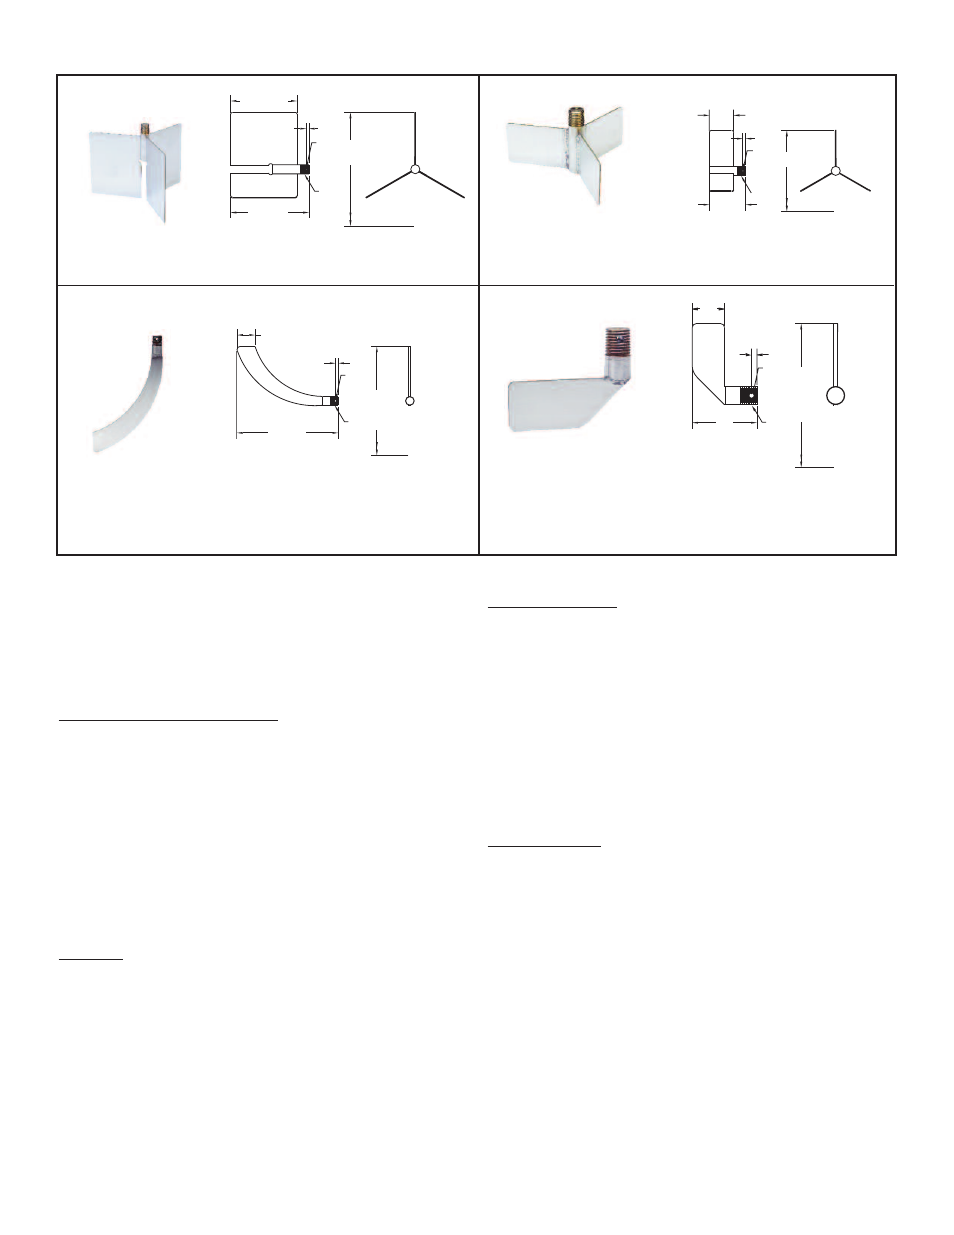
PADDLES
PDL-4. 316 SS single vane paddle for heavy weight materi-
als with a minimum bulk density of 70 lb/ft
3
(1122 kg/m
3
). Fits
through 1-1/4˝ coupling eliminating the need for a mounting
flange.
PDL-2. 316 SS three vane paddle for medium weight mate-
rials with minimum bulk density of 30 lb/ft
3
(481 kg/m
3
).
PDL-1. 316 SS three vane paddle for light weight materials
with a minimum bulk density of 5 lb/ft
3
(80 kg/m
3
).
PDL-3. 316 SS single vane paddle for medium weight mate-
rials with a minimum bulk density of 30 lb/ft
3
(481 kg/m
3
). Fits
through a 1-1/4˝ coupling eliminating the need for a mount-
ing flange.
1-9/64
[28.93]
11/64
[4.32]
6-15/32
[164.13]
1/8
PIN
HOLE
1/4
NPT
TURNS
IN
7˝
[177.80]
CIRCLE
1
[25.40]
11/64
[4.32]
1/8
PIN
HOLE
2
[50.80]
1/4
NPT
TURNS
IN
4-1/2˝
[114.30]
CIRCLE
4-3/32
[103.99]
4-53/64
[122.66]
11/64
[4.32]
1/4
NPT
1/8
PIN
HOLE
TURNS IN
7˝ [177.80]
CIRCLE
1-1/2
[38.10]
11/64
[4.32]
1/8
PIN
HOLE
2-15/64
[56.77]
1/4 NPT
TURNS IN
5˝ [127.00]
CIRCLE
INSTALLATION
Mounting Location
Select a location where the paddle is out of the direct flow of media/material, and
where media does not accumulate permanently. It may be necessary to protect the
paddle with a protective shield or baffle protection.
Protection provided by the equipment may be impaired if the equipment is used with
accessories not provided or recommended by Proximity, or is used in a manner not
specified by Proximity.
Mounting Accessories
Shaft Extensions and Flexible Shaft/Coupling
A standard paddle extension is supplied with all controls that is used to connect the
stub shaft of the control head to a paddle or to an extension shaft constructed of 1/4˝
pipe. Shaft extensions may be purchased from Proximity Controls in carbon steel and
stainless steel. Shaft extensions may also be constructed from 1/4˝ pipe, which is
threaded with 1/4˝ male NPT connections on both ends. Drill .152˝ diameter holes
through the pipe at a distance of .170˝ from each end. These holes should accept a
1/8˝ diameter roll pin. Shaft extensions should not exceed 48˝ in length. Multiple cou-
plings may be connected using coupling model number CPL-1.
Note: All joints should be secured with the 1/8˝ diameter roll pins supplied. Care
should be taken to press pins flush without damaging the bearings of the control.
A flexible shaft/coupling, model number CPL-FLX, may be substituted for the stan-
dard extension. The flexible coupling helps protect the control by absorbing side load-
ing, heavy loading, or loading caused by material surges. It is also recommended for
top mount applications when shaft extensions are used.
Shaft Shields
Shaft shields are recommended for use with shaft lengths over 12˝ to protect the shaft
from side loading. Shaft shields are available from Proximity Controls in carbon steel
and stainless steel. Shields may also be constructed from 1-1/4˝ pipe, which is
threaded with a 1-1/4˝ male NPT connection on one end. Shield pipe should be cut to
cover the shaft length while allowing sufficient clearance between the paddle and bot-
tom of shield. The shaft shield should be securely threaded into a full coupling weld-
ed to the bin or a full coupling mounting flange attached to the bin. Shaft should not
contact the inside diameter of the shaft shield.
Mounting Procedure
Mounting without a Flange
Paddles PDL-1 and PDL-3 will fit through a 1-1/4˝ coupling making a mounting flange
unnecessary. A mounting flange may also be avoided for applications where there is
access to the inside of the bin to attach the paddle from the inside once the switch
control head is installed.
Locate the desired mounting point and cut a hole in the bin of the proper diameter to
insert a 1-1/4˝ pipe coupling. For mounting without a shaft shield weld a 1-1/4˝ half
pipe coupling to the bin wall so that the coupling is flush with the interior wall. For
mounting with a shaft shield weld a 1-1/4˝ full coupling so that the coupling is halfway
into the bin. If using a PDL-1 or PDL-3 attach the paddle to the switch control head,
if not already connected, by screwing into the 1/4˝ NPT connection on the shaft and
inserting the roll pin. Attach the switch control head to the pipe coupling buy inserting
the paddle through the coupling and screwing in. If attaching the paddle from the
inside then first attach the switch to the coupling and then attach the paddle from the
inside of the bin as described above.
Mounting with a Flange
Paddles PDL-2 and PDL-4 will require flange mounting if the interior of the bin is not
accessible. Half coupling flanges (Models FLG-CSH and FLG-SH) should be used on
installations not requiring a shaft guard. Full coupling mounting flanges (Models FLG-
CSF and FLG-SSF) should be used with installations requiring a shaft guard.
If the mounting flange is used on a flat surface, layout a 7˝ bolt circle. The flange is
designed with clearance holes for 1/4˝ bolts or screws. Drill and tap 6 holes equally
spaced, on the bolt circle, of the appropriate thread type. At the center cut a hole of
sufficient clearance diameter to allow insertion of the paddle selected. It may be nec-
essary to tack weld bolts or screws to the flange or inner surface of the bin. On bins
with curved surfaces it may be necessary to create a template, which will follow the
contour of the bin wall, in order to locate the hole positions. Use the gasket supplied
if required between the bin wall and flange.