AW Gear Meters JVx-80KL & 90KL Series User Manual
Jvx-80kl w/ quad-4 shown
AW Gear Meters 8809 Industrial Drive, Franksville, WI 53126 web: www.awflowmeters.com
Tel: 262-884-9800 Fax: 262-884-9810 Email: [email protected]
REV. 05/24/12 JVX-80KL & 90KL W-QUAD-4.DOC
MAINTENANCE GUIDE FOR THE JVx-80KL & 90KL SERIES FLOW METER
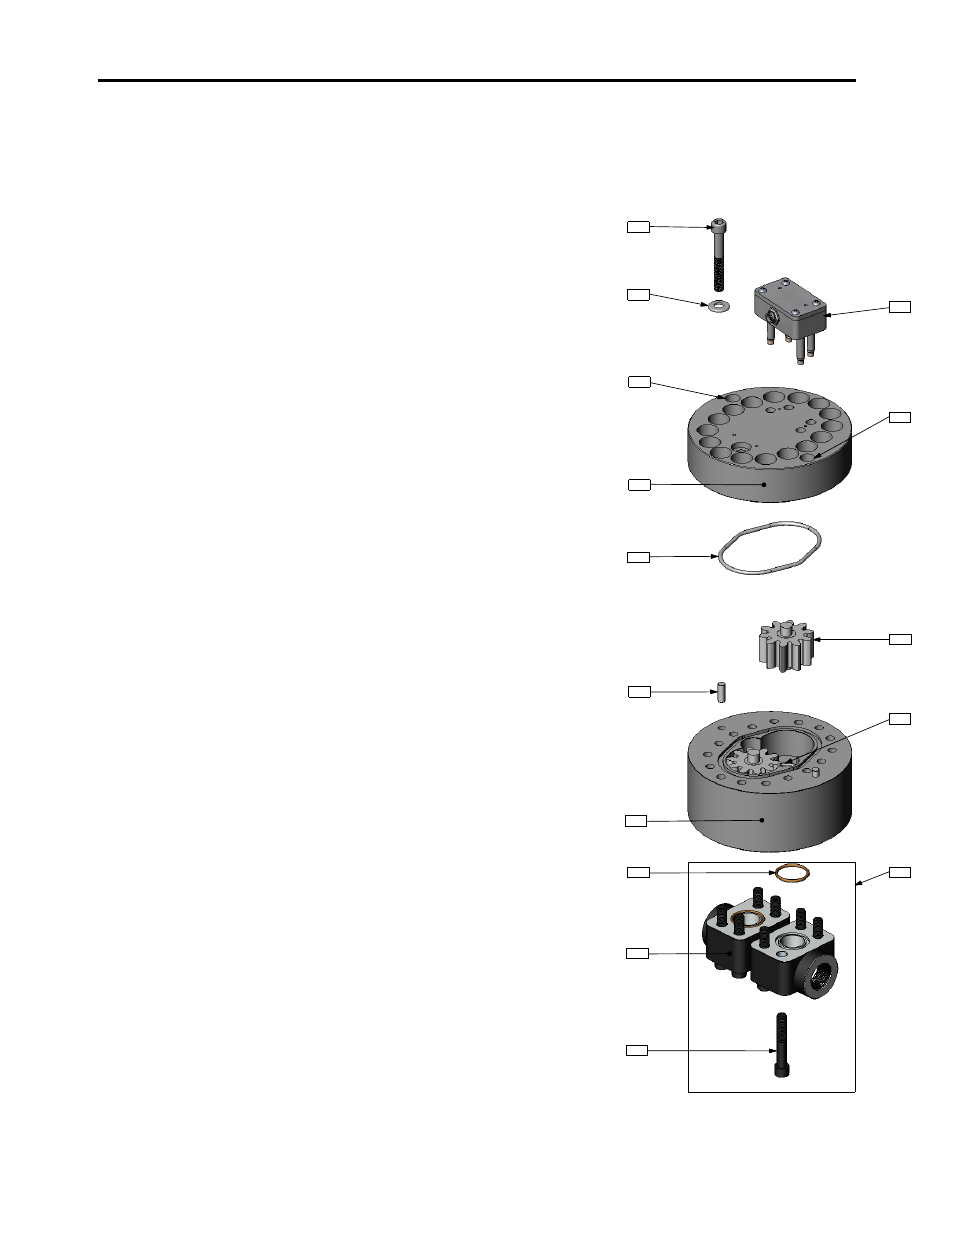
Cleaning, inspecting or repairing a JVx-80KL & 90KL Series gear flow meter is easily
accomplished by following the procedures below.
1. Remove the Sensor (3) from the flow meter body Upper
Housing (5). Using a 9/64 hex key, loosen the 2 mounting
screws inside the sensor.
2. Remove the hex bolts (1) with a 3/8 hex key.
3. Turn 2 of the hex bolts into the extraction bolt holes (4) until
they make contact with the lower housing (10). Using these
bolts for separating the housings helps to reduce any stress
on the locating pins and gear shafts.
4. With the extraction bolts turned down to the lower housing,
give each bolt a half-turn, alternating them, until the
housings have separated enough to where you can lift the
upper housing (5) straight off the locating pins. CAUTION:
When lifting the top housing off, make sure the gears
stay in the lower housing. If they come out with the
upper housing, they may fall off and damage the lower
housing or the gears themselves.
5. After separation, inspect the gears (7) and bearings (9).
Carefully remove the gears and thoroughly clean them with
solvent. Special care must be observed when cleaning or
flushing either the upper (5) or lower housing (10) as the
bearing could dislodge from the housing. NOTE: Do not
remove the bearings. For bearing repairs the meter
should be returned to the factory.
6. After cleaning, add lubrication if possible. The gears can be
reinserted into their previous positions. Check for free and
easy rotation of the gears.
7. Replace the O-ring (6) if it is damaged or deformed.
8. Keep the meter housings parallel during reassembly and
align the index marks on the housings so they are on the
same side. NOTE: Do not force the housings together
using a hammer or other similar device. Make sure to
turn out the bolts from the extraction holes.
9. Replace the hex bolts and torque all the bolts to 50 ft/lbs,
once one bolt is torqued, move to the bolt that is opposite it
and repeat until all bolts have been torqued. Over tightening
will not cause damage, but may restrict operation if surfaces
are not completely clean.
10. After reassembly, gently blow air into the meter so the gears
spin. This should be clearly audible given a moderate
background noise level.
11. The bearings should be lubricated prior to storage.
Never allow contact with water without immediately
drying and lubricating after use.
THIRD ANGLE
1
2
3
4
4
5
6
7
8
9
10
11
11a
11b
11c
THIS PRINT, INCLUDING THE INFORMATION
CONTAINED IN IT IS THE PROPERTY OF AW COMPANY.
IT IS CONSIDERED PROPRIETARY IN NATURE AND
MAY NOT BE USED OR DISCLOSED OUTSIDE OF
AW COMPANY, EXCEPT UNDER PRIOR WRITEN
AGREEMENT. ANY MODIFICATIONS MADE TO OR
COMMENTS WRITTEN ON THIS DRAWING
BY UNAUTHORIZED PERSONNEL WILL VOID
THIS DRAWING. ALL DIMENSIONS SHOWN
ARE SUBJECT TO CHANGE WITOUT NOTICE.
8809 INDUSTRIAL DR.
FRANKSVILLE, WI
53126
TEL. # (262) 884-9800
FAX. # (262) 884-9810
SCALE: 1:20
PAGE: 1 OF 2
PROJECT NAME:
PART DESCRIPTION:
MATERIAL:
HARDENING:
DRAWING NUMBER:
REV:
DATE:
PART NUMBER:
DRAWN BY:
PURCHASED PART
AW COMPANY USE ONLY
TOLERANCES UNLESS NOTED
ENGLISH
. XXXX +/- . 0005
. XXX +/- . 001
. XX +/- . 01
FRAC. +/- 1/64
ANG. +/- 0.1 DEG
SURFACE FINISH: 64 MAX
JVX-80KL
JVX-80KL W/ QUAD-4 SENSOR
SHONSBERGER
JV-80KL 042607
C
--/--/--
FINISH:
REV.
DESCRIPTION
DATE
APPROVED
REVISIONS
JVx-80KL w/ QUAD-4 Shown