Pilot valve and actuator plunger servicing – SANDPIPER RS30 Metallic User Manual
Page 22
rs30mdl1sm-rev0614
Model RS30 Metallic Page 20
To service the pilot valve or the actuator plungers, first shut off and bleed the air being supplied to the
pump. For safety purposes the air supply line should be disconnected from the pump. Then shut off the
suction and discharge lines to the pump. Bleed the pressure from the pump suction and discharge lines
and remove the lines from
the pump.
Step #1: Remove the Patch Cable
• Twist the ribbed portion of the patch cable connector in a counterclockwise
direction, until it unthreads from the connector. The cable can either be removed from
the intermediate or from the control module.
Step #2: Remove the AirVantage from the Pump
• Use a ½” socket and remove the four 5/16-18 x 5 cap screws that hold the AirVantage to the
pump. Be sure to support the weight of the AirVantage while removing the last cap screw. After the
AirVantage is removed from the pump, carefully set the unit down on the plastic cover located on the
bottom.
Step #3: Remove the Air Inlet Adapter Plate Adapter
• Use a ¼” hex key wrench and remove the four 5/16-18 x 1 ¼ socket head cap screws. This will allow
access to the pilot valve, gaskets and actuator plungers.
Step #4: Disassemble the Pilot Valve
• Remove the pilot spool and wipe it clean. Inspect the spool and o-rings for dirt, cuts or wear.
Replace parts if necessary.
• Use a set of outside snap ring pliers and remove the retaining ring holding the sleeve in the pilot
valve body. Gently push the sleeve from the body and wipe it clean. Inspect the sleeve and o-rings.
Replace parts if necessary.
Step #5: Reassemble the Pilot Valve
• Generously lubricate the o-rings on the pilot sleeve with multipurpose grease
(BP-LSEP-2 or equivalent). Carefully insert the sleeve in the pilot valve body, taking care not to
shear any of the o-rings. Install the retaining ring.
• Generously lubricate the o-rings on the pilot spool. Carefully insert the spool in the
• sleeve.
Step #6: Inspect the Actuator Plungers
• With the pilot valve assembly off the pump, the actuator plungers can be accessed.
• Remove the plungers and inspect them for nicks or unusual wear. Replace them if necessary. If the
bushings or o-rings need to be replaced, refer to the Intermediate Servicing section (p.17). Apply a
generous amount of lubricant and install the plungers back in the intermediate. Push the as far in as
they will go.
33
14
21
5.A
5.F
23
36
6
29
8
37
5.B
5.D
5.E
5.C
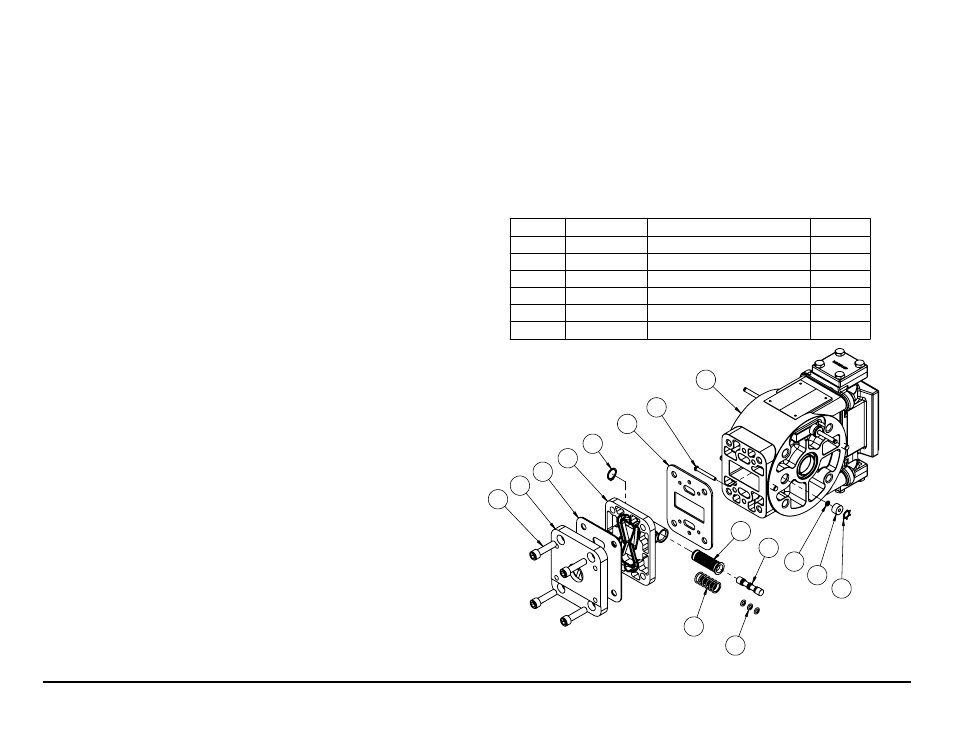
ITEM NO.
PART NUMBER
DESCRIPTION
QTY.
5.A
095.095.157
BODY, PILOT VALVE
1
5.B
755.051.148
SLEEVE, PILOT VALVE
1
5.C
560.033.360
O-RING
6
5.D
775.055.110
SPOOL, PILOT VALVE
1
5.E
560.023.360
O-RING
3
5.F
675.037.080
RING, RETAINING
1
Step #7: Reassembly
• Reinstall the pilot valve and gaskets. Take caution during the installation to align the ends of the pilot valve
stem between the plunger pins. If the pilot valve does not fit flush against the gasket, check to make sure
the actuator plunger are pushed all the way. Failure to do so may cause damage to the pilot valve or the
actuators.
Step #8: Reassemble AirVantage and Cable
• Reinstall the AirVantage using the four 5/16-18 x 5 cap screws and torque to 90 in-lbs.
• Reattach the patch cable connector that connects the AirVantage module to the intermediate.
Pilot Valve and Actuator Plunger Servicing
Note: Refer to Composite Repair
Parts List on page 12 for part
numbers