Maintenance, Caution warning – Lincoln Electric IM640 SAE400 Weld'n Air User Manual
Page 24
D-4
MAINTENANCE
D-4
SPARK ARRESTOR
•
Spark Arrester and Muffler may be
hot!
•
Allow engine to cool before servicing
spark arrester!
•
Do not operate engine while servicing
spark arrester!
For machines with separate spark arresting units:
Service the spark arrestor every 100 hours of opera-
tion or twice a year, which ever occurs first.
Service as follows:
1. Stop engine and allow to cool.
2. Loosen clamp and remove spark arrestor from
machine.
3. Remove locknut on top of spark arrestor housing
and lift off cap.
4. Separate plates and clean if necessary.
5. Inspect plates and housing for holes or cracks.
Replace spark arrestor if damaged.
6. Assemble spark arrestor using reverse order: step
3, then step 2.
For machines with integral spark arresting mufflers:
Service spark arrester every 250 hours.
Service as follows:
1. Stop engine and allow to cool.
2. Remove clean out plug from side of spark arrester.
3. Without damaging the spark arrester, gently tap on the
arrester shell near the clean out plug.
4. Once particles are removed, replace the clean out plug.
SAE400 & SAE400 WELD
’
N AIR
ENGINE AND COMPRESSOR MAINTENANCE
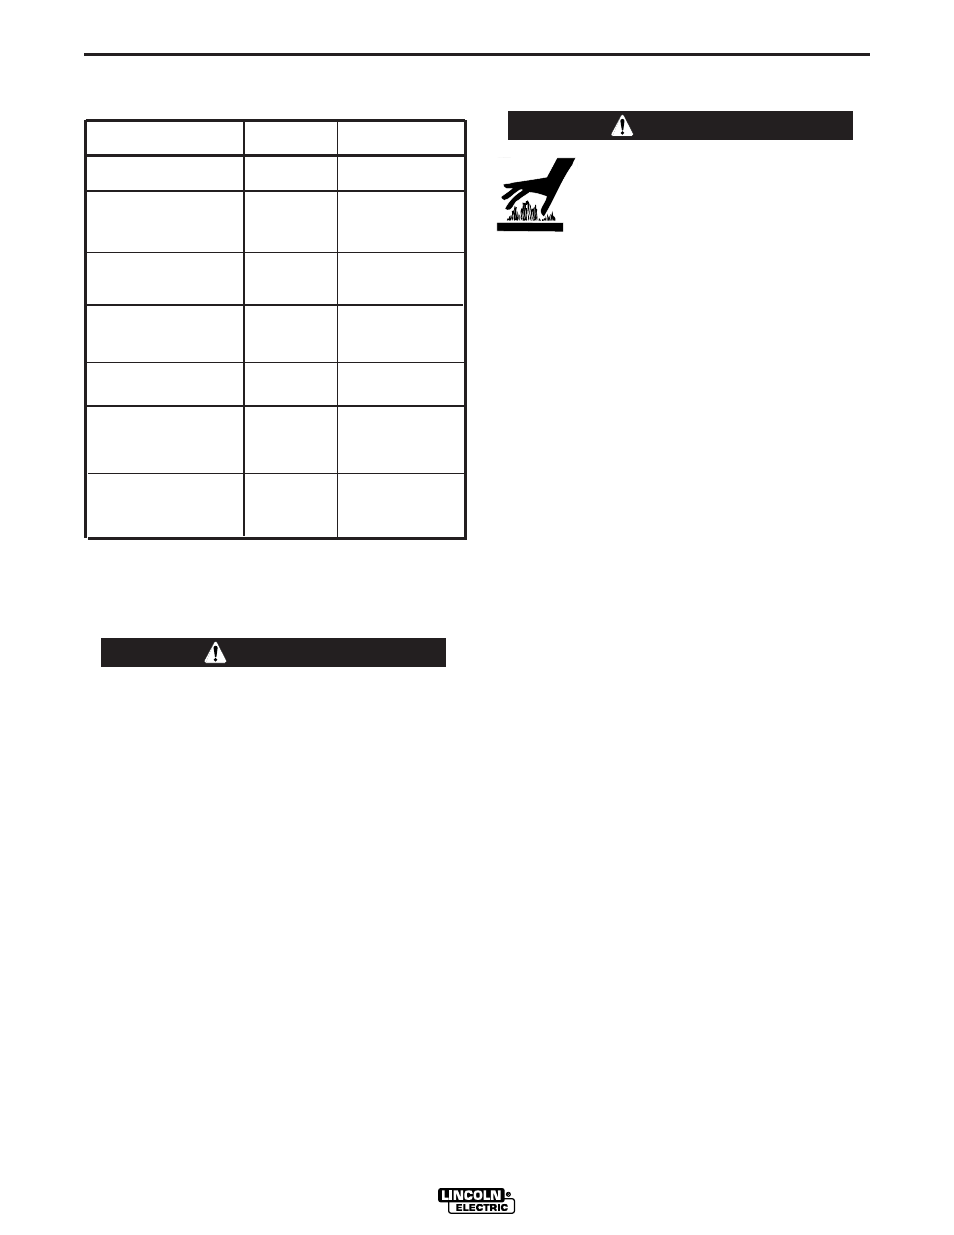
COMPONENTS
ITEM
MAKE
PART NUMBER
Engine Air Filter
Donaldson
P181052
Fan Belt
Perkins
2614B550
Compressor Belt
Lincoln
S23887
(SAE400 WELD’N AIR only)
Gates
2/A40
Fuel Filter
Perkins
26560143
Engine Oil Filter
Perkins
2654403
(Codes 10884 & Above)
Water Separator
Lincoln M16890-C
Element
Stanadyne 31572
(Codes 10884 & Above)
Fuel Pre-Filter Screen Lincoln M16890-B
Stanadyne 29575
REPLACING AIR COMPRESSOR DRIVE BELT
(SAE400 WELD
’
N AIR only)
Belt is tensioned using a automatic tensioning
device. Remove with care.
------------------------------------------------------------------------
To remove compressor belt:
1. Remove nut and lock washer from lower locking
bolt on idler tension flange.
2. Loosen center mounting bolt on idler tensioner 1/2
turn or until it moves freely.
3. Using a pipe wrench or equivalent tool, turn ten-
sioner body slightly to free locking bolt. Remove
locking bolt and slowly release tension on belt.
Remove belt.
Note:
Do not loosen or remove compressor mounting
bolts. Pulley misalignment may result.
To install belt (after following above procedure):
1. Mount belt into pulley grooves and over idler pul-
ley.
2. Using a pipe wrench or suitable tool, turn idler
body to realign locking slot in idler flange with
locking hole. Insert locking bolt and tighten before
releasing idler body. Tighten center mounting bolt.
Note:
Ensure that both belt strands are running prop-
erly in pulley grooves.
CAUTION
WARNING