Maintenance – Lincoln Electric IM994 RED-D-ARC LN-25 PRO EXTREME (CE) User Manual
Page 36
D-2
MAINTENANCE
D-2
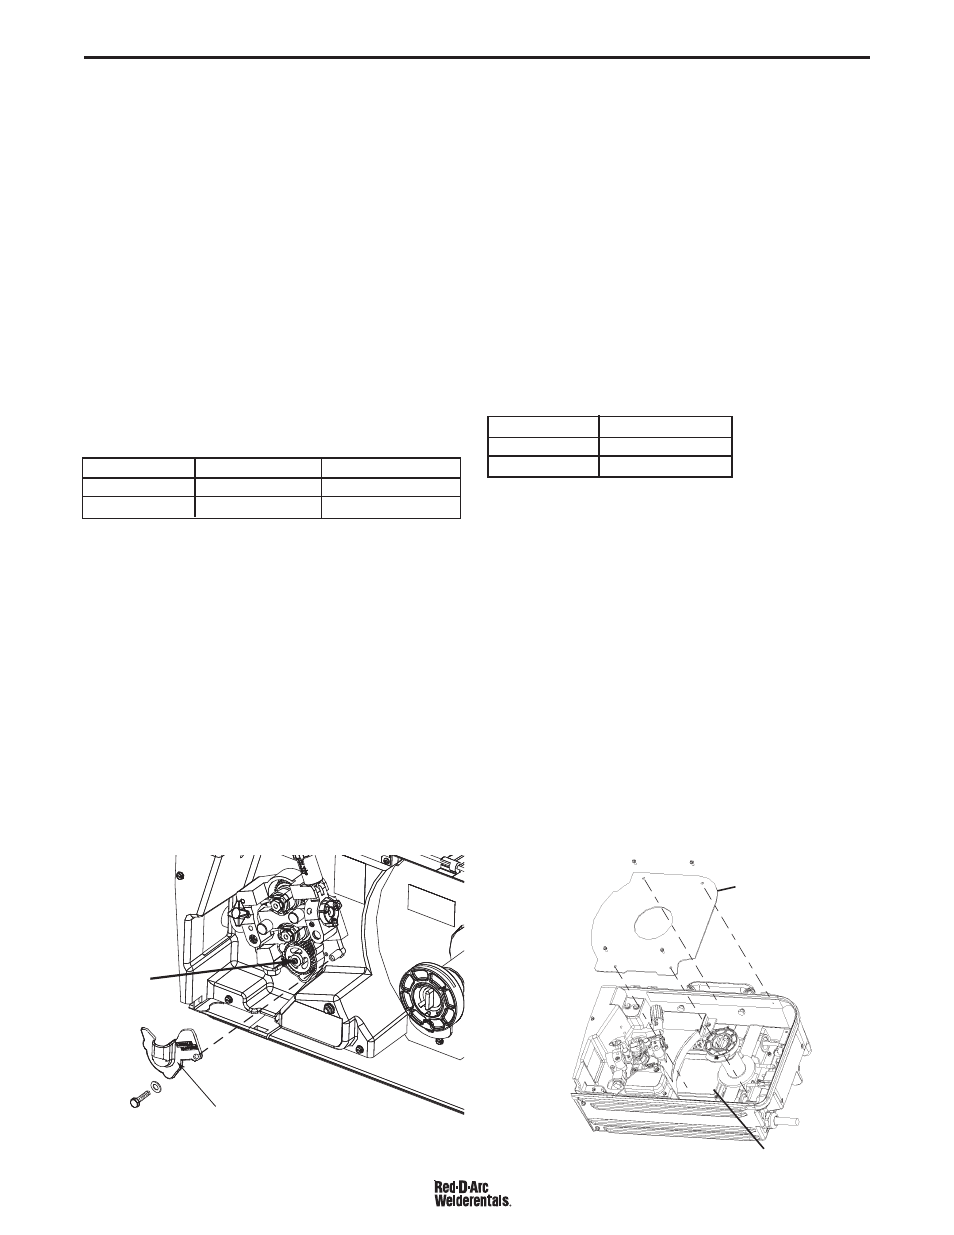
Wire Feed Speed Validation
(See Figure D.1)
Calibration of the Red-D-Arc LN-25™ PRO DUAL
POWER may be required when the p.c. board, wire feed
speed potentiometer or motor is replaced or serviced.
Calibration matches the scale on the name plate to the
actual wire feed speed.
Tools required:
• RPM meter
• Constant voltage DC welding power source (DC-400,
V-350, CV-400 or equivalent)
• 7/16" open end wrench
To verify if calibration is necessary:
1. Turn power OFF.
2. Set the wire feed speed per the table.
Model gearing Wire Feed Speed Acceptable Range
Standard Speed 400 in/min
69 - 77 rpm
Extra Torque
150 in/min
52 - 58 rpm
3. Remove the plastic cover from the lower portion of the
wire drive with a 7/16" wrench.
4. Connect the Red-D-Arc LN-25™ PRO DUAL
POWER to the constant voltage DC welding power
source. The work lead of the Red-D-Arc LN-25™
PRO DUAL POWER must be connected to the work
terminal of the power source.
5. Turn power ON.
6. Measure the motor rpm when the COLD FEED button
is pressed.
7. Verify the rpm is within the acceptable range.
To change the wire feed speed calibration:
(See Figure D.2)
Tools required:
• 5/16" nut driver
• RPM meter
• Shorting plug. The shorting plug shorts pins 4 & 8 of
connector J3 on the p.c. board. J3 is a 8 pin molex
connector.
1. Turn power OFF.
2. Remove the 4 screws holding the rear cover inside
the feeder and remove the cover.
3. Open the idle arm.
4. Set the wire feed speed per the table.
Model gearing Wire Feed Speed
Standard Speed 400 in/min
Extra Torque
150 in/min
5. Connect the LN-25™ PRO DUAL POWER to the
constant voltage DC welding power source. The work
lead of the LN-25™ PRO DUAL POWER must be
connected to the work terminal of the power source.
6. Turn power ON.
7. Insert the shorting plug into connector J2 on the p.c.
board. The shorting plug shorts pins 1 & 5.
8. Remove the shorting plug.
9. Turn power OFF.
10. Replace the cover and secure with the screws.
RED-D-ARC LN-25™ PRO DUAL POWER (CE)
COVER
MOTOR
SHAFT
FIGURE D.1
FIGURE D.2
COVER
P.C. BOARD