Exchange, Continued, Bfx 1 – MAHLE RTI BFX-1 User Manual
Page 8
IMPORTANT:
Test drive vehicle after service to verify proper
brake system performance.
Page 7
Exchange
continued
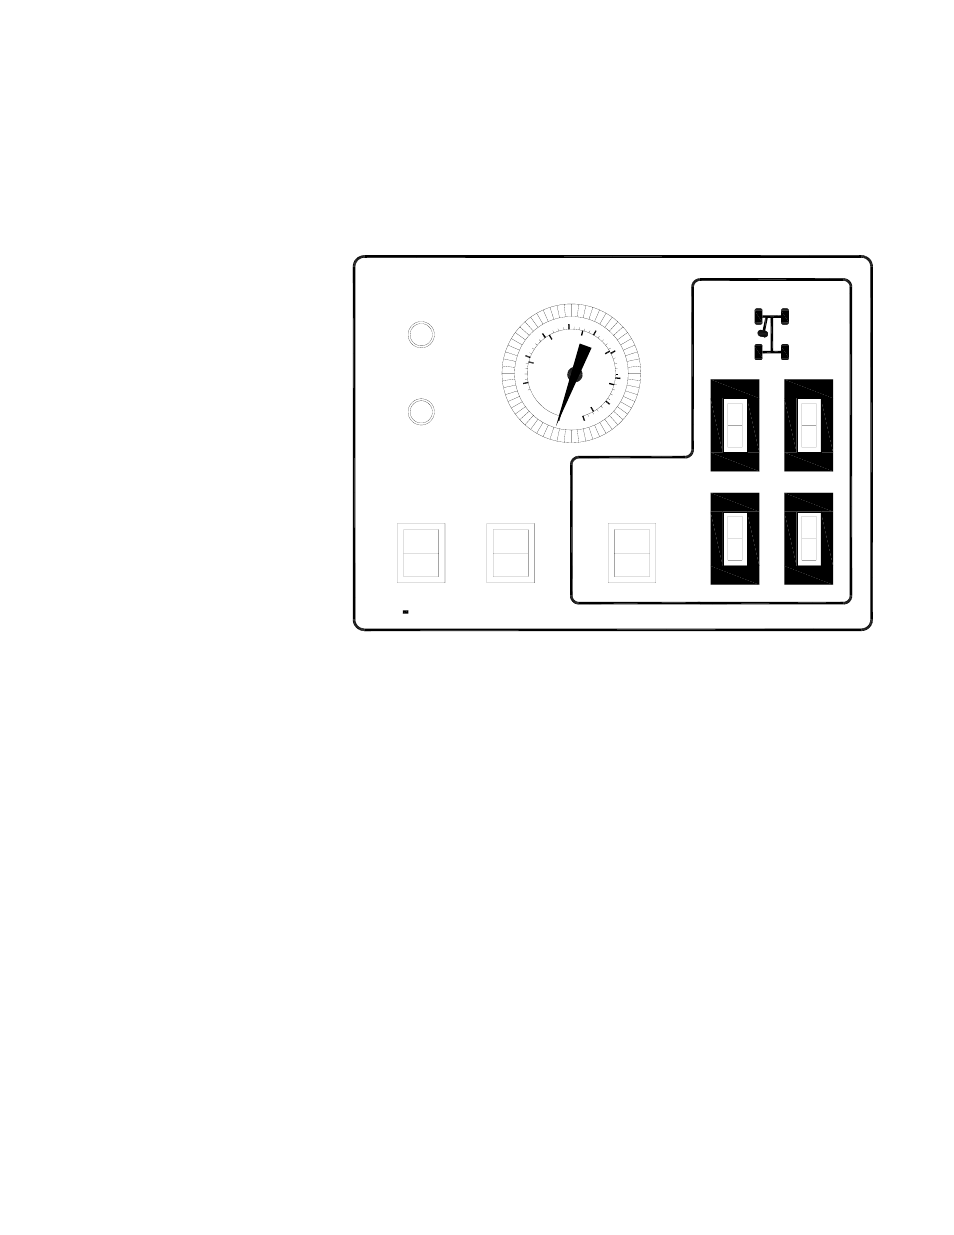
10. Turn on FILL MASTER CYLINDER switch. Verify that fluid is flowing through the Fill Hose
into the Master Cylinder and that the pressure stops and holds at approximately 12 psi as
shown on the BFX Pressure Gauge.
Note: If pressure does not remain constant as indicated on Pressure Gauge, check
master cylinder adapter for
leaks and tighten.
11. Verify hose and battery
cable clearance, then
raise vehicle.
12. Connect Bleeder Hoses
to the bleeder valves
located on each wheel
cylinder. Match color
code on each bleeder
line to the graphic
located on the BFX
Control Panel.
13. Turn off FILL MASTER
CYLINDER switch.
14. Turn on EXCHANGE
BRAKE FLUID switch.
15. Using the four VACUUM BLEEDER switches, vacuum each wheel bleeder. Always
follow the OEM recommend service for the correct sequence. Select appropriate
switch and turn on. Loosen corresponding bleeder until adequate flow is observed.
16. Monitor flow and color of fluid in Bleeder Hose and turn off VACUUM BLEEDER switch
when fluid becomes clear or the desired amount of fluid has been exchanged.
Warning: Monitor both the NEW TANK EMPTY and USED TANK FULL Indicator Lights.
If either illuminates during service, immediately turn all switches off, add new
or remove used fluid as needed and continue with procedure.
Note: The appearance of air bubbles in the Bleeder Hoses is due to air being pulled
around the thread of the bleeders. This is a common occurrence and does not
indicate a malfunction with the process.
ON
ON
OFF
OFF
OFF
ON
PRESSURE
EMPTY
FULL
USED TANK
NEW TANK
ON
OFF
ON
ON
OFF
ON
OFF
OFF
VACUUM BLEEDER
BFX 1
EMPTY
MASTER
CYLINDER
FILL
MASTER
CYLINDER
EXCHANGE
BRAKE
FLUID