Pfister 016-500SP User Manual
Page 12
19
CAUTION: Maintenance
DISASSEMBLY
1. Replacement parts may be available at the store where you purchased your faucet.
2. When replacement parts are not available, please write or call Price Pfister Consumer
Service.
3. Always turn off water and relieve pressure before working on your shower panel.
NOTE: Trim Care
Cleaning Instructions:
For all Handles and decorative finishes, use only a soft damp cloth to clean and shine. Use
of polish, detergents, abrasive cleaners, organic solvents or acid may cause damage. Use
of other than a soft damp cloth will nullify our warranty!
Special Trim:
Trim products which contain Porcelain or other similar substance are not acceptable for public
areas or Commercial use. Installation of Said Trim is at Users Risk!
(1–800–340–7608)
For Toll Free Information call
1-800-340-7608 or visit
www.pricepfister.com/International
• Installation Support
• Care and Warranty Information
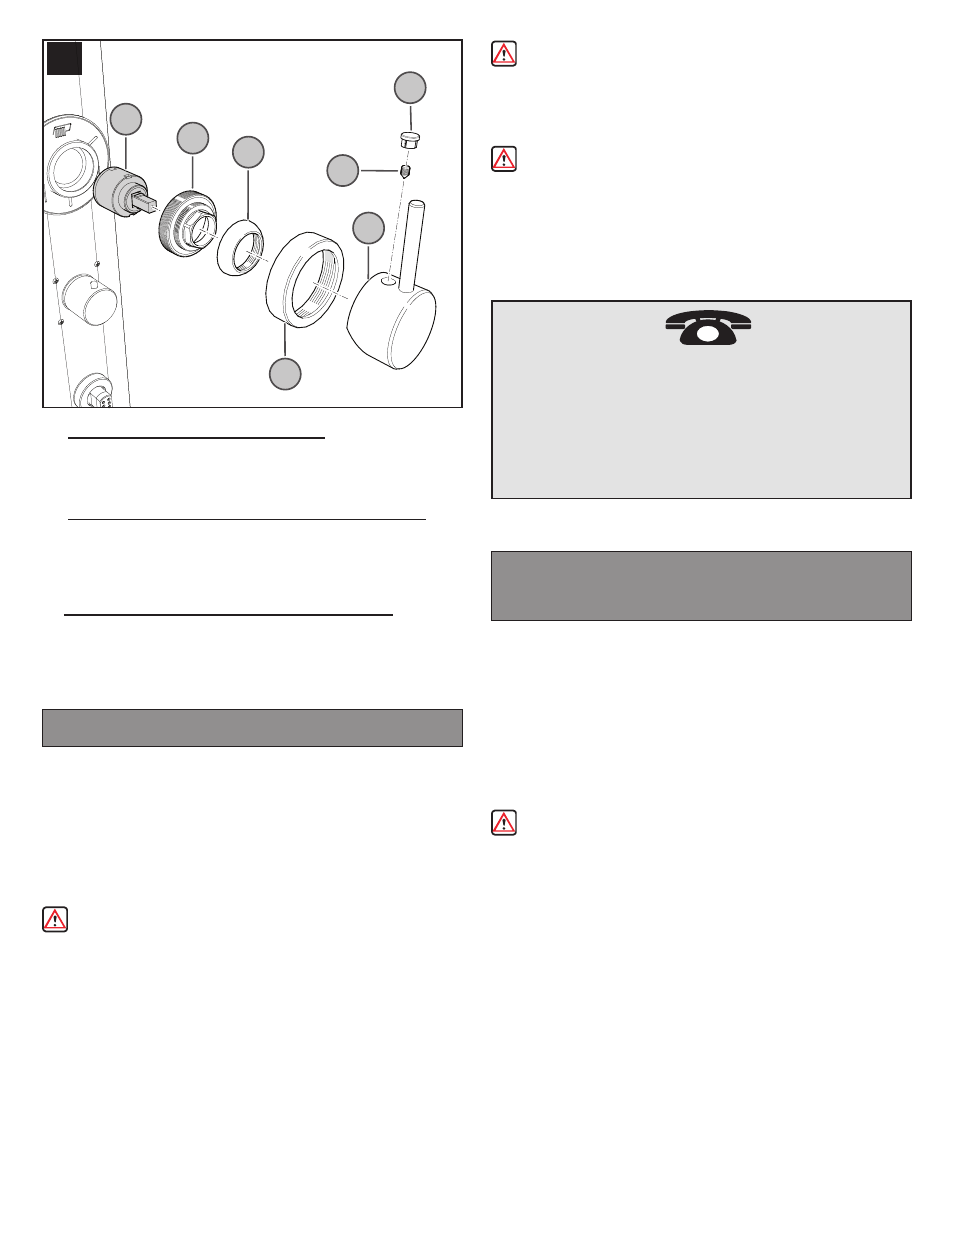
19 RETRAIT DE LA CARTOUCHE DU MITIGEUR
Enlever le bouton (19B). À l'aide d'une clé Allen de 3/32 po, enlever la vis pression
(19C), puis la manette du mitigeur (19A). Dévisser les anneaux de retenue
(19D), (19E) et (19F) et retirer la cartouche du mitigeur (19G). Remonter le
tout dans l’ordre inverse.
19 CÓMO SACAR EL CARTUCHO DEL DESVIADOR
Quite el botón (19B). Con una llave Allen de 3/32" (2,4 mm), saque el tornillo de
ajuste (19C), luego la manija del desviador (19A). Desatornille los anillos de re-
tención (19D), (19E), and 19F) y saque el cartucho del desviador (19G). Vuelva a
montar siguiendo el orden inverso.
. La temperatura o el flujo no son constantes.
Debe limpiarse la unidad del cartucho termoestático (18A). Corte el suministro
de agua. Saque el botón (18E) y luego el tornillo de ajuste (18D). Saque la
unidad de la perilla (18C) de la unidad del cartucho (18A). Desatornille el anillo
de retención (18F) para sacar el tornillo de ajuste (18B). Saque la unidad del
cartucho termoestático (18A) del cuerpo de la válvula (18G). Inspeccione las
entradas para comprobar que no haya sedimentos y limpie con agua corriente.
Inspeccione los anillos O (circulares) (18H) para comprobar que no estén daña-
dos. Vuelva a montar todo en el orden inverso. Hecho esto, abra el suministro de
agua. Si el problema persiste, reemplace la unidad del cartucho (18A).
PRECAUCIÓN: No desmonte la unidad del cartucho termoestático (18A).
. La regadera de mano, el cabezal de la ducha o los aerosoles para
el cuerpo gotean
Limpie la unidad del cartucho (18A). Revise para cerciorarse de que los anillos O
(circulares) (18H) en el cartucho (18A) estén en su lugar. Vuelva a armar el car-
tucho y la unidad de la perilla. Abra el agua y pruebe. Si la unidad sigue goteando,
reemplace el cartucho.
. Asegúrese de que las entradas del agua caliente y fría estén abi-
ertas.
. El agua no fluye o no está suficientemente caliente.
Compruebe que el calentador de agua esté funcionando debidamente.
. El agua fluye muy poco.
Inspeccione la unidad del cartucho (18A) para comprobar que no tenga
desechos.
. El agua sale fría y se calienta gradualmente al girar la manija en el
sentido de las manecillas del reloj.
Puede tratarse de una situación peligrosa que deberá corregirse antes de utilizar
la unidad. Revise las posiciones de las entradas del agua caliente y fría (caliente
izquierda, fría derecha).
. El agua sale de los aerosoles para el cuerpo o de la regadera de
mano cuando se utiliza el cabezal de la ducha.
Es posible que el sello dentro del mecanismo del desviador (19G) se haya salido
de su lugar. Quizá sea necesario reemplazar el desviador (19G).
19 DIVERTER CARTRIDGE REMOVAL
Remove Button (19B). Using a 3/32" Allen Wrench, remove set screw (19C), then
remove Diverter Handle (19A). Unscrew Retainer Rings (19D), (19E), and (19F)
and remove Diverter Cartridge (19G). Reassemble in reversed order.
TROUBLESHOOTING TIPS
CONSEJOS PARA LOCALIZAR Y
RESOLVER PROBLEMAS
.
Temperature or Flow does not remain constant.
The Thermostatic Cartridge Assembly (18A) must be cleaned. Shut off water supply.
Remove Button (18E) then Set Screw (18D). Remove Knob Assembly (18C) from
Cartridge Assembly (18A) Unscrew Retainer Ring (18F), then remove Set Screw
(18B). Remove Thermostatic Cartridge Assembly (18A) from Valve Body (18G).
Inspect inlets for sediment and flush with water. Inspect O-Rings (18H) for dam-
age. Reassemble in reversed order then turn water supply on. If problem persists,
replace Cartridge Assembly (18A).
CAUTION: Do not disassemble Thermostatic Cartridge Assembly (18A).
.
Dripping either from Hand-Held Shower, Head Shower or Body Sprays
Clean the Cartridge Assembly (18A). Check to ensure the O-Rings (18H) on Car-
tridge (18A) are in place. Reassemble Cartridge and Knob Assembly. Turn on the
water and test. If the unit still leaks, replace the Cartridge.
.
Make sure that both hot and cold water inlets are turned on.
.
No water flow or water not warm enough.
Check if water heater is working properly.
.
Water Flow is very low.
Check the Cartridge Assembly (18A) for debris.
.
Water starts out cold and becomes hotter as handle is rotated clockwise.
This is a potentially hazardous situation and should be corrected before using the
unit. Check the hot and cold inlet positions (hot left, cold right).
.
Water flows from the Body Sprays or Hand-Held Shower when Head
Shower in use.
The seal inside the Diverter Mechanism (19G) may have been dislodged. The Di-
verter (19G) may need replacement.
12
19G
19A
19C
19D
19E
19F
19B