Installing the software, Using an ethernet connection – Teledyne LeCroy Summit T3-16 PCI Express Protocol Analyzer QSG User Manual
Page 3
Installing the Software
The PETracer software operates all of Teledyne LeCroy’s
PCI Express Protocol Analyzer and Exerciser products and should
be installed on a Microsoft
®
Windows
®
-based host machine. You
need to install the PETracer software on the host machine before
attaching the Analyzer to the system. The minimum requirements
for the host machine are:
•
Windows® XP, Windows 7 (x86, x64) Windows 8 (x86, x64),
Windows Server 2003, Windows Server 2008 and Windows
Server 2012 R2
•
Processor with clock speed of 1 GHz or higher
•
2 GB of RAM
•
Hard drive with at least 250 MB of free space for software
installation and additional space for storing recorded data
•
Display with at least 1024 x 768 resolution , with 16-bit color
•
USB 2.0 port
In general, the higher the performance of the host machine, the
better user experience you get. Please refer to the Readme notes
and Summit T3-16 User Manual for recommended configurations
and additional information.
User manuals for your Teledyne LeCroy PCI Express products
can be found in Start > All Programs > LeCroy > PETracer >
PCIe Protocol Suite Documents.
To install the software, follow the steps below:
1.
Insert the CD into the CD-ROM drive of the host machine that
will control the Analyzer. The installation window displays
links to software installation, user manuals, application notes,
and data sheets.
2.
Select Install PCIe Protocol Suite and follow the on-screen
instructions. The PETracer software installs automatically on
the host machine’s hard disk. During installation, all
necessary USB drivers will be installed.
3.
To start the application, launch the PETracer program from
the Start menu: Start > All Programs > LeCroy > PETracer
> LeCroy PETracer
Software installation can also be downloaded from the Teledyne
LeCroy website.
7
8
Setting Up and Connecting the Summit T3-16 Analyzer
You can connect the Analyzer to the host machine using USB or Ethernet.
Using an Ethernet Connection
To set up the Analyzer using an Ethernet connection:
1.
Install PETracer software on the host machine.
2.
Connect the Analyzer to a 100-volt to 240-volt, 50 Hz to
60 Hz, 120 W power outlet using the provided power cord.
3.
Connect the Ethernet cable between the Ethernet port on the
Analyzer and a Ethernet port in the local network.
4.
Turn on the power switch on the front of the analyzer.
Note 1: No driver installation is needed for Summit T3-16 to
operate over a network.
Note 2: At power-on, the Analyzer initializes and performs a
self-diagnostic. The results are reflected by messages on the
Summit T3-16 LCD display. If the LCD display indicates
failure, call Teledyne LeCroy Customer Support for
assistance.
Note 3: Summit T3 is configured at the factory to use dynamic IP
setting and will get all required network parameters from the
DHCP server on your network. If the DHCP server is not
available, or to connect Summit T3 directly to the host
machine, you can reconfigure the network settings of Summit
T3 using the menus in the LCD display on the front of the
analyzer (see the “LCD Menus” part of section 4 of this
document).
Connecting to Summit T3-16 in the software
Start the PETracer software and perform the following procedure to
connect to a Summit T3-16 analyzer over the network.
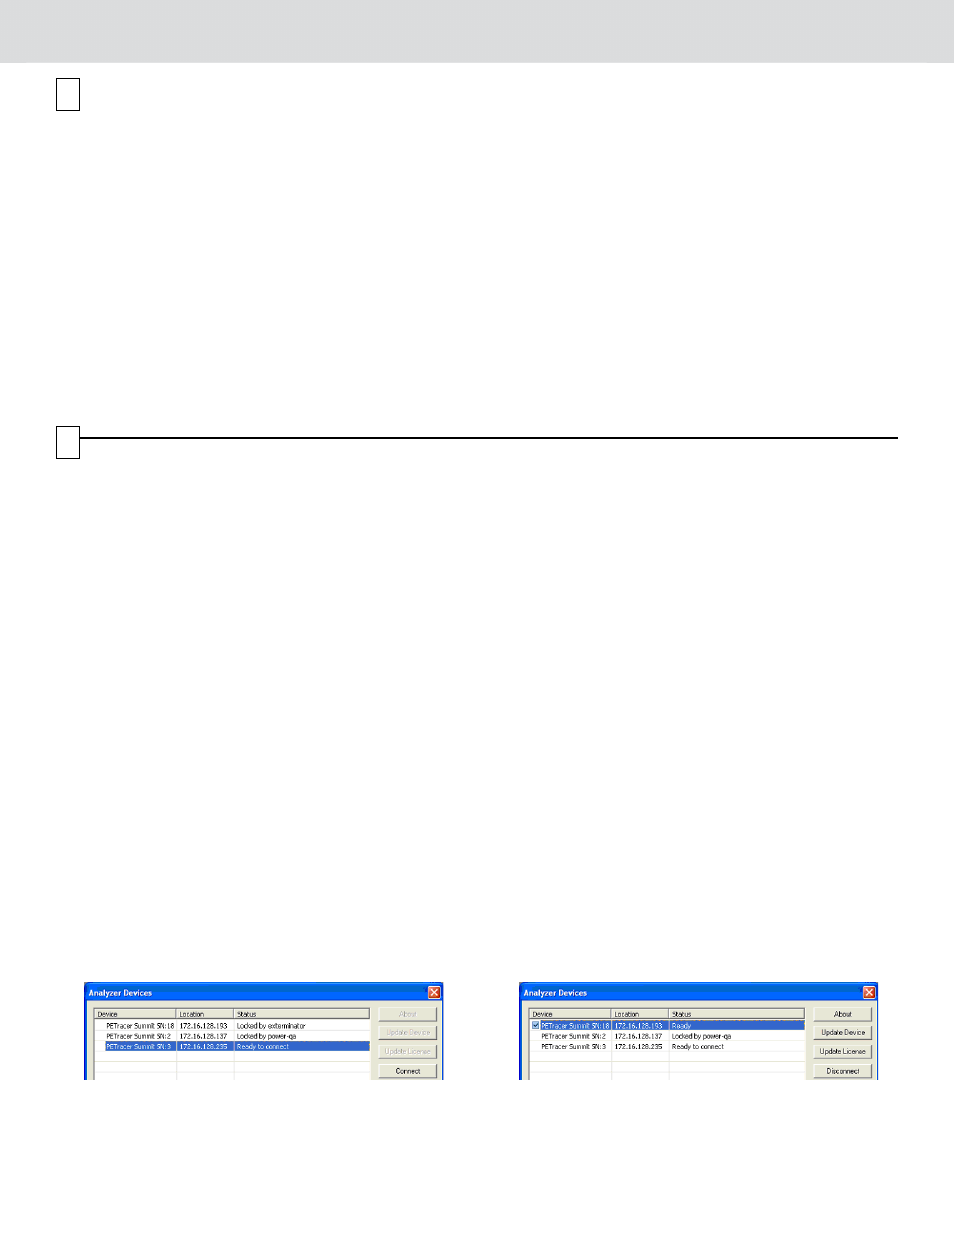
1.
Select the Setup > All connected devices… menu in the
PETracer application to display the Analyzer Devices dialog.
The Summit devices in the list are marked:
•
Locked: Some other client on the network is already
connected to that device
•
Ready to connect: Available for connection
2.
Select your Summit T3 device in the list and press the
Connect button to execute the connection procedure. After
the connection is established, the application displays the
Connection Properties dialog.
3.
Select an option:
•
Automatically connect to the device: When the
application is started or when the named device appears
on the network while the PETracer application is running
on this computer, the PETracer application will try to
connect to the named device.
•
Ask if I want to connect to the device: When the
application is started or when the named device appears
on the network while the PETracer application is running
on this computer, the PETracer application will display a
message box allowing you to connect to the named
device.
•
Take no action: When you start the application or when
the named device appears on the network while the
PETracer application is running on this computer, you
must connect manually to use the named device.
Note: When you close the application on this computer (or
you perform manual disconnect), the application
disconnects from the device.
4.
Press OK in the Connection Properties dialog. After you
finish the connect procedure, the Summit T3-16 to which you
have connected is marked as Ready and you can use it for
recording.
Note: To disconnect from a device, display this dialog,
select the device, and click the Disconnect button.
Note 2: Summit T3 will not appear in the Analyzer Device dialog
if it is connected on a different Subnet on your local
network. You can connect to it on the Subnet by
specifying its IP address in the Add Device dialog.