Gilderfluke&Co Sd-10 Audio Repeaters User Manual
Sd-10 configuration & installation, Audio repeater, Line level outputs
Running
Status
External power for Switches
Battery
Left
Switch ‘a’
A
Inputs
B
Switch ‘b’
Sd-10
Br-MiniBrick4
Gilderfluke & Co.
Burbank, California
0 1
2 3
Record Go
Data
Trigger
9-24
vdc
Outputs
Outputs
Triggering from a
Control System
A
Inputs
B
Sd-10
Sd-10 Configuration & Installation
Before the Sd-10 can be used, you will need to load your SoundFiles onto a
MMC/Sd flash card, attach a power supply, an amplifier and speakers (or ampli-
fied speakers), and (optionally) a switch to start the Sd-10. Selecting the operat-
ing mode will tell the Sd-10 how you would like your SoundFiles to be played.
MMC/Sd Card:
Any 3.3 volt Multi Media Card (MMC) or Secure
Digital (Sd) flash memory card can be used with the
Sd-10. Starting with version 1.16 of the Sd-10 firm-
ware, Sd HC cards are also supported. These will
be available with capacities up to 2048 GBytes. As
of this writing, Sd cards are available in sizes
up to eight GBytes. These hold about 2000
typical Mp3 songs for about four days of
continuous audio playback. The Sd-10
supports up to 255 SoundFiles in most op-
erating modes. Some modes support up to
32,767 SoundFiles.
The flash card should be formatted ʻFATʼ or
ʻFAT32ʼ (it will probably come that way).
The order in which the SoundFiles are
placed onto the card is the order in which
the Sd-10 will play them. You can load
Mp3 and .wav files onto the card using a
flash card writer attached to a PC or Mac.
For the Sd-10s to recognize a SoundFile,
its FileName must start with an alphanu-
meric character, and it must have the ex-
tension of either ʻ.wavʼ or ʻ.Mp3ʼ. If a
SoundFile meets these criteria, the Sd-10
will attempt to play it. If the Sd-10 canʼt play
a SoundFile for any reason, it will give up af-
ter about three seconds.
The Sd-10 will play just about all Mp3 or .wav
file formats. Mp3 bit rates up through 320 Kb/
second are supported. .wav files of
up to 48 Kbytes/second and six-
teen bit are supported. If a file
does not play, it is most often caused
by which has a large (more
than 2 MBytes) ʻid3ʼ tag at its
front. These typically hold the
album cover artwork for files
downloaded from iTunes and
similar sources. Since a Sd-
10 canʼt use album artwork, it simply
takes up additional storage space, de-
lays the time it takes a sound to start
playing, and (in the worst case), will
keep a sound from playing at all. Most
audio programs (including
iTunes) have an option to
eliminate ʻid3ʼ tags.
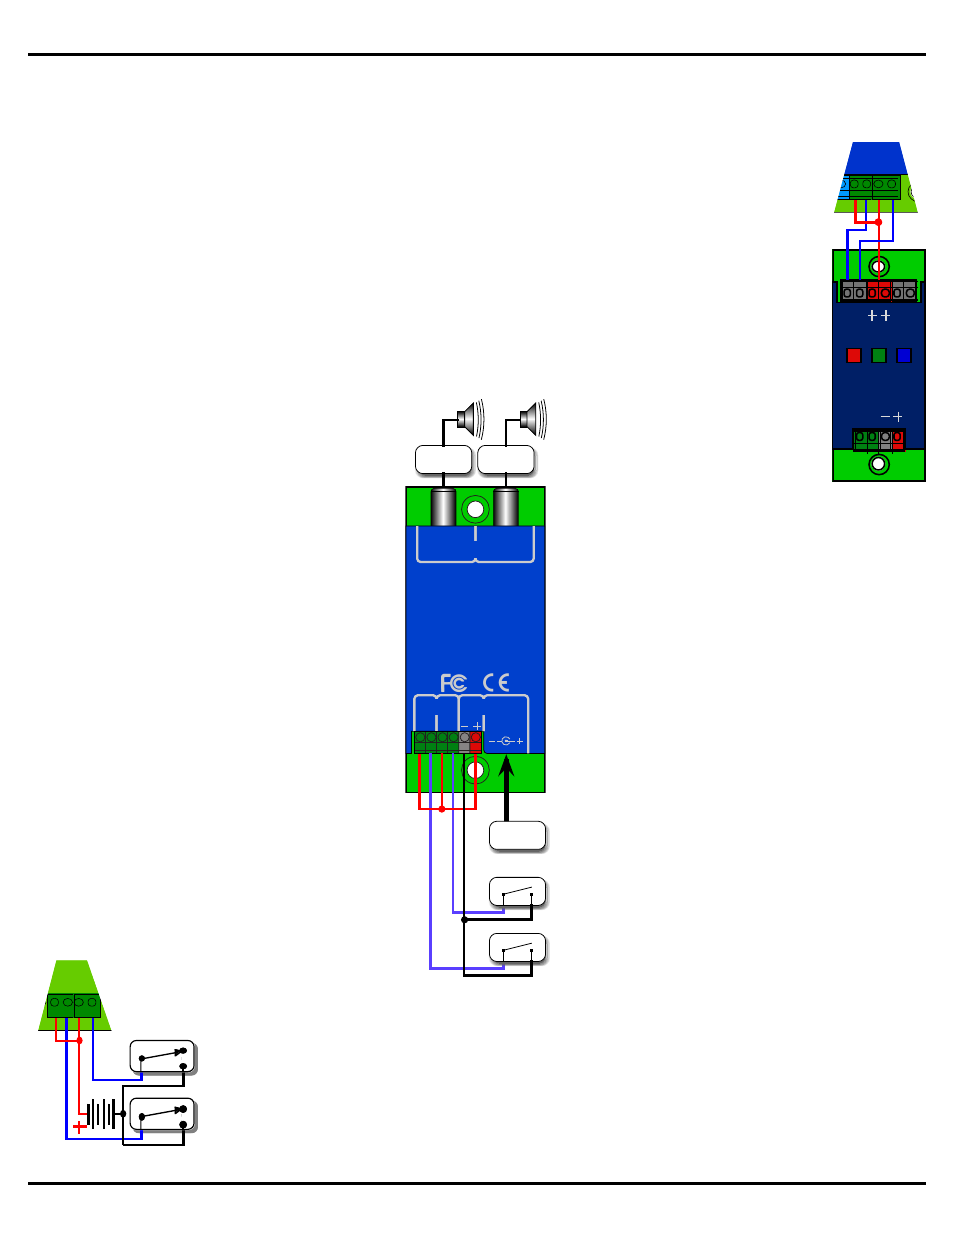
Line Level Outputs:
The Sd-10 features line level
outputs. To use the line level
outputs, just run a pair of RCA cables to
your amplifier (or amplified speakers), just
as you would if you were connecting a CD
player. The line level outputs are robust
enough to drive headphones and small
speakers directly.
Trigger Inputs:
The trigger inputs can be used with any
switch. This can be a pushbutton, motion
detector, IR beam, step mat, a digital signal
from a control system, or anything else that
will give you a ʻpowered switch closureʼ.
The trigger inputs are non-polarized (they
donʼt care which terminal is positive or
negative) and opto-isolated. You must feed
a DC voltage into them. Just touching a
pair of leads from a nine volt transistor ra-
dio battery is a good test of the inputs. As
shown at the middle of the page, you can
ʻborrowʼ some of the power that is running
the Sd-10 using the adjacent screw termi-
nals, or use a separate isolated supply (as shown at
left). The power supply is shown as a battery, but
can be any power supply from 9 to 24 vdc.
Not surprisingly, all Gilderfluke & Co. control sys-
tems are easy to attach to a Sd-10. A Br-
miniBrick4 is shown, but all of our systems are
wired in exactly the same way. The common posi-
Gilderfluke & Co.• 205 South Flower Street • Burbank, California 91502 • 818/840-9484 • 800/776-5972 • fax 818/840-9485
page 1 of 5 • © August 17, 2012 Gilderfluke & Co. DCM
Audio
Amplifier
Audio
Amplifier
Audio
Repeater
Sd-10
Gilderfluke & Co.
Burbank, California
9–24 vdc
Line Out
Left
Right
Inputs
Power
B
A
9–24
vdc
Switch
Switch
Power Supply
(9–24 vdc)